Showing posts with label ink. Show all posts

Monday, July 11, 2022

I'M WEIRD BY FRAN CHALMERS

Hi everyone!

Welcome to the blog.  Today I have made a postcard with one of the great clown stamps that VLVS do!


First of all I stamped my main image onto thick paper, coloured with copics and fussy cut out.


Then onto my background.  I blended some Elements Inks onto a piece of card.  The colours were Lime Punch, Pine and Blue Lagoon.


For some interest and texture, I flicked water onto the card and dabbed dry, then I put some thin gesso through a harlequin stencil.  I then stamped some of the texture background stamps randomly in black ink.


I stamped onto some tartan paper I had so that the clown had something to "sit" on, then fussy cut it out.


I finished it off by adding my sentiment, and putting some white gel pen on the gesso to make it more 3D looking.


Hope you like it! See you next time :)

Stamps Used:

Clown Face 6727

Carved Xs 20162

Mesh texture 1455

Scallops from Plate 1471

I'm Weird 18561

Other Items Used:

Elements Inks

Versafine Clair Ink - Nocturn

Copic pens

Thin gesso

White gel pen

Tartan paper


Wednesday, February 25, 2015

Journaling SAMCRO

One of the things I'm going to try to be better at is journaling the little things that I want to be able to look back on and remember.  One of my favorite shows was the "Sons of Anarchy", LOVED IT!!!!  My husband and I watched it faithfully, all 7 seasons, and I wanted to do a page on how much we loved it. Pay a little homage to Jax if you will. :)

Here is my journal spread and then I will show you how it all came together:
I started out with two pages that I had cleaned my Gelli plate on (I love doing that) after making other pages as well as cleaning stamps on, a great way to use up the extra ink!
Then I had an awesome image of Jax that I had clipped from a magazine and I placed him onto the one page.
Then I saw the left side needed a little something so I stamped the film strip stamp onto it.
Then I painted inside of the film strip so it would tie in with the color on the other page, making it more cohesive.
And once more here is the finished spread
and some close ups
 I love that glob of paint, texture!!!
The stamps I used to make this project are the film strip, bubble wrap texture, tire tread, danger skeleton, line of chevrons, row of stars, censored, one way, arrow, writing arrow, chevrons, not all who wander are lost, french writing background, on the flip side, and last but not least the spotty background! Whew, I don't think I missed any but I sure had fun using all of these stamps!

Thanks for stopping by and I hope you enjoyed my project.

Tuesday, November 04, 2014

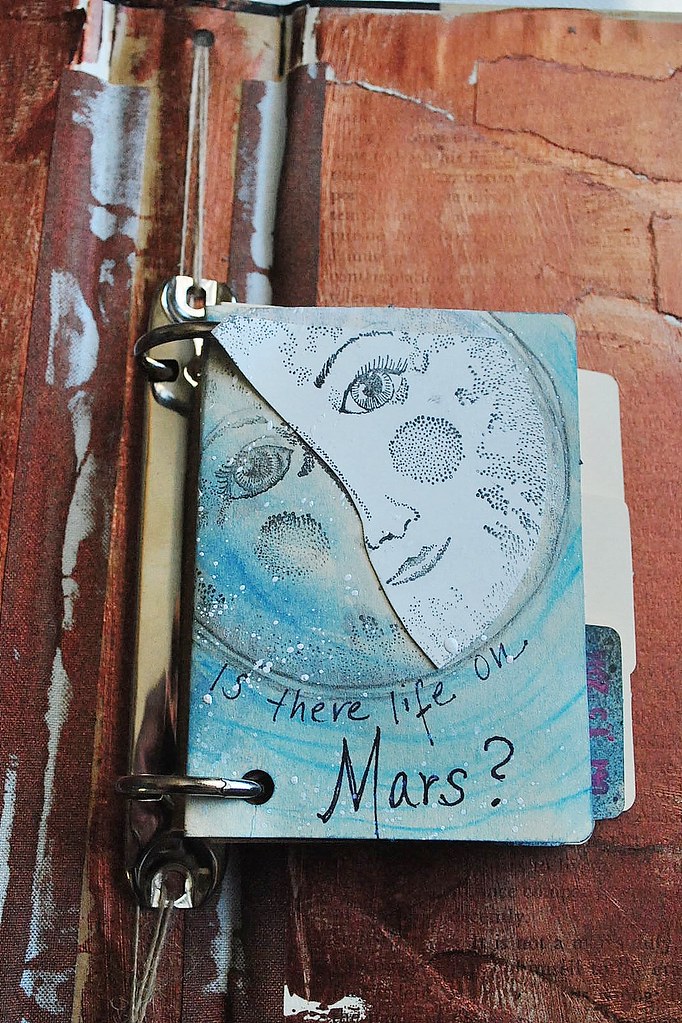
Is there life on Mars? (ATC folio)

ATC folder inside
Hello stampers!! It's Amy, and I have a little ATC folio I created to share today!
I am a big fan of the show "American Horror Story- Freakshow," and at the end of the first episode, Jessica Lange's character sings a cover of David Bowie's "Is There Life on Mars?" This got my creative juices flowing for some funny reason. I wanted to make something out of my box, with an element of freakiness.
I started the card by water coloring the front of the folio, using watercolor pencil to create space like rings, and used some white ink splatter across the page as well, for stars.


I then stamped the Man in The Moon stamp, using tuxedo black memento ink. On a separate bit of smooth cardstock, I stamped the moon again, and cut it out to give an angular illusion, and some layering. I then hand wrote the song quote underneath.


For the inside of the folio, I sprayed Dylusions ink in black, and added splatter of Hero Arts ink in neon pink. I stamped the Banksy Gas Mask Flower Girl stamp onto cardstock, but to give the fading illusion, I stamped using Big Brush pens from Faber Castell Design Memory Craft, and colored her skirt and tights with watercolor.

have started a little book holding ATC's and I'm so happy this silly little (different for me) bit is the first I see when I open the book!

Thanks so much for having a look! I hope you were inspired today!
~Amy

Stamps Used:
Man in the Moon
Banksy Gas Mask Flower Girl

ATC Folder:
7 Gypsies
Ink: IMAGINE Crafts, Hero Arts
Adhesive: Helmar
Hole Punch/Binder Rings: Tim Holtz
Pens: Faber Castell-Design Memory Craft, PaperMate Flair


Wednesday, June 25, 2014

A Carnival of Happy

It's Amy here today to share a blast from the past, the HERE stamp.
I had fun getting this funny Mardi Gras gal ready for a carnival atmosphere, on this layered ATC (I'm clearly big on those these days).


I used my gelli plate to make the background, using purple and green paints, and neon pink Hero Arts ink, spreading it with a brayer, over a stencil. I then added some drywall tape, cut down, for texture, and rolled the brayer over the top.

For the ATC card with the Mardi Gras Mask stamp on it, I stamped with IMAGINE Crafts Neon and Memento inks in Pink and Green shades, and colored it in with watercolor pencils. The background is shaded with purple watercolor pencil.


Finally, I added layers of embellishments, including the vintage plastic ballerina. I tried to keep everything light and fun, using some cupcake flags from Ruby Rock-it for little banners.


Thanks for having a look today, and I hope you enjoyed taking a trip back in time, to find a new stamp!
Loves,
Amy

Supplies:
Stamp: Mardi Gras Mask
Adhesive: Miracle Tape, E6000
Ink: IMAGINE Crafts/Tsukineko
Chipboard Frame/Hearts: Studio Calico/Pink Paislee-Heidi Swapp
Metal: Bead Landing/Tim Holtz
Ballerina/Laces: Vintage
Cupcake Flags: Ruby Rock-It
Rhinestone word: Unknown


Tuesday, March 18, 2014

Little House of Madness


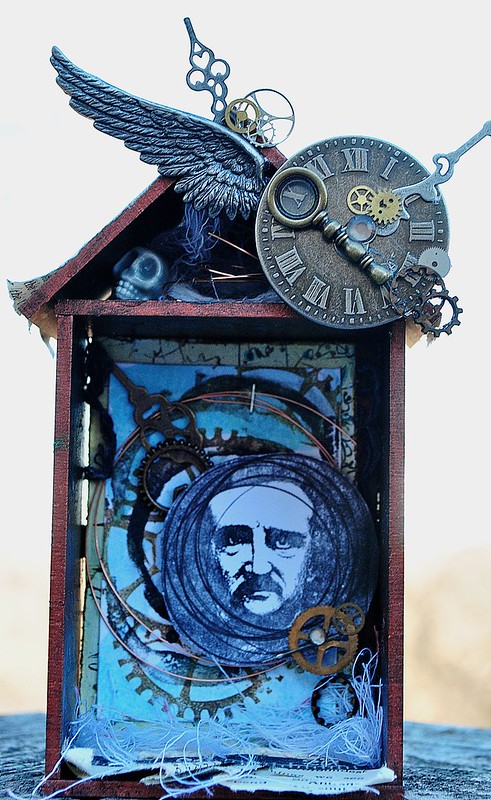
Poe Shrine Full
Hello, it's Amy here today to share my first ever attempt at an ATC. I decided to also create a shrine for my ATC, so Mr. Edgar Allan Poe has a little house for his
brilliantly mad mind.
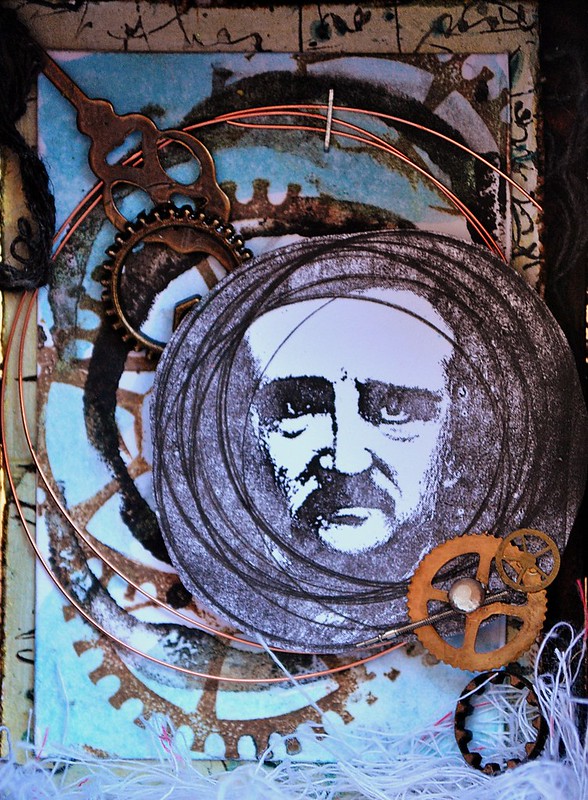
 Poe ATC
To create the look I was after with my ATC, I started with one standard size ATC card, and after painting it with iridescent green paint, I stamped it, using the cursive writing background stamp in black ink. Next, I used a 1.5" smaller piece of cardstock, and painted it with an aqua mist. When that was dry, I stamped randomly with the nesting gears and coffee ring stain stamps,using brown and black inks. I stamped the Poe stamp onto another piece of paper, and then sponged black ink around his face. When that had dried, I hand doodled circles around the face as well, using a template, cut them out, and mounted it using foam tape. Adding some metal embellishments gave it steampunk/time passing flair.

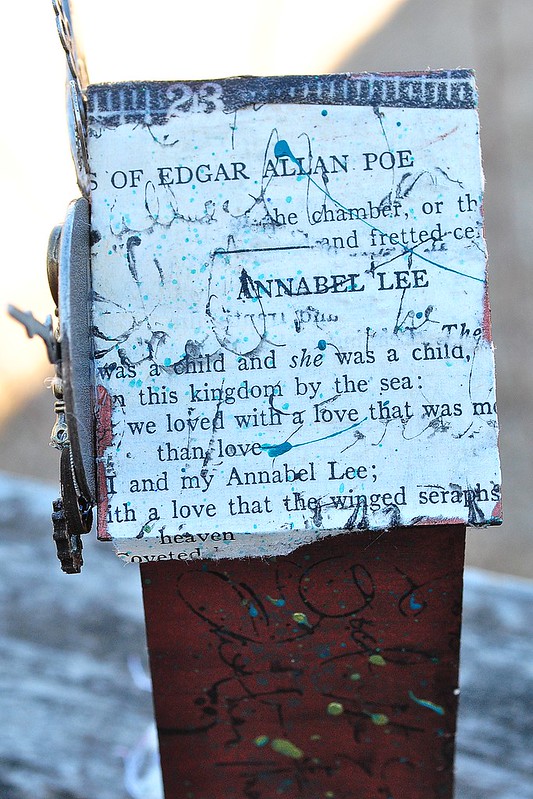
poe shrine roof
When creating my ATC shrine, (from Retro Cafe Art) I also stamped over the painted and papered outside, using the cursive writing stamp here as well.

I am super excited about my first ATC, and the little house it has to reside in. I've already been so inspired by the creations of the design team, I cannot wait to create another very soon! Keep an eye out for more fabulous ATC sized projects from the design team as we continue to celebrate our ATC bash!

Supplies: 
Viva Las VegaStamps!: Coffee Ring Stain, Nesting Gears, Cursive writing background, Poe
Ink: Momento-Tuxedo Black, Clearsnap mix'd media inx-noir, Ranger Archival-Coffee.
Paint: Plaid, Mist: Heidi Swapp Color Shine- Teal
ATC Shrine, watch gears, skull bead: Retro Cafe Art
Metal Embellishments: Tim Holtz, Bead Landing, vintage
Chipboard Gears: UmWowStudio


Monday, January 13, 2014

The Background Takes Center Stage

Good Monday morning to you all! It's Amy here today, to share an art journal page, with lots of background stamping that adds a bit of flair to the pages. 
I began by stamping both pages with the cracked background stamp,
with Ranger Archival Ink in coffee. I then dotted on acrylic paints in gold, silver, and metallic green, and spread them thin with a brayer. After waiting for the first layer to dry, I added flicks and flecks of paints in many colors, and black ink, as well. When those were dry, I began stamping, first using the checkerboard background 4x3   and the star pin, in random places that seemed pleasing to my eye. 
 To add layers on top of my vintage photo of children during the great depression, I stamped on Prima cotton tape with the lace background stamp, and added it along the sides, along with washi tape, and bits of 7 Dots Studio papers.
Finally, I added embelllishments, like UmWowStudio chipboard hearts and stars, Prima Gears, and  a chipboard banner piece from Maya Road, stamped with the moon circle (I love that sweet face).
I finished off the page using the fabulous new Color Wheel Lines  and the No. 5 Tag  stamps.
I'm so pleased with how this page came out, and the way it showcases this very unique photo, in such an artistic and "different" way. Thanks for having a look, and for more inspiration, visit my blog at www.sparklinggnome.com . Have a happy, inspired, and stampy week! ;)

Thursday, May 09, 2013

Imagine Spring

Missouri doesn't really have a spring, it is winter, rain, then summer!!  It jumps from 40-50 degrees to 80-110!

(Note picture taken from above on a slant)

Decorative paper was used in this design, but the butterflies were stamped right on top and enhanced with gel pens!

The banner I stamped, colored and cut so it looks like it wasn't even stamped at all.

Of course the flowers you can tell are a stamped image.  I bought many flower images to fill my stamp file.

VLVS Images:
6038 - Butterfly
19042- Chevron Banner
899- Plate  15752 - Gladiola's

Paper by Bo Bunny Press.  Hand-dyed May Arts Ribbon with Smooch sprays.

Painted colors to bring out texture and color with inks and gel pens.

My garden up by the front door has many greens and buds waiting to bloom.  I can't wait to have lots of color in my yard!

Stamp, layer, color, enhance!  Use elements and embellishments to finish your art.

HAPPY SPRING!

Cre8tiveLea Yours - Lea

Monday, March 25, 2013

Clearsnap + VLVS! Day #1

Hello Friends!!

Welcome to the first day of our inspiration week between Clearsnap and Viva Las VegaStamps!


First up today we have miss Aimee Fleck with this gloriously bright journal page :

Aimee used the following VLVS! stamps:

She used Candleglow smooch spritz by Clearsnap to color the trim as well as Sea kiss spritz, Splash spritz, and Cherry Ice spritz, Sassy Pink smooch, Siren, Azure smoch, Pumpkin smoch, Gold Lame smooch, and Green Apple smooch on the rest of her page.  
Other: Watercolor paper or canvas paper, Nested dies & die cut machine, or elecgtronic die cut machine, White card stock, Black card stock, Bling, Embossing ink, VLVS Super Gloss clear embossing powder, Stapler/Tiny Attacher
Tulle trim, Heat gun, Scissors, Washi tape, Craft Glue.

Second we have the fabulous EllenBee:
 VLVS! used:
Miracle Tape
Clearsnap used:  Bronze Ink and Copper Smooch. Ellen colored her rhinestones with smooch!
Other: mini coffee notebook, May Arts ribbon, various papers.


Don't forget to hop over to the Clearsnap Blog and see what they have to share today!!
(P.S. don't forget to leave a comment for your chance to win the plate o' rubber of your choice!) 

Thursday, March 21, 2013

Inspiration Week!!

Join us Monday to celebrate a week long festival of inspiration.

What goes better with stamps than INK? Nothing of course!! (except maybe more beautiful stamps)

Welcome to the table.. CLEARSNAP INC!


Starting Monday both VLVS! and Clearsnap will be sharing a surplus of beautiful projects showcasing both stamps and ink! 

Join us and be inspired, plus stick around for a chance to win some prizes!

Monday, August 13, 2012

VLVS! @ CHA!

I had the pleasure of sending some projects to CHA Summer for 2012 in Chicago.. and one *or maybe a few* happen to have had Viva Las VegaStamps! in them...

one would be this teapot Globecraft Memories globe I altered... check it out:


The
was stamped in Memento's Tuxedo Black and embossed with Viva Las VegaStamps's Ultra High Gloss Embossing Powder on Kromecote cardstock. The cheese was colored in with the Mustard Seed distress marker (we've got the best deal around on these!!) by Tim Holtz. 

Papers used are from Echo Park's Be Mine collection, and the steam for the teapot is the cotton from a q-tip! 

Friday, July 13, 2012

EYE ON FASHION of the PAST

This past week the Viva Las Vegastamps! design team  partnered with Gauche Alchemy. We have a wonderful collection of projects using products from both companies!
My project was a book titled EYE ON FASHION of the PAST. 

Only the front cover was used to in the daily post.  I am here today sharing the rest of the book. 

The base is a 5 Ring Kaiser Craft Scrapbook that was first painted brown.  After the paint dried, all pages were covered with vintage papers then inked using   Color Box Fluid Chalk Ink Pad - Rouge and Punchinello as a stencil.  Papers were trimmed then all edges were sanded.  On the cover VLVS! Fifties Eye Cat Glasses and Lady with Flowered Top. 

Note: All stamped images in this project are from VLVS!  They were stamped on sewing tissue, heat embossed with VLVS! High Gloss Embossing Powder and tinted with Tim Holtz Distress Markers.

Gauche Alchemy Supplies include: Vintage Papers including sheet music, yellow game piece as an eye glass on front , sequins, fabric cut into strips used with ribbons, Punchinello as a stencil with ink, lace black and purple, tag, Button, Bottle Cap and Gold Beads. Other supplies acrylic paint, Sakura Crystal Lacquer, Color Box Chalk Rouge, ribbon, 

Collage papers, inked using punchinella as a stencil for coverage of the background. Added pieces of doilies, colored some of the images on the collage papers with Tim Holtz Distress Markers.

Game piece over the eye on the cover... "EYE" on fashion of the past! 


Page 2 & 3 - VLVS! stamps Lady In Slacks, Lady Showing Slip and  Lady With Muff  Embellished flower cut from GA black lace. Pieces of doilies have been incorporated through out the book.  
  
Page 4 - VLVS! Lady with Pleated Skirt Another GA black lace flower with button and decorative straight pin. Tag between pages 4 & 5 purple lace, sheet music and VLVS! image of Lady Holding Up Dress. 


Page 5 - VLVS! Two Ladies Fancy Dress  another flower from the black lace.

Page 6-has this beautiful framed image. The frame is a GA bottle cap filled with Sakura Crystal Lacquer over the image, add the beads around the perimeter set aside to dry.

Pages 7 & 8 - VLVS! images Art Doll Set Large (head only) and Lady in Scarf Dress

The back of the book has been stamped with VLVS! Beautiful Women. Embellished with flower from the black lace, trim cut from the purple lace.  

To finish the project add a lot of ribbon/fabric to the rings.  On this book there is combination of both. 

Hope you enjoyed viewing my book and you are inspired to collage!