Thursday, February 28, 2013

RSM Ad

If you subscribe to RSM you may have noticed our ad on the inside front cover...

...if not you can view it here :) 


Creative Team member Sandra Strait supplied me with her beautiful marker rendering abilities and turned out the picnic table and the flowers in the backdrop :)

I stamped some of our foodie stamps and our ants from the ant plate with archival black ink. I gave them all a nice color with Distress Markers and then added our info!
Watermelon
Apple
Candy Cane (as a straw)
Mason Jar 

RSM is the stamping industry's leading stamping magazine. You can check it out for inspiration and publication opportunities!
We sell a subscription offer as well as single magazines HERE.

Be Happy!


Good morning everyone!

DeeDee here today sharing with you a tag I made at last week's Saturday Craft Fair
Saturday Craft Fair is a time on each Saturday where crafty folks gather and stream live to do projects with you! I'll be there every last Saturday of the month from 11 am to 12 pm. And I'll ALWAYS be using VLVS!  :) Our very own Susan streams every week and lots of other great crafters, too!


Here is the tag I made:


I used the following stamps:
Flying Bird Trio 4.25x1 - $4.50

The paper is by Teresa Collins, The ribbon May Arts, the brad Basic Grey. The washi tape is from Gauche Alchemy, the mist is Tattered Angels, the layered chipboard is UmWowStudio. I used a black pen to draw the lines on the outside, a dymo label maker for the Be Happy and distress makers to color the hat. All stamps are stamped in black archival ink.

You can watch a full video here (beware.. it's a recorded session almost an hour long with converstaion) here
(give it time to load :) )

Tuesday, February 26, 2013

Spring is Coming!!!

With Spring come the BUGS!!! 
Here are a couple of buggy cards for you!

Grandville Bug & Bike
With black ink on white card stock stamp VLVS! Grandville Bug cut mask of VLVS! Grandville Bug to cover stamped image then stamp VLVS! Clockface Bike. Heat emboss images with VLVS! Ultra High Gloss Embossing Powder. Stamp VLVS! Christmas Trees Large in the background, the more distant trees stamp off some ink before stamping on the card.  Heavily distress bottom edge of card with brown ink, lightly around the sides and top. Adhere to green base with VLVS! Miracle Tape.

If you haven't seen all of the Grandville Stamps you should go check them out in the VLVS! online store.  Search for Grandville and you will be delighted with them!

Supplies for Grandville Bug & Bike:
Ink
Card Stock


Bees on Honeycomb
On yellow card stock stamp VLVS! Chicken Wire with brown ink, using black ink stamp VLVS! Large Bee once and VLVS! Small Bee twice. Heat emboss images with VLVS! Ultra High Gloss Embossing PowderHeavily distress edges of card with brown ink. Adhere to brown base with VLVS! Miracle Tape.

Supplies for Bees on Honeycomb:
Ink-Black and Brown
Card Stock Yellow and Brown

Spring is just around the corner!
Get your bugs at Viva Las VegaStamps!

Kick up your Umbrella


                                                         Kick Up Your Umbrella


                                          Supplies:  Viva las vegastamps
                                                        " Four Showgirls with Umbrellas"
                                                           item number:  18940
                                                           plate number: 887
                                                           Kotocrome paper (from VLVS)
                                                           Momento ink: Black Tie (from VLVS)
                                                           Copic pens
                                                           double sided foam tape
                                                           photo tape
                                                           papers used: kraft papers by Canvas Craft
                                                           Graphic 45 Secret Garden collection
                                                                           "April Showers

                                                              Four Showgirls With Umbrellas 4 1/4 x 2 3/4
              Upon deciding to do a square card I choose three of the dancers.  I stamped a
              a second time to have 3 umbrellas to use to pop up the design.

             I used Copic pens to color the dancers and umbrellas.

              I cut out the actual card from kraft paper, then adding added the G45 paper
              and the second news print kraft paper.

               I used double stick tape to pop  the colored paper from the back ground .
               I did the same with the umbrellas using 2 pieces of tape
              under the middle umbrella to give the card more dimension.


Monday, February 25, 2013

No Masking the Fact


Supplies:
VLVS! stamp Double Masks With Fan - Item 16258
2 sheets Kromecote A2 Cardstock 4 1/4 x 5 1/2
Miracle Tape 3/8 inch x 55 yds

Recently one of my friends moved to Hawai.  When I saw this series of Masquerade stamps I immediately knew they'd be perfect for a 'Missing You' card.

I wanted a chocolates in a porcelain dish ambience, so I went with glossy white Kromecote paper, with dark, chocolate-y brown, and cream-colored ribbon.

One sheet of Kromecote I folded into a card.  I cut two pieces from the other sheet--one just a little larger than the Maquerade stamp, another piece about 1/2 inch larger. 

After stamping the image on the smallest piece with Timber Brown StazOn, I taped it to the larger piece, and bordered it with the brown ribbon.  I stuck this whole assemblage onto the card with more Miracle tape.  

I finished off by trimming the card with the Woven Check Ribbon, sticking on the white flower and more of the brown ribbon.  The flower was a bit too white, so I brushed it lightly with the Timber Brown StazOn.

The inside of the card reads 'There is no masking the fact that we've missed you!'

VLVS! has a series of these stamps, so if you like this one, you might also like--


Check out the VLVS! Store for all your stamping needs and the  VLVS! Blog for new projects and news every day. Follow VLVS! as the VLVS! Forum - VLVS! FB - VLVS! Pinterest - VLVS! Twitter.

Sunday, February 24, 2013

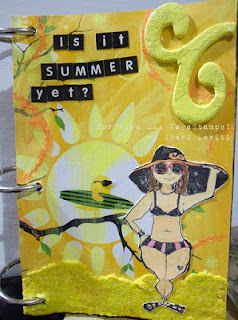
Is it summer yet?

I know we are only in the middle of winter. But its too cold out! I did this little art journal page of wishing it was a bit warmer (and sunny) outside in Chicago.

The background is from a calender that I got in the $1 spot in Target. I cut it and glued it on the page with modge podge. After it dried I took some yellow paint that was inside the cap and with a somewhat dry baby wipe just rubbed the pain on the page in spots. The orange circles you see are a stack of mini cup cake liners. I just took the group of them and dabbed them in orange paint and stamped them on the page in spots.

The swirl you see is a chipboard piece that was just laying on my desk. I painted it the same yellow I used earlier  I stamped the Harlequin stamp in clear embossing ink pad, and sprinkled some heat and stick embossing powder that I had for YEARS that I got a a local rubber stamp store that is now closed. It is very similar to the Ranger stuff. After embossing, it was very tacky, I sprinkled some yellow glitter from the Art Institute Glitter. Glued it on the page with Aileen's tacky.

The bottom of the page I used this sand type stuff that is made by MuddPuddles(I got it in a RAK a while back and thought this was a great page to use it on to try it out). The color I used is called Lemonade, it also has a little bit of glitter in it.

I stamped  the Beach lady on Kromecote with black Memento ink pad. Frst I tried coloring her with my Neo color II's but wasn't liking it. Luckily it came off with no problem, with maybe a little tint of the peach. I went back to coloring her with the Artist's Loft water colors. I glossy accented the sunglasses on her and on the little birdie. Glued her on with glossy accents. Finally I used little sticker alpha letters by Kaiser Kraft (love these little letter stickers) and spelled out "is it summer yet?"

Stamp used
Beach Lady

items used
Kromecote
Straphmore Visual Journal 3 1/2 by 5
calender page
craft paints
cupcake liners
modge podge
water colors
PuddlePuddle
chipboard piece
heat and stick embossing powder
glitter
alphabet stickers
Aileen's tack glue
glossy accents

Saturday, February 23, 2013

Things from the heart

Hi, Hermine here, I choose a heart because february is the month of hearts.


Step 1: take a wooden heart and mask off the areas at the top and bottom. Then take some acryllic paints and a creditcard and put on some colour.
Step 2: remove post-it and take a stencil, I used Colorbox M'xed Media Inx Jasmin to stencil the clock.
step3: take a piece of tissuepaper and stamp the dandelion on it, turn the tissuepaper and stamp again. Because of the transparency of the tissue paper the images are almost equal, this is an awesome way to mirror stamps. Ofcourse this doesn't work with text stamps.
Step 4: use some gel medium to glue on the dandelions. Use a little bit of acryllic paint to cover up the edges of the tissuepaper.
step 5: Stamp the text Dream big with the M'xed Media Inx Jasmin op the left side of the heart. Take a piece of washi tape (in my case its with butterflies) and put on the right side at the edge of the green.
step 6: take a piece of cardstock and stamp the unicorn, give it some colour with watercolors and cut out. Glue on the richt side of the heart with gel medium.
step 7: take a piece of string and tie through the hole. tread some beads on it, tie a piece of lace and a bow. Stamp the text Make a Wish on the bow with Stazon Black.


Used stamps:
Unicorn 19044
Blowing Dandelion with extra seeds 19045
Dream Big 19047
Make a Wish 19040
All those stamps are also on plate 918

May Arts Ribbon: ribbon, lace and string at the top of the heart

Friday, February 22, 2013

Our 2nd post from Pauline!!

Hi everybody :) I'm here with the 2nd post from Guest Designer Pauline today! She just started a blog, too.. so check her out there! : http://paulinescraftyhaven.blogspot.co.uk/

Today she brings us two very bright and beautiful pieces.. the first.. "Unicorn"
6"x 6" card, coloured with Tim Holtz Distress inks in Tumbled Glass, Squeezed Lemonade, Pine Needles. Unicorn, stamped using 'Momento' Tuxedo Black, and coloured using a water brush and 'Tim Holtz Distress inks' in Brushed Corduroy, Gathered Twigs, 'Uni Posca' white pen, and 'Sakura' Clear star gelly roll pen. Stamp pure imagination at the bottom.


Project 4... Superboy !!!! 2 stamps used, Boy in Cape and Dream Big.
Boy and Sentiment stamped using 'Momento, Tuxedo Black.
Boy coloured using 'Promarkers' in Sky Blue, Ice Grey 2, Warm Grey 3, Satin, Putty, Khaki, Pastel Yellow, Soft Lime, Poppy, Berry Red. Large and small Tag coloured with 'Dylusions Sprays' in Crushed Grape, London Blue, Squeezed Orange, Vibrant Turquoise.

Also used..
Creative Expressions Mica Masks-Puzzle Background.
Bee crafty 'Inkables' - Arrows.
Imagination Crafts 'Sparkle Medium'- Black Stars.
Glossy Accents.
Blue Ribbon.
Brad.

Thanks so much again Pauline, all your projects were beautiful and we're honored you took the time to share your work with us!

Thursday, February 21, 2013

Adventure Awaits!

Today's piece is more inspired by color and sun, more so than any real plan.  The handful of papers I randomly reached for consisted of all sorts of lovely greens, purples and blues...the rest of the card simply fell into place! 

Background paper is a page from an outdated lunar calendar - it marks the turn of page from February to March.  On this, I used various colors of Distress Stains to create a striped effect on the page.  On top of this, dry streaks of white Gesso.  Once that was set aside to dry, I embossed Nike on Kromecote with Stampo's Ultra High Gloss Embossing Powder.  This piece I trimmed, added a bit of glitter glue to her wings, and set it aside.

Back to the primary piece, I stamped the Columned Architecture and glued thin paper strips to the back of this piece.  The entire piece was then adhered to black background paper.  Adventure Awaits and Nike were added last.

Wednesday, February 20, 2013

Girls Weekend | Art Journaling & Dr. Who


This weekend I had a great opportunity to sit with my favorite arty girl and art journal while we had a marathon Dr. Who showing--love Netflix. My Fancy Pants is very much a SciFi fan and Dr. Who is among her favorites. She and I both were thrilled with the January release of stamps which included a T.A.R.D.I.S. [AKA Police Box]. I knew this would be perfect for lots of applications in my life including scrapbooking, cardmaking and journal pages. 
I used a combination of Niji Pearlescent Watercolors and Derwent Inktense pencils to create my base  on Kraft Cardstock--this will be "tipped in" to my art journal at a latter date. While the base was drying, on a scrap of Black Cardstock I painted a coat of blue pearlescent paint. I then coated my stamp with the opal colored pearlescent paint and stamped on top of my cardstock scrap. This was set aside to dry and then trimmed. I love the look of dimension that is achieved with these paints and this stamp.
Miracle Tape was used to create my Chevron Tissue Tape and my antique paper sentiment. I hand-journaled about our girls weekend to finish off the page.

For this project :
Black and Kraft Cardstock
Tissue Paper and Book Paper remnants
Black Paris Trunk Ink
Niji Watercolors & Derwent Inktense


Thank you for looking! ~leslierahye

Tuesday, February 19, 2013

I Have so Much to do...but I'm Going to Stamp!

Happy Tuesday {but it might seem like a Monday for those who had a long weekend}!!!! Welcome to Viva Las Vegastamps!!! Susan here today bringing you some inky inspiration ... and then perhaps take a nap.


I sit down to plan out my project and I start rifling through all my new stamps from Viva Las VegaStamps! and I want to use everything, but can't decide. Then this snoozing flamingo jumped out at me. I got this because my nickname is snoozin' - I even have it engraved on my bowling ball. I can sleep anytime, anywhere in a matter of minutes. After flipping through a few more stamps I arrived at a funny quote to go with my feathered friend.

This tag came together fairly easily. I used a matte finish cardstock misted with water and dipped the paper onto my "Hydrangea" Ranger Big & Juicy Rainbow Ink pad. I made many papers rather quickly and made lighter versions by placing a clean, dry cardstock on top of a wet version, rub gently and peel apart. This made for interesting patterns in the color. I selected a paper for the background, heat set then stamped the flamingo and quote in black archival ink. I added some collage accents using the Paris address and ruler numbers stamped in weathered wood distress ink. One more round of heat setting and this tag ready for final embellishing.


I misted the May Arts ribbons with water and gently applied some weathered wood and broken china distress ink to add some color as they were all white/natural color. On the canvas ribbon I stamped the Paris Address #17539 stamp repeatedly to create a border using the archival ink, then heat set.


To finish this off my tag, I colored in the flamingo using my Ranger Distress Markers, clipped the corners and added a circle reinforcement, then tied off the top with May Arts Paper Raffia.

Supplies used: STAMPS - Flamingo Sleeping #5168"I Have So Much to Do..." #17528Paris Address #17539, and Measuring Tape Numbers from plate 1430; Also used matte finish cardstock; Miracle Tape; Various May Arts Ribbons; Black Ranger Archival Ink; Ranger Weathered Wood and Broken China Distress Ink, Ranger Distress Markers, Ranger Big & Juicy Rainbow Ink Pad in Hydrangea; and misting bottle with water.

Thanks so much for dropping by. If you have a little time... check out what the rest of the Viva Las Vegastamps! Design Team has been creating -OR- drop by and browse the thousands of stamps in the Viva Las Vegastamps! store. If you would like to see more of my creations please visit my blog, sbartist : painting in the dark HERE. I'll be back with another stamping adventure real soon! Hope you have an inky day! Sb

Monday, February 18, 2013

I'm Not Weird.....

Good morning Viva Las VegaStamps friends!!
Pinky here today with a fun project to share!

So, what do a mustache stamp, triangle banner stamp, 
and an "I'm not weird. I'm just gifted" stamp have in common?


 Ok nothing I know.....except that they go really
 well together on this fun little layout! 
When I tell you that Viva Las VegaStamps makes a stamp for every occasion
I really do mean it! Even for my warped little life!

Raising 3 amazing boys can be a laugh a minute and when I saw this mustache
paper from Bella BLVD I just HAD to dig into my VLVS stamp stash
and grab the Mustache stamp, and use it for my layout!

You know stamping is especially fun on 6X6 layouts, they are a great
gateway into stamping on full size layouts. 

I definitely used my handy dandy Miracle Tape- it is amazing! You need to try it. 
To create this layout you just need to:
Trim layout base to 6X6"
Trim out mustache paper to 4.5X5.5"
Trim out extra paper to 5X2.6"
Adhere papers using Miracle Tape
Adhere photo (2.5X3") using same Miracle Tape. 
Stamp VLVS Mini Handlebar Mustache onto paper in brown ink
Trim out mustache using scissors
Stamp VLVS Triangle Banner Stamp using same brown ink
Trim out using scissors
Stamp VLVS I'm Not Weird  using same brown ink onto cream paper
Trim out in shape of banner
Apply stamped images onto layout using foam pop dots
Add title! 
That's it! So adorable and a memory for the books! 

I hope you enjoyed today's post! 

 Supplies Used:
VLVS Triangle Banner Stamp 1X2 Item 19043 Plate 918
VLVS I'm Not Weird 3/4X1 1/4" Item 16338 Plate 1302
VLVS Mini Handlebar Mustache 3/4 X 1 1/4 Item 18806 Plate 1423
Miracle Tape
Patterned Paper
Clearsnap Truffle Ink
Westcott Scissors
American Craft Thickers
Mister Huey's Mister

Sunday, February 17, 2013

Art Journal Fun!

Hi Glenda here with another new prompt from the A Year in the Life of an Art Journal! Pop on over and check it out and play along with us!! For my take on this prompt I had fun using 3 different stamps, the "Demure Lady" stamp which is retired and no longer available (sorry she's great isn't she??) as well as what I call the "super dog" found on this Plate 1349
and the "lady bending over" found here on Plate 1414
to make this art journal page
I hope you enjoyed seeing my art journal page and I would love any of you art journalers to pop on over and play along with us! I love seeing so many different takes on our prompts.

You're the cream in my coffee

Hi there, Glenda here! I must have love on the brain due to February being the month for Valentine's Day and and all because I made a 2nd lovey dovey project celebrating the hubs and I's 24th wedding anniversary.

I used 3 different stamps on this mixed media layout. I used the Six Hexagon Background stamp


and the man and woman symbol stamp

these two can also be found here on Plate 917

and last but not least the Romantic Encounter stamp

I got messy with my paints and created a mixed media layout celebrating our 24th anniversary.

Supplies used:

Six Hexagon Background stamp
man and woman symbol stamp
Romantic Encounter stamp
Miracle tape
12 x 12 Kraft scrapbook paper
Making Memories paper
Hambly transparancy
Heidi Swapp felt butterly & acrylic heart
Me & My Big Ideas rhinestone words
KI Memories stickers
Mega paint & Glimmer Mists
Staedtler Watercolor pencils

I hope you enjoyed this layout and until next time,

Glenda

Saturday, February 16, 2013

Shoes for the Shoeless

I should have been a Boy Scout because I have this obsession about being prepared. Maybe it has something to do with living in California, aka earthquake country, but I only feel 100% secure at home knowing I have enough toilet paper, Advil and hair cream to last through a major catastrophe.

You’re probably dying to ask, but what about work where you spend 8 hours a day?

From 9-5 my obsession disappears…except for this one little thing. Birthday cards! It seems uncanny but someone is always having a birthday. And my dilemma is how can I accept a piece of sugary store bought cake without first giving the birthday gal/guy a card?

Since I make and sell greeting cards it’s a real life case of the shoemaker’s kids goes barefoot. But I am determined to get those poor kids new shoes.


If you know me, you know that I love easy, quick projects. These mini Birthday Cards fit the bill perfectly. I used some patterned papers from an old My Minds Eye 6”x 6” pad that had a nice gender neutral theme. After making the envelopes with my new favorite toy – the Envelope Punch Board from We R Memory Keepers I took some Kraft paper, cut to size and folded in half. Next, I cut patterned paper for the front and inside and using Miracle Tape attached to the card. I then stamped the front with the Make a Wish stamp. I had plenty of scraps so I just rolled them tight to make a candle, placed a bit of red/white twine in the center and using my Miracle Tape again attached to the inside card.
Going to stash these mini cards in my desk drawer and next time someone tells me, there’s birthday cake in the kitchen I will be prepared!!

Friday, February 15, 2013

Today Is Magical

Hello, my dear stampahiolics!
 
I hope you're having a wonderful day!
 
I have an art journal page to share with you today,
using two Viva Las Vegastamps, Pan Pastels, and of course,
Stickles!!
 
I hope you like it!
 
 
Want to make it?
Alllllrighty, then!
 
What you'll need:
Book to work in (mine is watercolor paper)
Pan Pastels (or other soft pastels)
Permenant inks- brown & black
Spray sealer (I use Krylon)
Tree stencil
Scraps of white card stock
Scrap of colored card stock
Die cutter
(or, alternatively, you can use a stamped sentiment)
Stickles
Scissors
Stuff to color with (I used markers)
 
Create your background using the pastels.
I started with the grassy area and used three greens.
Start with the lightest color first, and work your way to
the darkest color.
Once the grass is laid in, start on the sky. I used three blues.
Once all the color is on, blend it.
Spray with sealer.

Add the trees using a stencil and brown pastel.
When you life of the stencil. lightly swipe over the page with
a cloth or paper towel, to seoften the edges.
Spray with sealer.
 
Now start stamping the flowers across the bottom of the page.
I stamped some in brown and some in black.
Color as desired.
(I used a white gel pen on some of them)
 
Now, get that white card stock out and stamp some flowers and a fairy.
Trim closely and stick the images onto the Miracle Tape sheet.
Color as desired and cut out.
I cut the flowers and just used parts of them.
Remove the liner from the Miracle Tape and place the
fairy on the page. Add the flowers in front of and around her.
 
Cut out or stamp your sentiment and add to the page.
Scribble Stickles around the words,
and use your finger to tap the Stickles around and up the page.
 
I also added black Stickles to my words.
 
Set aside to dry, and you're done!


And, here's your wiener!
 
My Dachshund Valentine card from my post on the 1st.