Tuesday, April 29, 2014

Vintage Art Journal Spread

Hi Stampers! DeeDee here again, today. This time sharing a project of my own, using a splattering of old and new stamps!

Did you see this post on Saturday talking about the new Art Journaling classes we're doing? Well I've been wanting to really fill up my new journal with all types of pages.. and so today I have a double spread to share, that really is just sort of all my favorite techniques and styles. 


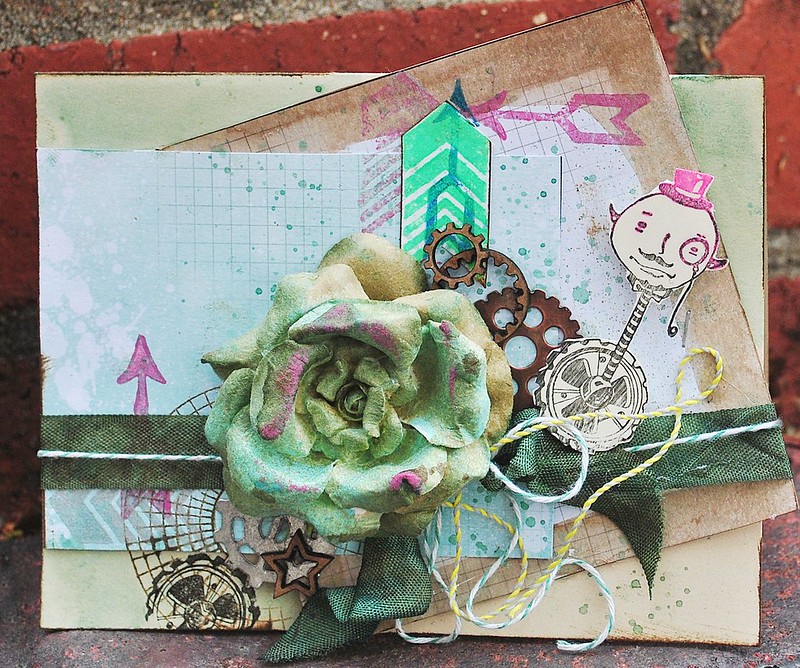
The page base is a sheet of Nature Walk from 7 Dots Studio, with layers of stamping and gesso, coffee, distress ink and more. 


Up in the top right corner I stamped the Cracked Background in Memento gray flannel. I have tons of ink pads in different colors, but it's tough for me to break out of stamping black. I found this gray was a nice subtle alternative, without losing interest in the rubber stamped image. You can also see, in the very corner, where I stamped the Writing Background in archival ink. At this point I did find it to be a bit heavy for the vintage feel of the page, and so I covered it up a bit with gesso, just letting the stamp peek through. 


Below this tag you can see some more stamping in gray, this time the Color Wheel Lines. Notice in the top left corner... that's the brand new Waybill / Invoice background. It's been stamped in Versafine Toffee and whitewashed with a thin layer of gesso. It helps lighten the stamped image allowing it to blend in a bit to the background. Handy when you don't have a lighter colored ink pad.


On the left hand corner is the new Butterfly Specimens stamp in a nice heavy black Archival ink. It helps balance out the spread. 


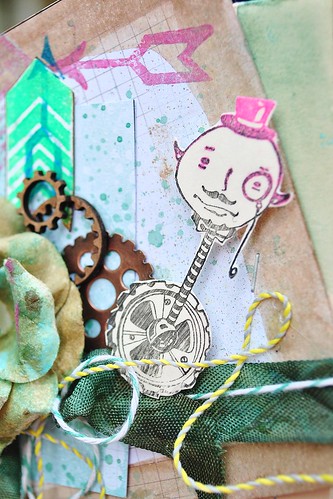
And one last final photo here.. I snuck in the 23.24.25 tape measure stamp from Plate1430. It's been stamped in that same gray used earlier in the page. 

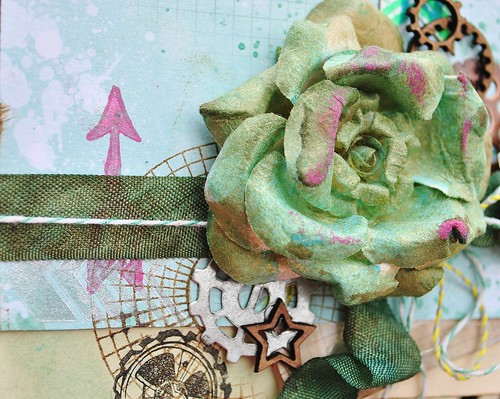
There's tons of media mixing going on here, including ink types (Archival by Ranger, Memento, Versafine,) mists (Tattered Angels mixed with coffee,) coffee stain (Which I totally picked up from this post by Natasha, SO COOL,) gesso, patterned paper (7 Dots Studio,) Golden Gel Medium, Tim Holtz tissue tape, Prima flowers, My Minds Eye brads, UmWowStudio chipboard, 7 Dots Studio and Sizzix die cuts, and more. 

Monday, April 28, 2014

Fan Feature on a Monday

Hi stampers :) DeeDee here today bringing you a few fun things I've seen around the web lately! Don't be afraid to post on our FB wall, in our FB group, tag us on Instagram (@vivalasvegastamps) and more. We're always on the lookout to share fun bits by fans from all over.

First up is this superb card using the Walking Turkey stamp by Alie Hoogenboezem-de Vries.


Second is another card, this one by Georgia Heald using our Steampunk Fawn stamp.


And last (another card) is this bit by a local gal - Paula Cook! She's used our Pinup Girl with Martini.


Good stuff to share today :) Leave these super fans some love!

Sunday, April 27, 2014

Wheeling in with Spring Color

wheelie man full card2
Hello stampers! It's Amy here today share a card I've made, with lots of springy bright colors. I'm happy when I see it, and that's a good thing.
wheelie man arrows and cirlce

I started my project by layering on two haphazardly cut squares of pretty patterned paper. I inked the edges of one paper, using walnut ink, and both edges were inked with Archival Ink in coffee. These were adhered with Miracle Tape. I tapped on a little bit of green mist, and then stamped the Arrow 3/4x1 1/2,and Chevrons 1x1 1/2, directly onto the paper, using pink and silver inks. I stamped with green ink and the chevron stamp onto a separate paper,and fussy cut this out, inked the edges, and adhered with miracle tape. The final bit of the layers of stamping was to stamp the color wheel lines stamp in the bottom corner, and the wheel from the Wheeley Monocle Face slightly off the page.

wheelie man, arrows close

I dyed my own seam binding ribbon with the green and brown walnut inks, dried it, and adhered it using miracle tape on the back. To the tied ribbon I added some baker's twine for extra pizzaz.;) I sprayed the Prima flower with mists, adhered, and added the chipboard and metal pieces.
wheelie man, close
Finally,I colored on the wheeley monocle face stamp with a Faber-Castell Big Brush Pen in black, and then swiped on some radiant neon ink in electric pink....to give some va-va-voom to his hat, eyes, and monocle, and stamped that baby onto some heavy cardstock. I fussy cut him out, and popped him onto the paper, using foam dots. And voila! A fun, springy, and special card to pop into the mail for a friend!

Thanks so much for having a look today! I hope you were inspired to start stamping up a storm! :)
<3 Amy

Supply List:
Viva Las VegaStamps!: Wheeley Monocle Face, Arrow 3/4x1 1/2, Chevrons 1x1 1/2, color wheel lines
Ink: Tsukineko/Imagine Crafts-Delicata Silver, Radiant Neon in Electric Pink,Green
Paper: 7 Dots Studio-Messy Head
Pen: Faber-Castell Design Memory Craft, Big Brush Pen in Black.
Chipboard: UmWowStudio
Flower: Prima
Mist: Imagine Crafts-Walnut Ink in Eucalyptus, Java; Lindy's Stamp Gang-Midnight Teal Starburst; Heidi Swapp Color Shine-Teal Other: Seambinding, baker's twine, metal gears

Saturday, April 26, 2014

Art Journal Classes - $10

Hey folks! DeeDee here today ...

Last year for the first Sunday of every month from 1-3 pm I hosted a tag demo/make n take/class @ The Crafting Place here in Las Vegas.

This year I've upped the ante and we'll be doing some art journaling! Bring yourself, a book, and $10. We'll be exploring LOTS of goods.


A bit of info:

We'll be meeting @ The Crafting Place : 3560 E Russel here in Las Vegas. Down by the airport, right after Pecos.

The class is sponsored by UmWowStudio & Viva Las VegaStamps! - we'll be doing lots of stamping, chipboard altering, mask using and more.

1) Bring your own journal/book (can be anything! An old planner, children’s book, vintage book, coloring book, whatever! You can even bring a regular art journal, we’ll go through all the ways to prepare a page for building on, regardless of its type)

2) You should also bring (if possible) a non-stick craft mat, a heat tool, acrylic blocks, scissors, any of your favorite pens and an archival ink pad.

3) It will be $10 per class; and you’ll always leave with SOMEthing; a stamp, some chipboard etc.

I’m excited to get to explore some of the more expensive materials; I still love being thrifty but this will give us a chance to really delve deep into all sorts of goodness! And we’ll be doing it on a bit larger scale, which will prove better for learning each technique. See you there!

Friday, April 25, 2014

Paint, ink, two stamps, one flower... and... the card is ready!

Hi))
It's mellpellmell (Maria Potapovich) here today with you!

You know, creating cards for me for some reason is very difficult task.
I do not want to make cards with  kilos of flowers and rhinestones ... but everyone usually do so!

This time I've made it tricky - I've used the flower, just one.
And except it on my card there are only two embellishments - both are made by using stamps (wide strip with chevron and uneven quadrangle with text )!

Here is the video of my card creation:


And I'll show you the photos of the card:


I've used two stamps - Washi Chevron Background 1 1/4 x 5 1/2 and Until Further Notice 1 x 2 3/4

Hope you like simple cards...are you?

My future's so bright....

I gotta wear shades! Ok are you all singing Corey Hart along with me now?? haha One of my fave stamps is the Lid lady, isn't she simply fabulous???
I love her big shades, leopard print scarf and that big garbage can lid as her hat! haha  Since I am one who always wears big shades as well (they are prescription) I did a layout using the lid lady and a bunch of pictures of me in my shades.

I added some rhinestones to the lid lady's hat to decorate it up. I love her!!

I also made an ATC using the lid lady to show how versatile she is! Here are some pics showing how I made it.  first I stamped her onto some plain white cardstock using versafine ink
 Then I cut her out and found some papers I wanted to use and put a sticker down the side of one side.

 I love using painty circles to add some extra interest on my backgrounds and colored her using watercolor pencils
 Then I added a quote that I printed off from the computer and used stickles to glitter up her lid!
 and here I made one card without using a black marker to color in her sunglasses and dress and one where I made the sunglasses and dress darker.  I think I like the darker what do you think?
and voila, here is the lid lady on an ATC!  I added a little blue bow this time to her lid, isn't it cute?
 I hope you enjoyed seeing how I used the Lid lady and until next time, Glenda


Thursday, April 24, 2014

New Stamps | Free Shipping | 1 PreOrder Plate

We've got some fun things going on!

Did you know? We have a newsletter, where you can get all updates and info delivered right to your email! Sign up and be informed. We'll let you know about sales, coupons, new stamps, giveaways, preorders and more.


Today our newsletter is letting you know about all of our new stamps now ready for individual sale. Check out this video to see just how good they are:


Our newsletter also mentions a PreOrder Plate O' Rubber.

http://www.vlvstamps.com/pre-order.html

By Popular Demand we've released Plate 1443 dedicated solely to Banksy spray paint images!  Pick it up for the 20% off price of $17.56. Combine it with our free shipping coupon -- what a deal! 

Use coupon code "freeshipping" to receive free shipping on any order, international included! (Click My Cart at the top of the page, enter code in the Discount Codes section of your cart and hit apply.) Expires Thursday 5/1/14.

So >>> Get some shopping done won't ya??

Wednesday, April 23, 2014

The Hunt.

Hello!!  Mary here with a pocket-sized book for lookin'.
 
Last weekend, I was able to capture a few snapshots of my kiddos at my church's annual Easter egg hunt.  From the moment I took them, I knew I wanted to scrap them...and FAST!
 
Here's a peek at my book...
 

I've been on a mission to use up some of my old paper stash.  While it's a noble endeavor, playing with older paper can be a bit blah.  I find myself craving the new.  It's exciting to get your hands on craftin' goodies---hot off the press!!  So, I thought what better way to jazz up old paper and make it new again, that with some rock solid stamping??
 
I started my book by cutting my photos and papers down to 3x2 inches in size.  For each patterned paper, I chose a stamp and stamped (sometimes repeatedly, depending on the size of the stamp) my image down with Memento ink in Tuxedo Black.  A bit of color added really makes the stamped image POP!!  I've used my Copic markers in a variety of colors.


Being such a tiny book, I decided to add my journaling on vellum.  It gives me plenty of room for the story without covering up any of the lovely stamping.

I LOVE how this bulls eye page turned out!


And this clouds page is super whimsical and totally makes me smile.


Here's a peek at the rest of my pages...


And that's my book!!  I love that it's pocket-sized but still packs a punch.
 
Viva Las VegaStamps! used:


Thanks so much for joining me today!!  xx Mary

Tuesday, April 22, 2014

a series of cards

Hi Hermine here. I deciced to make a series of cards using Bistre. Bistre is a powedry substance with lots of pigment and deluted with water it releases its colour. The colours are a bit grungy looking and I really love that.


Here is the whole series in one view.


step 1: Put some Bistre in a spray bottle and add some water. Then spray a little bit on a craftsheet with several colours (I used three).
step 2: heatset it untill fully dry
step 3: Stamp paint brushes in jar 9235 and your color my world 19344 with Stazon Black ink
step 4: use the deluted Bistre as a water colour and give some colour to the brushes. Make some white Highlights with s white sharpie pen.


step 1: Spray the bottom half of your card with water. Then sprinkle some Bistre in it. Heatset until fully drr.
step 2: stamp men in balloon basket 19002, Time Flies and blowing Dandelion and extra seeds19045 with Stazon Black ink


 step 1: Do the same as with the balloon.
step 2: Stamp the Xmas Slihouette collage 19317, Bring on the twinkle 19313 and the Arrow with stars 19303 with Stazon Black ink
step 3: make some high lights in the tree with a white Sharpie pen.


step 1: Spray some deluted Bistre on a craftsheet and put your card in and turn it 90 degrees. Heatset to completely dry then take a stencil and spray on the right bottom hlaf.
step 2: stamp set of three Ornaments 19309, longen the threads with a black fineliner and stamp the alphabet of the December daily plate 1430 and December 25 19301


And yes the last 2 are Christmas cards hahaha, because there is no such thing as start to early, at least for me it is. Every year I promisse myself to start in the first half of the year and then discover in november that I didn't do so, it will defenitely takes out the stress of the holiday season. Hopefully it will inspire you. Have fun playing and stamping around.


Warmly Hermine


Used materials:
paint brushes in jar 9235
you color my world 19344
men in balloon basket 19002
Time Flies 19008
blowing Dandelion and extra seeds 19045
Xmas Silhouette collage 19317
Bring on the twinkle 19313
Arrow with stars 19303
set of three onrnaments 19309
alphabet of the December daily plate 1430
December 25 19301


Stazon black ink

Monday, April 21, 2014

Key from the past

Hello all, Nataliya is here :)
Today I will show you vintage card without scrapbooking paper:


I very love to use hot embossing on the chipboard.


And my favorite variant to use stamps - create background:


Here's how I did it.
1. Mask+coffee+watercolor paper


2. Add some blots


3. Stamping everywhere (with coffee & Distress Ink)


4. Edge toning:


My VLVS!:

Six Hexagon Background 1 1/2 x 4 1/4

French Writing Background 2 1/2 x 3 3/4

Thursday, April 17, 2014

Love Envelopes....


Hello and Happy Thursday!  

Tina here again today and I am excited to be able to share another project with y’all.  Today, I would like to share Love envelopes, using 'Bird Head', 'Steampunk Owl', 'Face Collage' and 'Color Wheel Lines'.


To create my envelopes, I started by heat embossing several stamp images to small tags.  I used a white/gold embossing powder so that it would act as a resist when applying paint.  Using several complimentary colors, I painted each tag and wiped off the paint from the stamped image (with a baby wipe).  


I then stamped a white coin envelope with 'Color Wheel Lines' stamp and colored in (randomly) the pattern.  I then stapled the stamped tag to the stamped envelope.


To finish my Love Envelopes, I dry embossed several larger envelopes, then attached a rhinestone brad, tag, stick-pin, and sentiment to each envelope. 

This is one of those ‘done in a minute’ projects,  that I just love.

Thank you for stopping by!  Have a great day!

Tina