Showing posts with label rubber stamp. Show all posts

Monday, September 06, 2021

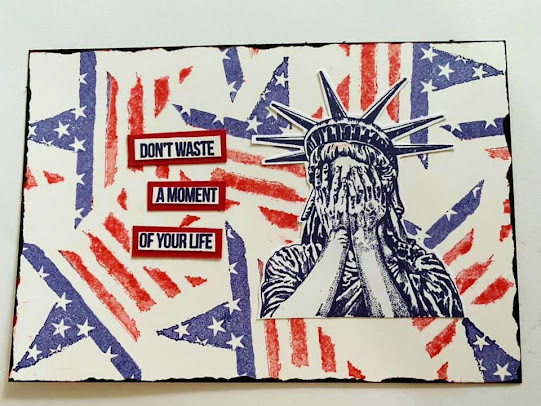
DON'T WASTE A MOMENT by Fran

Hello everyone!

On Saturday it will be 20 years since the terror attacks on America.  In the UK over the last week there have been so many tv programmes remembering  the 9/11 atrocities, so today I have made a postcard to honour all those innocent people who lost their lives.  


First of all, on a piece of 6" x 4" card I randomly stamped the background star, which I had inked in two colours - Distress Ink in Candied Apple and Versafine Clair Medieval Blue.  I felt the colour was a bit too intense so I decided to stamp it off once first to make it a little paler.


I stamped the main image in Medieval Blue on a separate piece of 180gsm paper and cut it out.


I stamped the sentiment "Don''t Waste a Moment of your Life Trying to be Normal" but discarded the words "Trying to be Normal" and mounted them on red card.


Finally I edged the card with the Medieval Blue.


STAMPS USED:

Weeping Statue of Liberty 19152 Plate 925

Don't Waste a Moment 19786 Plate 1470

Stars & Stripes Star 20609 Plate 1526 Plate

OTHER ITEMS USED:

White card

Distress ink in Candied Apple

Versafine Clair in Medieval Blue

Red Card


Hope you like this postcard. 

 Every day is a gift - live it as if it's your last!


Tuesday, October 13, 2020

Creatures of the night

 Hello everyone, 


For today's post I have made a postcard. I have used a mix of new and older stamps for this. 


I have made the background with Distress Oxide Inks. I used the smoosh the inked and dunk method, drying between layers. The images were coloured with coloured pencils. 


Stamps used: 

Other materials:
Distress Oxides : Peeled paint, Ground Espresso and Carved Pumpkin. 
White pen for splattering
Coloured pencils
Versafine ink 'Nocturne'

Thank you for stopping by today ! 


Thursday, October 01, 2020

Life is a Carnival

 As Summer slowly fades into Fall, county fairs start up. Using the Spinning Swing Ride stamp and some Distress Oxides on a tag, reminds me of simpler times.


Supplies:

Spinning Swing Ride

Distress Oxides: Wilted Violet, Picked Raspberry, Spiced Marmalade and Squeezed Lemonade

Blending Brushes (or any blending type tool)

Chipboard Tag

White Gesso

Black Pigment Ink

Black Embossing Powder 

Stencil Flower Dot (use any stencil you have on hand)

Texture Paste Copper Crackle


Directions:

1) Cover chipboard tag evenly with white gesso (if you have a tag that is on white chipboard, skipp this step).

 2) Stamp and emboss the stamp, positioning it to the left of the tag.

3) Apply in strips horizontally each color, purple, pink, orange and yello.


4) Blend colors with blending tool, color to color, edge to edge of pigment.

5) Find stencil and add texture metallic pastes.

This tag can have a tassel added and the sides inked with black as well, but I ended up leaving this as is.

Hope you enjoyed this quick project! See you on the flip side!

Thursday, February 13, 2020

Causing a Scene


Hello VLVS fans!  Mercy here and I am super excited to share my new experiment.  While I have definitely used tissue paper in my craft projects in the past, I haven’t actually stamped directly on it. Being in the experimental mood, I thought I’d use the Whimsical Tree Lady as my focus image for this altered hoop design, and see where it went from there.

My idea was to layer the tissue paper across several inked layers, like a paper mâché meets soft fabric, with the image laying on the top tissue paper layer.  The result was a quilted pillow like surface that easily fits a small embroidery hoop frame.

Supplies:

Black Archival Ink
Dylusions  (or any brand) Yellow-Orange Watercolor Ink
Small 3” round wooden embroidery hoop
Copper Wax Paste
Several sheets of white Tissue Paper
White Butterfly Brad from Eyelet Outlet
Leaf Pins (I had these in my stash)
Die cut flowers
Yellow pearl embellishments
Clear Glue
Tim Holtz Saying

Instructions:
  1.  First, I took a sheet of white tissue paper and folded it down into a rough 6X6 stack.  There were about four layers that I used for the base and I sprayed the top with Dylusions Yellow-Orange Ink in the center, allowing the ink to seep down and spread, it was set aside to dry.  Taking a small scrap of white tissue paper and permanent black ink, the Tree Goddess was stamped, allowed to dry, then fussy cut out.
  2.  Using clear glue, pour a generous amount onto the center of the yellow inked stacked paper, spreading the glue out thinly.  Once spread, layer the stamped image across it, carefully flattening the stamped image and making sure there are no air bubbles, folds or excess clear glue underneath it.  Allow to dry.
  3. While the tissue paper is drying, gently rub some of the copper wax paste around both sections of the embroidery loop. Wipe off all excess wax so that it doesn’t stain or come off.  Get out your trusty small flower dies (or whatever flowers you have on hand that complement the color theme) and color in varying shades of blue to pop off the yellow-orange inks.
  4. Place the dried inked and glued tissue paper centered into the wooden frame. Carefully adjust for best presentation and tighten screws to hold everything taut.  Once in, take saying from Tim Holtz stickers, cut and place beside the stamped image.  Once glued down straight, arrange colored flowers and butterfly brad within the circle, then glue or punch down.  Add yellow pearls to the centers of the flowers, and pin through the tissue paper outside of the frame with the leaf pins.
  5. More embellishments can be added as well as distressing the tissue paper outside of the frame.  I decided to keep this one simple, celebrating the sentiment and the lovely stamp celebrating nature and woman. 
Hope you enjoyed this and it gives you some encouragement to stamp on different types of papers.


Monday, February 18, 2019

Love. Repeat. By Guest Inspiration Team Member Elisa


Hi VLVStamp lovers/hoarders/aficionados,


Elisa here from the Guest Inspiration team with my first project and post on the blog and I am still pinching myself that I am here !

I was inspired to create this mixed media art journal page by all the lovely sunrises I have seen so far this year walking myself to better health and happiness in 2019. The gorgeous stamp set Plate1502 with the Ethos range of stamps by Tina Walker and sentiments were a perfect companion to my hand dyed calico fabric background.


The background was created using a tie dye kit and calico scraps. The colours represent the ocean, sky and sunrise. We have such beautiful sunrises here on the East Coast of Australia and I am lucky enough to sink my feet into the sand and watch the sunrise each morning while I walk.


VLVS! Supplies: 
Plate 1502 : https://vlvstamps.com/plate-1502.html
Ink pads : Staz on - Black 

Other Supplies:
American Crafts Black Cardstock
Calico,
Fabric Dyes - Navy, Teal, Coral, Cobalt, Orange
Cotton Thread,
Book Paper,
13Arts Ayeeda Inks,
Prima - Bloom Collection 6 x 12 Circle Stencil,
Ranger Distress Inks - Abandoned Coral and Cracked Pistachio


Thank you for stopping by the blog today !

Hugs

Elisa xo


Thursday, January 10, 2019

Stay Cool | Sue Plumb


Hi everyone, happy new year! 
I am so incredibly excited and blessed to have the opportunity to stay on the Viva Las VegaStamps design team for another year and share my love of VLVS rubber stamps with you!

To kick off the new year, I have a 12x12" mixed media scrapbook layout to share with you that features a photo of one of my twin boys that was taken only a couple of weeks ago. I created this page to document how in a very short time he has gone from being terrified of swimming to loving being in the pool.

Here is my layout...


To create my page, I began with a sheet of white Bazzill cardstock and some Ranger Distress Oxides in Mermaid Lagoon; Cracked Pistachio; Twisted Citron; and Faded Jeans. I used the "packaging technique" to apply the inks - swiping the ink onto some plastic packaging, then adding a spritz of water before "smooshing" it down onto the cardstock. 


I started with the Mermaid Lagoon colour and then dried it off before repeating the process with the Cracked Pistachio and Twisted Citron. I love the layered watercolour style effect that it creates - perfect for my water themed page!


Next, I used the Faded Jeans Distress Oxide to add some splatters over the top. To do this, I swiped some ink onto my craft mat, then added water before soaking it up with my paint brush and splattering it over the top.


Then it was time to add some stamping! The first stamp I used was the Bubbles (Large Black), using Ranger Archival Ink in Paradise Teal. I added the bubbles in a vertical line down my page then added an extra group of bubbles where the left edge of my photo would sit. (This gave me the "visual triangle" I was looking for.)


Once I had the bubbles stamped out, I chose the Humpback Whale stamp for a bit of fun and to tie in with the water theme of my layout. I stamped the whale twice with the same teal ink, positioning it so that it was "swimming" through the focal area of the page and helping to draw the viewers eye in.


I also stamped the It's a whale of a tale... sentiment several times around the page, switching to black Staz On ink for that one.

With the majority of my background work done, it was time to switch to adding some papery layers and texture. I created a layered mat for my photo using an assortment of tissue paper, paper doilies, paint sample card, a tag, glitter cardstock, frayed gauze and coloured wire. I also added a few pieces of torn washi tape around the page.


Once the layers were in place I added some scrap cardboard to the back of my photo before mounting it on top. I also added a handmade heart embellishment from Charms Creations, and a flair button from Cocoa Vanilla Studio.


Then it was time to finish my page off. I added my handwritten journalling using a felt pen, then stamped the Let Fear Be quote underneath it using black ink. 


I also used my favourite Doodle Dots stamp to add further depth to the background. (How could you not love how this stamp looks?) 

The finishing touch was a few blue and green sequins from Cocoa Vanilla Studio scattered around the page.


Here's a closer look at some of the finished details...


(I am so in love with that background, and glad that I finally treated myself to some Distress Oxides for Christmas!)


You can see where I used my Tim Holtz tiny attacher to fix the wire to my page. I love the extra texture the metal staples add.


That's all from me today, I hope I have inspired you to get your stamps out and create something too. Until next time, get inky! X


Stamps used: 

Other materials:
- Bazzill cardstock
- Ranger Distress Oxides
- Ranger Archival Ink
- Tsukineko StazOn Ink
- Cocoa Vanilla Studio flair button and sequins
- Charms Creations handmade heart
- Assorted collage materials (as detailed in post above)
- Felt pens
- Staples

Friday, November 23, 2018

Love. Repeat.

Hello everyone,

and welcome to my second November post. I made a very small art journal page today. I had this piece of paper in my stash that I had gelli printed on and wanted to use it today. It is 10 x 15 cm which is aprox. 4 x 6 inches.


I did add some stencilling on the right side to repeat the pattern of the left side. I then added white paint in the middle and some splatters. I doodled the same words as from the stamp onto the whitish spot in the middle. Next I stamped this fab stamp by Tina Walker, went around with a white pen and filled in the heart with a pink paint pen. I then stamped the sentiment as a background stamp and also separately on a strip of white paper which I edged with a pink marker. I adhered the strip underneath the woman image. Lastly I added a line around the sentiment and around the page. 

I have used the following stamps:


Thank you for stopping by today ! 


Thursday, November 08, 2018

Always Be a Mermaid | Sue Plumb


Hi everyone!
Sue Plumb here today to share a sweet little project I created recently for my daughter, and it's in stark contrast to my previous project share which featured my "zombie" cat. This time I opted for a small scale project - working on an index card, which fits perfectly into a small 6x4" frame that can then go into my daughters bedroom.


I started by applying a light coat of gesso all over the card, before using Faber-Castell gelatos to add some colour. I used a moist baby wipe to blend each colour, mixing the 3 colours together, but concentrating on having the darkest tone around the outer edge to border it. Once I was happy with the colour, I set it aside to dry.


I then took the Cat Mermaid stamp, which was to be my focal image, and stamped it onto some white cardstock using Staz On ink. I again used my gelatos to add colour; this time by adding a little to my craft mat and then using a water brush to pick up the colour so I could colour my image.


I then turned my attention back to my index card, using the gorgeous Sky of Stars Background stamp and Ranger Archival ink to add a whimsical touch. I also used the Scribble Heart stamp to add a little love.


Next, I fussy cut around my cat mermaid; before stamping the quote using the Always Be Yourself/Mermaid stamp onto cardstock. I again used a gelato to add some colour, then fussy cut the quote into two pieces.
Now it was time to construct my piece. I started by adding a small paper doily to the centre of the card, topped with some messy cotton thread, then added my cat mermaid on top.


I then added the two pieces of the quote above and below the cat.


For a bit of extra whimsy, I finished my piece with a sprinkle of sequins.


This was a super fun little project to make. I must admit that I wasn't really used to creating pieces on such a small scale when I began working on this team; but my amazing VLVS teamies inspired me to give it a go and now I love creating these delicate little pieces! 


Thanks so much for stopping by today, I hope I have inspired you to get inky too!


Stamps used: 

Other materials: 
- Index card
- Colour Blast White Heavy Gesso
- Cardstock
- Faber-Castell Gelatos
- Tsukineko Staz On ink
- Ranger Archival ink
- Paper doily, cotton thread, sequins