Showing posts with label Altered Tag. Show all posts

Saturday, September 06, 2025

Tall tags by Cathy N

 Good afternoon, Cathy here with some tall tags for you they are 2in by 6in.


                                                      Stamps Used:

                                     17545 grunge writing background

                                     18923 flower pot

                                     20572 doodle triangles

                                    19658 skeleton diagram

I started by making the backgrounds.


I used distress inks to make it.

Next, I stared the backgrounds.


I added some ephemera to the tags and some stamping.


 The next one I did in a Halloween theme.


Monday, November 06, 2023

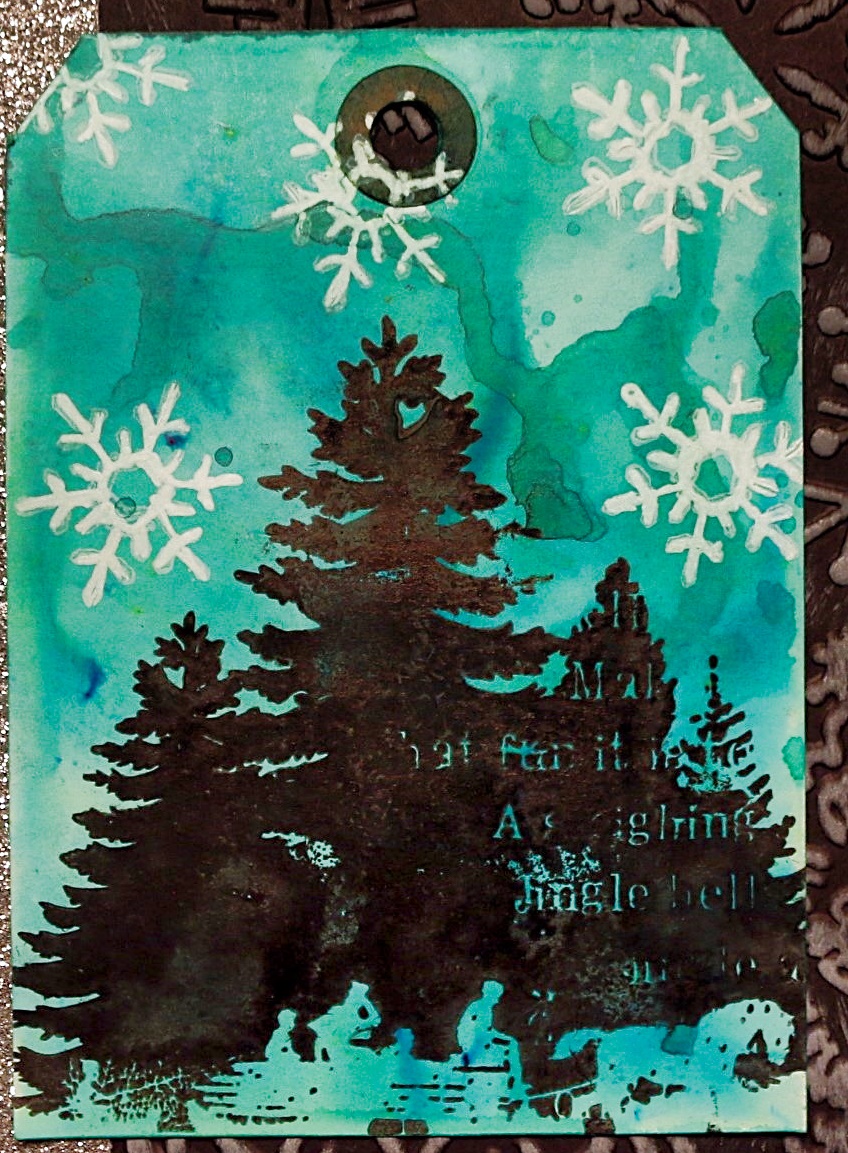
First winter card by Cathy N

 Goodmorning, Cathy here with my first winter card of the season. 

I started out with a half of a tag and some Lavinia dinkles. I used pine green that gave me some greens and blues. 
I stamped Xmas silhouette collage on the bottom of the tag in black ink and then I used white ink and stamped medium snowflake on the top. 
I then embossed blacked cardstock with a snowflake embossing folder. I rubbed the white ink pad over top to highlight the snowflakes. Next, I added that to a white card base.


Lastly, I took a strip of sliver glitter paper and added to the side and then added the tag I made and that is my card. 

Stamps Used:


Thursday, October 29, 2020

Halloween tags with witch and death moth

Hey everyone,

just two days until Halloween, so of course I have another inspiration project for this. Today I want to share these two tags. I know, it might be a bit hard to see on the photo, but guess which material I used as a base?


... it's foil! Windmill foil to be exact.

I cut my two tags from the foil and colored them with alcohol inks and some blending solution. I worked on them as long as I was happy with the look.


 While they were drying, I stamped and cut two focal points - the witch with her broom and the death moth - on watercolor paper. I left a white boarder around both images. I usually don't do that, but I thought they needed a little more contrast to stand out against my colorful tags. Bonus: it made the cutting much easier. ;-)

To add more interest I chose a chipboard element for each tag and heatembossed it - my favorite thing to do with chipboard.

As my backgrounds have dried in the meantime, I could work a little more on them. I decided to turn the tag around and stamp on the smoother side without the alcohol ink. For stamping I used a white Stazeon ink which works really well on foil. I stamped the row of chakras as well as part of the tree stamp on the red tag and two different skulls and the branch antlers on the blue one. The tree and the antlers both create a similar look when you just stamp parts of it, but I wanted to give you double the inspiration. 


I finished the tags by glueing the chipboard pieces, the cutout images and a lot of thread on them and added one of the Tim Holtz stickers on each.

I haven't had my alcohol inks for a while now, but it was fun playing with them on the foil. And of course there are some cool possibilities of using foil tags for decoration such as placing them in front of an electric candle.


Stamps used:
Witch Holding Broom (19705)

Death Moth (20056)
Weathered Tree (19467)
Realistic Skull (19724)
Branch Antlers Set of 2 by Cat Kerr (20147)
The Head Figure by Cat Kerr (20138)
Chakras (20246)

Other material:
- windmill foil
- watercolor paper
- Versaclaire Ink (nocturne)
- Stazon ink (opaque cotton white)
- Ranger alcohol inks + blending solution
    red tag: sunset orange, purple twilight, wild plum
    blue tag: denim, turquoise, raspberry
    on both: pitch black

- Scrapiniec chipboard elements (spiderweb 4967, boarder 4614)
- Embossing powder (Lindy's Gang - chalk it up)
- black and white thread


See you soon & happy Halloween!


Thursday, October 01, 2020

Life is a Carnival

 As Summer slowly fades into Fall, county fairs start up. Using the Spinning Swing Ride stamp and some Distress Oxides on a tag, reminds me of simpler times.


Supplies:

Spinning Swing Ride

Distress Oxides: Wilted Violet, Picked Raspberry, Spiced Marmalade and Squeezed Lemonade

Blending Brushes (or any blending type tool)

Chipboard Tag

White Gesso

Black Pigment Ink

Black Embossing Powder 

Stencil Flower Dot (use any stencil you have on hand)

Texture Paste Copper Crackle


Directions:

1) Cover chipboard tag evenly with white gesso (if you have a tag that is on white chipboard, skipp this step).

 2) Stamp and emboss the stamp, positioning it to the left of the tag.

3) Apply in strips horizontally each color, purple, pink, orange and yello.


4) Blend colors with blending tool, color to color, edge to edge of pigment.

5) Find stencil and add texture metallic pastes.

This tag can have a tassel added and the sides inked with black as well, but I ended up leaving this as is.

Hope you enjoyed this quick project! See you on the flip side!

Thursday, July 23, 2020

A Tag and Train


Tag You're It!

Today I want to share some tag love with you!

I just love creating vintage grungy tags!


Stamps Used:


I chose to start with some scrapbook paper I had left over from a project. I created a 3x6 in tag and used various brown distress inks to ink the edges and add a bit of color through a Tim Holtz layering stencil.


Using Archival ink, I then stamped my row of numbers and my scribble circle. 


To add visual interest I ripped up some scrap pieces of book pages then glued them down.  To make them pop, yet blend i used brown distress ink to watercolor around the edges.  I wanted this piece to be grungy, so added flicks of vintage photo and antique linen distress stain. 


To finish everything I mounted this tag on a piece of dark brown card-stock, and stitched around it.  I stamped my train on a separate piece of paper and inked it to match the tag.  When it was just like I wanted I added some string in the area of the scribble circle and glued the train down on pop-dots. 

The stickers and metal tab I used are both by Tim Holtz

Tuesday, October 23, 2018

Bright ideas

Hello crafty friends!

I hope you are all doing well. Today I want to share and inky tag...
(this is one of the larger 3 x 6.25 in manila tags)


Stamps Used:

Other Products: 
Distress oxide ink- Fossilized Amber, Salty Ocean
manila tag (6.25 x 3)
Archival ink- Jet black
white Gelly roll pen
black ink pen
glass craft mat

I started by adding blue (salty ocean distress oxide) and yellow (fossilized amber distress oxide) ink on my glass work mat, then blotting it up with my tag. 
(you can set this aside to dry or use a heat tool)

I originally planned to go with an Alice in wonder land theme
(but like many bright ideas, my brain changed its mind and said no... lets try something else. )

(I'm sharing this so you can see we all have these moments where things just don't come together like we plan)

So you can see I next stamped my scribble circle and my /// in black archival ink. 


When my brain changed gears, I chose to add more blue edging around my tag with a blending tool. Next I added more details my stamping the chevron and adding details with a white Gelly roll pen. 


Ok, to finish my piece off I used a separate piece of card stock and stamped my light bulb. 
(I used distress ink to color the card stock before stamping on it)
I used pop dots to adhere my light and to give it depth. 


I hope you have all enjoyed this fun "bright ideas" tag! 


Tuesday, October 10, 2017

Eat More Candy

Hello! Who has already decorated for Halloween or is ready for Halloween? Well I, Shanna,  have some Halloween simple fun to share today!


I kept it simple with just a manilla tag and altered it with some 7 Dots Studio paper. I used a UmWow Studio stencil and some Distress Inks to add some pop of color. I also used Distress Inks around the manilla tag. 


The stamp was added with StazOn Black Ink. Then I used the Eat More Candy with black in on a strip of canvas. I added the canvas with some tiny brads. 


Thank you so much for stopping by today!

Stamps Used:


Other Items:
Manilla #8 tag
7 Dots Studio Paper
Distress Ink - Wild Honey, Spiced Marmalade, Hickory Smoke
StazOn Black Ink
Canvas
Brads


Tuesday, February 21, 2017

She Was... Tag by Shanna

Hello everyone Shanna here. I have a new tag I made and had a blast creating it. I was limited to what I could use as my craft stuff is currently packed and in storage while we wait to close on our new home. So this was tons of fun to create.


I started my tag off with some quick spot stamping using the stamp Dictionary Page - 19015. Then I used some different colors of Distress Paint on the Expanding Rays Silhouette - 19896 and stamped it on the tag. 


Let it dry then add some Distress Ink over it. I love how the Distress Paint pops out. 


I added water splatters but it didn't show too well so I went over with another color of ink. 


So I totally forgot to snap a photo of stamping Doodle Circle - 19823 on white cardstock and cutting it out as well as stamping She Was - 19632 on canvas. I then stitched it down on the tag. My original idea was to use clay however the paint wasn't sticking to my clay right and every time I tried a certain technique it kept coming off so we shall try clay stamping another day. 

Here are some close ups I hope you enjoyed this quick little project. 


Stamps Used:

Other Items Used:
Ranger Ink #8 Tag
Distress Ink and Distress Paint
Canvas scraps
Bombay Black India Ink
Stitching (sewing machine)