- card base, black card stock, brown/craft card stock. paper trimmer, Yupo/glossy card stock. scissors, adhesives, alcohol ink tools
- white gel pen
- Archival Ink (Jet Black)
- Alcohol Ink blending solution
- Alcohol Ink colors- Sailboat Blue, Clover, Cool Peri, Raspberry, Sublime pearl, Intrigue pearl, Tranqiuil pearl.
- Viva Las Vegas Plate 910A
Monday, July 31, 2023
Sunday, July 30, 2023
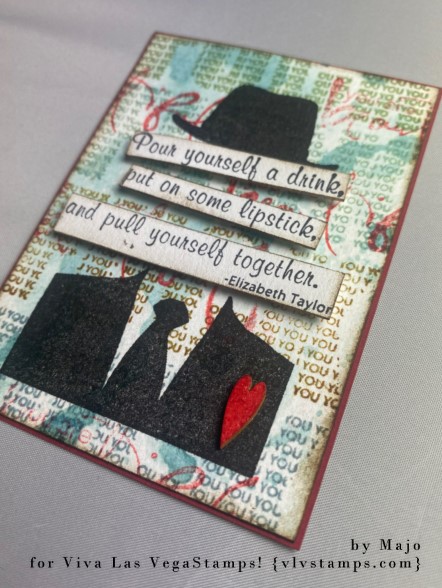
Pour yourself a drink .... ► Majo
Hi Sweets,
today I show you an ATC I created to explain my mood this week. Never mind, I had fun creating this.
I used the following stamps:
Fuck you 20334
Liz Taylor sentiment 19478
Business Man Silhouette 20363
You are beautiful 19832
I splashed my background with distress ink and took it from there, just added the word(s) in several colors, made me happy.
Luv ya ♥
MAKE LAUGHTER A PART OF EVERYDAY! by Fran Chalmers
Hello Everyone!
Today I have made a postcard for you. I hope you find it amusing!
To start off I made the backgroud using brushos.
I then stamped my main image on a piece of thick paper and coloured it
I stamped the sentiment and cut it into strips, and stuck the image and the sentiment onto the postcard. I went round the very edge with a black pen.
I went round the edge of the postcard with a stamp in two colours to give it a bit more interest.
And voila! I felt that it was finished. Hope you like it.
Stamps Used:
writing and Scribbles collage 20695
Other Items Used:
Versafine Clair Ink in Nocturn, Summertime and Grey Mist
Brushos in Lemon, Orange and Grey
Black Sharpie pen
Zig brush pens
Saturday, July 29, 2023
Dorthy..... by Tracy Blackwolf
Hello everyone!
Today I have a very quick tag art to share. With all the stores having Halloween in, I was inspired.
I sprayed the tag with Crackling campfire and marigold and speckled egg spray stains. I Stamped the horned face, added spray stains with a paint brush for highlights in hair and used a white gel pen on her eyes. I stamped the spiders and added a sparkle to them using a glitter gel pen. For the finish, I used a stick verbage from a Halloween pack. Finally, I rubbed the black ink pad around the edges of the tag for a distress look.Friday, July 21, 2023
Easel card by Arwen
Hi Lovelies
Welcome back on this Blog :)
Today, I wanna share my easel card incl. the "how I made it"
Close-ups:
Here are the single steps:
1.) For the basic structure I use black cardboard. 2 parts are required: 1x 14cm x 28cm and 1x 14cm x 14cm
2.) For the basic structure I use black cardboard. 2 parts are required: 1x 14cm x 28cm and 1x 14cm x 14cm
3.) Now both parts have to be put together. The 14cm x 14cm piece of cardboard is glued to the folded piece. See image.
4.) As a next step, a "stopper" is needed.
I used a punch here - brads, buttons, etc. can also be used if you prefer.
My die-cut was folded lengthways - one side to stick on, the other side stands up.
5.) I now glue this stop about 6cm from the 2nd fold onto the large part of the long piece of cardboard.
6.) The Easel card blank is now up and almost ready to be designed.
7.)As a last step, I cut watercolor paper, which is then designed. One piece for the high part and one piece for the part before the stop.
Stamps, I used:
other supplies:
- black cardstock
- Watercolor paper
- Staz on
- Distress reinker
- Twinklings H2O
- ZIG color pen
- Posca white pen
- Crackle texture paste white
See ya soon with other projects :)
Monday, July 17, 2023
Moonlight chat By Cathy N
Goodmorning all, Cathy here with a card for you today.
I then stamped 19556 Wildflower silhouette on the bottom of the panel I made. After I stamped it I then trimmed the panel, so it was the same size.
The next step I did was using the 3D adhesive paste. If you use this make sure you wash your stencil off right away. It's glue so you don't want that drying on your stencil and ruin the stencil. Wait till it goes clear and you can add the deco foil to it.
Stamps used:
Wednesday, July 12, 2023
Moon Moth by Tracy Blackwolf
Hello everyone!
Today I made A tag...I hope you enjoy.
To begin, I used my stamp as a mask.I then used three distress sprays to put color on.I removed the stamp and dried the tag, then stamped the moon in the empty space. Then I sprayed more yellow to fill in moon and added a bit of orange.Next I stamped the moon phase stamp at the top and bottom of the big moon. Then I used a sponge tool to add black ink around the edges of the scene.Next I stamped the moth twice and cut it out. I also used white ink to stamp over the moon phase I hadI then put some white re inker on a plastic scrap and ran an old tooth brush in it then flicking white splats onto the tag.
Stamps used:


.jpg)


.jpg)