Monday, October 30, 2023

Why fit in .....► Majo


 My friends,

today I show you a gift bag I made for a friend for Halloween. Unfortunately, I didn’t find my Happy Halloween Stamp, so I just used another one, which I thought also served the purpose.


I stamped the Grumpy cat, and masked it with a piece of paper before adding distress inks and the winter scene. I gave the cat some wings to fit my sentiment.


This goes to my friend filled with spices and other goodies today, she’ll have a blast.


I used the following stamps:


Tree (Winter Wood Scene)

Grumpy cat

Sentiment

Wings from plate 1459


Have lots of fun today, get scary!
 
BOO

 Luv ya ♥


SPOOKY OLD HOUSE by Fran Chalmers

Happy Halloween everyone!

Today I have made a card topper/tag (I haven't decided yet!) which is a bit spooky!


First of all I blended my background with Distress Oxides in Twisted Citron, Mowed Lawn and Wilted Violet.


 I then went round the edges with Element Ink in Dark Denim.


I used a moon mask and added the Dark Denim round the outside so the moon picked up the Twisted Citron underneath.  I then stamped the old house and coloured parts of it with a black pastel pencil.  I also used a bright yellow gel pen in the windows.


I added some tree branches round the edges and stamped the raven onto a piece of thick paper, and added Blueprint Sketch distress ink to the white parts (their feathers do have a bluish black tint, don't they!)


Once I had stuck the raven onto the tag, I used a Titanium White pan pastel to give the impression of mist.


As I haven't decided yet how to use this tag/topper, I didn't put any sentiment on it.  I quite like it without anything on it and I hope you do too!


Stamps Used:

Old House 19741

Raven Looking Up 20269

Weathered Tree 19467

Other Items Used:

Distress Oxides in Wilted Violet, Mowed Lawn, Twisted Citron, Blueprint Sketch

Versafine Clair in Nocturn

Elements Ink in Dark Denim

Black pastel pencil

Yellow gel pen

White Titanium pan pastel

See you next time!


Saturday, October 28, 2023

Halloween night scenic Mail Art by Cocofolies

Hello Everyone !

After a little pause on the blog due to lots of things behind the scene, so sorry, I'm finally back today... very happy to share with you a cute and fun scenic stamping mail art! 


I used masking techniques mainly on this one, starting from a simple white standard envelope (mine measures 11x22 cm). Several VLVS wonderful fun stamps to give life to the scene, dye inks in natural tones for the background, and a bit of extra (soft) coloring here and there, and that's all! 


To start I stamped on the left side my dancing cat using black permament ink and next stamped it again soon on a post-it with the remaining ink. Then I fussy cut out this one to create a mask of my dancing cat, and put it over my original stamped image to adhere.  

Next, I stamped my Jack o'lantern Along Fence over the cat, and created a second mask, before stamping  my  Tree with Tire swings.

On the right side, I stamped the sign, masked if off before stamping the Stone wall. And to finish the scene, I stamped  at the bottom my little Mischievous Elf  to add a bit of fun.


Next, I colored the pumpkins and the wall with just a few Distress ink pads squeezed on my craft mat,  in Carved Pumpkin, Walnut Stain, Hickory Smoke and Gathered twigs. I roughly watercolored some parts of the background too (be careful, you have to do this really slightly, as the envelope does not tolerate much water!). I also put a bit of grey and brown shadows under all the images.


At this stage, I decided to add in the right upper corner Hanging bats.


Still using my watercolor detailed brush, I added color (Brushed Corduroy) between the branches of the tree, and arounf the bats.


Don't hesitate to heat up your paper from time to time, to make your envelope more robust! 


Time to play with a few color pencils to add some dimension to the scene and characters. I used my Derwent Coloursoft pencils in the colors you can see on the photo below. I had a wonderful time during the process. 


For the finishing touches, I used my Posca pens in Black and white, and some fine blackliner. 


Et voila! :)

Stamps used:

Trick or Treat Dancing Cat

I hope you like this project as much as I did.

Happy Halloween!!!!

Corinne

Friday, October 27, 2023

Halloween gift box by ~*Arwen*~

 Hi peeps ❤

Are you in the Halloween mood yet?

For me, Halloween is 365 days a year - I just love it spooky ❤❤❤💀❤❤❤

Today I have a Halloween style gift box. Below you will also find instructions on how I made the box.


when light shines through the lid from behind


And that's how I made it:

1.) You need 2 sheets of cardboard. 1x DIN A4 for the box and 1x 23.8cm x 15.1cm for the lid.
Fold the sheet for the box all around 1x at 3cm and 1x at 6cm.
The sheet for the lid is folded at 1.5cm and 3cm - again all around.
Then cut away the unneeded cardboard as shown in the picture.


2.) Before the lid is folded, we need a second piece of cardboard the same size as the top of the lid. In this case it is 17.5cm x 8.8cm. I cut the piece 1mm smaller on each side so that I could fold the lid more easily at the end.
Now you choose a punch of your choice - I chose a bat. You fix the cut cardboard on the inside of the lid, position your punch, fix it too so that it doesn't slip and hop through the punching machine.


3.) Now you need something transparent to put between the two layers of cardboard.
Here I took a solid foil and embossed it with a spider web.


4.) Now the foil can be adapted to the cutout in the lid and glued in place. Leave enough margin. Then stick your second piece of cardboard on the inside of the lid and you have a cutout that looks equally beautiful from the outside and inside.


5.) Now everything can be folded and glued. This template is a double-walled box. This means that you first glue the small tabs to the sides and then glue the remaining 4 sides to the inside. The box is ready and can now be decorated according to your preferences.


All stamps, I used:

- Spider web in tree branches

- Cemetery

- Rats in Pumpkin 

- Spider


Other supplies:

- Cardstock

- ScorPal

- Bat die

- Embossing folder

- Staz on

- Versafine Clair

- Distress Reinker

- handmade watercolors

- Watercolor paper

- Ribbon

- Charm

- Foil


See ya soon *mwah* 


Monday, October 23, 2023

Monster mash by Tracy Blackwolf

 Hello everyone!!!

Almost Halloween!! Where has the month gone!?


So my project for this week is a long card. 4.5 x 10 and it s a new paper I have not used before. I have to say it does not have the blending properties of what I usually use. I used white heavy stock. This is for the background only. If you're a heavy inker/ paint user as I am, Id stick to the mixed media heavy stock.

The project is pretty straight forward, tons of fussy cutting and then painting the images and then a lot of foam tape, sometimes triple layered as I wanted a lot of different depths of the images. 

I chose many images, stamped and cut out as I wasn't sure how many would fit or what my scene exactly was going to be and I wanted enough to chose from. After all are colored and cut,  and foam tape applied, I like to fluff them- bend wings ,limbs, collars, etc. to give them some life as it were.

I hope you enjoy the monster Halloween!


Stamps Used:
Spider on web line   19263
Death head moth ( for the wings)   20056
piles of bones and skulls ( for 3 skulls on stick) 19903
wolfman   19725
Frankenstein bolts   5842
Devil  19905
Mummy   14748
Dracula   17686
Vampire boy   15165
Pumpkin   18626
Bat comin at ya   12649
 Plague doctor   19701
 Eye and brow   5795
Intense lady   17904
Bat wings set   14339
Vampire or kisser   17874

Other supplies:
Distress spray stains: Dried marigold, crackling campfire,
Squeezed lemonade, Wilted violet, Salvaged patina, Speckled egg, Lost shadow, Black soot, Antique linen, vintage photo, tea dye, tattered rose, twisted citron, lumberjack plaid

Silver sparkle gel pen
white gel pen
white pigment ink
foam tape


Tuesday, October 17, 2023

Spooky tag by Cathy N

 Good morning to you all, Today I have a Halloween tag for you all. 


To start off this is not the color I was going for. I wanted a purple color. 


As you can see, I have a distress stain dauber in dusty concord. (purple) Granted they are a few years old, but I never would think I would get a different color out of the stain. I said let's just go with it I made a tag and a panel background with it. I decided to go with the tag.


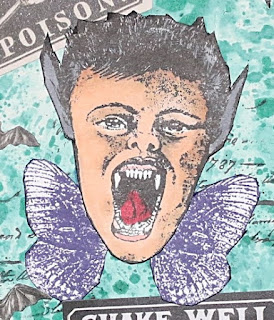
I stamped the Grunge writing background in black distress ink randomly on the background of the tag.  Next, I stamped Vampire boy and the wings from Alis Volat Proprits colored and cut out.

After I did that, I added some Halloween bits to finish the tag. 


                                                                 Stamps Used:

                                                             15165 Vampire boy

                                                            17545 Grunge writing background

                                                            19991 Alis Volat Proprits

Friday, October 13, 2023

Head like a hole by Arwen

 Hi Lovelies ❤

Welcome back on this Blog.

Today, I like to share my newest postcard.

I'm a huge fan of Nine Inch Nails :) They have a song named "Head like a hole"

So, here's my NIN card :


and some close-ups:


All stamps, I used:

- Place face here

- Hand holding gun

- Bullet Hole

- Scrabble Alphabet small

- Scrabble Alphabet regular


other supplies:

- Cardstock

- Staz on

- Distress Reinker

- Lindy's magicals

- Watercolor paper

- Micron pens 


See ya soon *mwah*


Monday, October 09, 2023

Candy corn haunt by Cathy N

 Good morning, Cathy here with a Halloween card for you today. 


I started by stamping candy corn on the bottom of some white cardstock 3 times. I then stamped the moon in the corner. 


I colored the candy corn with copic markers and I then stamped the whimsical pumpkin silhouette in orange distress oxide. Then I colored the moon with copic markers also. Next, I made some grass for the Candy corn to stand on. 
I felt like it still needed some work, so I grabbed a star stencil and some yellow distress ink and added some stars around the moon. 
Lastly, I stamped the saying.


                                                           Stamps Used:

                                             20320 whimsical candy corn

                                            20311 whimsical pumpkin silhouette

                                           20157 the moon

                                          19736 a haunting we will go

Saturday, October 07, 2023

Trick or treat cats by Tracy Blackwolf

 Hello everyone! 

Keeping with my love of Halloween is my blog card for today.


For this card, I stated with mixed media heavy stock postcard. For the background, I used acrylic paints and a brush. I squeeze the colors I want onto a plastic bubble packaging- I love to reuse- and randomly dip my brush in colors and swipe all over the card. I'm not too careful- If you hate it you can start a new card and save the other one to re do later.

While that dried, I stamped all of my images on the same type of cardstock, fussy cut them out and started painting them in with Distress spray stains and a brush.
I used the Happy moon face to stamp on the big moon. I try to ink just the face and then take a paper towel to carefully wipe away what I don't want. I did the same with the large pumpkin and face parts. I used a white gel pen to add fangs to the open mouth and whiten the eyeball. I added in the red veins with a tiny brush and paint.
Then I used foam tape behind the cats and all else got double stick tape.
Then I attached everything to the card and stamped some bats and done!
I hope you enjoyed this card- Enjoy October- its so short!


Stamps used:

The Moon   20157
Open Mouth   5766
Cheshire smile   19904
Eyeball   10398
Pumpkin, Lg.   15555
Trick or Treat Cats    18296
Happy Moon   19507
Flock of Bats   18909

Other Supplies:

Acrylic paints- Light blue violet, Fluorescent purple, Dyna- Iridescent green Yellow

Distress spray stains: Squeezed Lemonade, Mustard Seed, Spiced Marmalade, Dried Marigold, Crackling Campfire, Twisted citron

Color Hive Neon Reinkers: California Love, Outrageous, Purple rain

White gel pen
foam tape 
multimedia heavy stock postcards- TH