Thursday, August 31, 2023

Is pumpkin spice a carb?


Hello out there!
Aimee here with my first fall card for the year.
I used my favorite zombie boy.


Here's most of the supplies. 
You'll need stamps, a card base, cardstock for stamping, black card stock, 
patterned paper, and paper to stamp on.


Grab some card stock to stamp on, black ink, and three Distress Ink colors. 
I used Lost Shadow, Mowed Lawn, and Vintage Photo.

  
Stamp the zombie boy to the let of the panel and stamp & cut out a mask. 
Place mask over the stamped image.
Ink your panel all around the boy.
Throw some water a that Distress Ink and let it do its thing. 
Once it's dry, stamp the sentiment.


Now get out some more white card stock and stamp the coffee cup
Add a little details with grey markers.
Stamp the cup onto the back of your patterned paper and cut out the coffee sleeve.
Flip it over and add it over the stamped image.

Add a fall sentiment to the sleeve.

Color your zombie boy (I used alcohol markers).
Cover card front with patterned  paper.
Trim zombie boy panel to your preferred size and mat onto black card stock.
Add the zombie panel to the card front.

Put the coffee cup inside.


Supplies-
  • top fold card base, black card stock, white card stock, patterned paper
  • stamping ink, acrylic mounts/platform scissors, adhesive, masking material (I use post it notes )
  • coloring medium (I used alcohol markers)
  • zombie boy stamp
  • pumpkin spice stamp
  • coffee cup stamp


Tuesday, August 29, 2023

The Spinsters by Tracy Blackwolf

 Hello all!

Well I'm in full fall mode on the creative side.... enjoy.


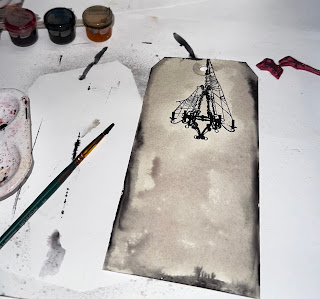
For this tag, I started with stamping the chandelier. Then  a light gray spray stain and added black around the edges with a small brush. While that dried, I stamped all of my images to be fussy cut and did that. I used the spider with lady and the realistic skull together for my spinsters.


One spinster got one layer of foam tape and the other got three layers. I fluff the legs by bending them a bit so they are not so flat, I just roll them over my finger. Then I paint them.
Once my tag was dry, I stamped the rest of the spiders and painted the flames on the candles of the chandelier. I love how the water made the yellow paint run a bit like the flame is blowing from an unseen source of air.

I also went over the webs with a glitter gel pen  Before attaching the spider skulls, I added some spider web material to the scene. I used a dab of hot glue on the back to attach them.

Last I got out my Halloween sticker book for the creepy words. I do use glue on the back of them as they tend to come off over time sometimes.
And that is all for this creepy art tag. I hope you liked it.


Stamps used:
Spider with lady      964
Realistic skull     19724
Striped spider    19508
Spider on web line   19263
Chandelier in cobwebs     19510

Other supplies:
Versafine clair ink pad: Nocturne and pinecone
Distress spray stains: 
Lost shadow, black soot, vintage photo, antique linen, squeezed lemonade, spiced marmalade
Spider web material
 TH Halloween sticker words


Sunday, August 27, 2023

ATCs WITH CHECKS AND PATTERNS by Fran Chalmers

Hello everyone!

Today I have made 3 ATCs.  I wanted to play with patterns, so the backgrounds and the stamps used all have patterns on them.


Firstly I made all my backgrounds using stencils from my stash and coloured with distress oxides.  I wanted the backgrounds to match the stamps I was using with them - for example, waves for the fish.


I stamped the images I wanted to use on thick paper and fussy cut them out.  You will notice that they all had black and white checks on them somewhere. I decided not to colour the images to give more impact.  


I edged each ATC with a pattern that echoed the pattern from the stencil using a black fine liner.  


I hope you like them!

Stamps Used:


Other Items Used:
Various stencils
Distress Oxides in Squeezed Lemonade, Fossilised Amber, Picked Raspberry, Wilted Violet, Salvaged Patina and Peacock Feathers
Black fine liner
Versafine Clair Nocturn


Thursday, August 24, 2023

Happiness Fairy by Cathy N

 Hello all, I have a card for you today. 


I started out with making the background with Lavinia dinkles pink power. I then stamped the I'm the happiness fairy saying on the top.


Next, I stamped 18415 large fairy lady on some white cardstock and colored with copic makers and fussy cut out. 


 Lastly, I added some blue stars to the background and glued the fairy down and then added it a black card base.                           


                                                         Stampes Used:

                                        8333 I'm the happiness fairy.

                                        18415 large fairy lady

                                                Other stuff used:

                                               Lavinia dinkles

                                                    stencil

                                             white and black cardstock

                                             distress oxide ink

Wednesday, August 23, 2023

You're How Old! by Madisen Hernandez

 Oh the end of an era... My wonderful co-worker is turning the big 3-0, so I decided to gift her something with this snarky little card attached, enjoy!


I started with these two stamps as inspo, I love the look on this woman's face, I feel like it could go with so many stamps and sentiments!


I stamped them out on white paper, then made a "mask" for both, adhering to the top of the stamped image so I could do some background magic. 


I used distress oxide ink and a cheap stencil to start this layered background


Then I went in with my fav background stamps 


I took off the "masks" I made for the two original stamped images. I then used my DYMO label maker to make this sentiment. 


The final touch was backing it on this orange card front to make the accents pop! 


Thanks for stopping by guys, love ya! -Madisen 


Friday, August 18, 2023

Pop up card by Arwen

 Hi peeps ❤

Welcome back on this Blog!

Today, I wanna share my pop up card, which is my first one ever (this special one).

Open:


closed:


some close-ups:


And that's the way, I made it:

1.) I used black cardstock for my card. In this picture, you can see how many parts you need and how big they have to be.


2.) For the layers, I used watercolor paper. In this picture you can also see how big these layers have to be and how many you need.


3.) First you stick the narrow strips in the middle of the back of the 7cm x 6.5cm cards. Each card a stripe.


4.) Before proceeding with the construction, let's lay out the layers. I have chosen a pattern from 2 different motifs for the inside and outside. I stamped with Distress Oxide and finally sprayed glitter water on the paper.


5.) Now our small cards with the glued-on strips are used. First we stick 1 card down in the middle part, on the left edge. Leave a few millimeters to the left and below. Only the first 1.5 cm of the strip are glued. The right side of the strip is glued to the right map flap. Make sure the end of the strip lines up with the fold of the card. You may need to shorten the strip a bit.


6.) Now repeat the same procedure with the 2nd small card. Only this time you start at the top right. Again leave a few millimeters of space and then adjust the other end of the strip and glue it to the left map flap.
Now all you have to do is design the layers for the small cards and the pop-up card is ready.
If you want, you can also create parts layers for the small strips (see my finished map).
The card can be left as it is or closed with a ribbon for example.


All stamps, I used:

- Doodle Circle

- Doodle Dots

- Whimsical Face with Horns

- Spotty Background

- Spend your Life


other supplies:

- black cardstock

- watercolor paper

- Staz on

- Distress Oxides

- Distress Reinkers

- Waterbrush

- Water mixed with Perfect Pearls

- Ribbon

- ScorPal


See ya soon with another project 💋