Thursday, April 29, 2021

Choose your own adventure ► Majo

Good Morning, my friends,

 today I’d like to show you a tag I made with a Banksy stamps, I have used so many times, I just love the little gal.


I stamped her on a piece of watercolor paper I had inked before with distress inks in different shades of green and turquoise. I stamped the “Sky of Stars” for more texture. I cut out the circle. I also stamped her on a piece of design paper and glued the circle on top. 

After stamping my sentiment, I adhered it to the panel and glued it on to the tag. A little piece of lace, two wooden charms and ready is my creation for today.


 The Stamps I have used:

 19819

19971

20213

Stay safe, my friends, and find time to craft ♥


Art journal cover - Soul of a mermaid

 Hi everyone,

Recently, I was invited to a letter journal round robin - actually the first time I'm participating in something like that. Today I'm sharing my cover for this letter journal. 

If you're not familiar with this form of art journal swaps, I'll give you a short explanation: Everyone who participates creates a journal that fits into a standard envelope. The journals are sent around in a circle, the recipient creates a spread in it and sends it to the next person and so on. Once the journal returns to the owner, it is filled with lots of pretty pages by the other artists.

I created a quick blue background base with acrylic paints applied with a baby wipe. On top, I added some stenciling with the same colors, just introducing a light grey shade as a new one. I dried the paints very well and then doodled around one of the stencil patterns with a fine black pen to accent the design. Also, I added some spatters with watered down acrylic paint.

Next I added some background stamping with the dictionary page as well as the invoice/waybill stamp, both stamped with teal and only partly to create just a subtle background element.

Because of the aqua tone of the cover I thought of the mermaid stamp and chose it as a focal image for the front. I stamped the mermaids onto watercolor paper, colored them with ZIG markers, cut them out and inked the edges with a black marker. As they screamed for something to be placed onto, I combined that with the title. I die cut the words into some black cardstock, tore the edges with the help of a ruler and placed a nice shimmery paper from my scrap collection under it.

I glued the elements down and stamped the mermaid and sailor quote on the back. After making the the fold, I inked the edges (as well as the fold) with a blending tool.


Stamps used:
Dictionary Page (19015) 
Waybill/Invoice Background (19416)
Mermaid Trio (18187)
Soul Of A Mermaid Mouth Of A Sailor (20639)

Other material:
- Canson watercolor paper
- black cardstock
- shimmer or glitter paper
- acrylic paints (Lukas: arctic, turquoise, prussian blue, light grey || Liquidex: bright aqua green)
- Archival Ink (paradise teal, seafarer)
- Versafine Claire Ink (nocturne)
- ZIG real brush markers
- stencils (Lemon Creation: broken circle
|| A.B. studio: arches || Dina Wakley: fractured circles)
- alphabet dies (Tim Holtz: gift card bag with alpha)
- black fineliner


See you soon!


Monday, April 26, 2021

PaperDolls by Tracy Blackwolf

            Hello Everyone! 

  So for this weeks project I did something a bit different....I was very inspired by the stamp Striped Leggings. I went a bit wild and made eight paper dolls !


It took a bit of trial and error matching up some of the torsos with the legs but I'm happy how they turned out...I stamped the legs first on a postcard size paper, then I stamp the torso using a clear acrylic block so I can see about where to stamp it. I used both sides of the card if I didn't get a good fit the first time.
I then used color pencils and Shimmering H2O's water colors to color them all in. After that I fussy cut them all out. For the Bride of Frankenstein, I hand cut a Waist and arms out of black paper to give her a torso. The fun comes when you embellish them....from wings to crystals to tiaras.. you can get pretty crazy and add as much as you like. Then they can be added to a tag or a canvas or a card....you could even add a magnet and stick them to your fridge.
They were really fun to make and now I look for more stamps to use with these legs!! 
I hope you enjoyed and that you are inspired to make your own dolls too! You could even cut out the face of a loved one and stick to the face for a personalized paper doll. Until next time...get Arty!!


Stamps used:

Striped Leggings   19639

Snake Lady            19113

man grabby hands  4800

Bride of Frankenstein 19906

screaming lady hands  4408

Marilyn cake   929

pretty witch       1639

Lady big hands and mouth  14930

Egyptian lady   817

Other products used:

Wing 3D emboss and cut TH

Crystals

Shimmering H2Os water colors paints

color pencils


Dream BIG


Hello everyone!
Today I am showing you a tag I made using the lovely Raven. I hope you like it!


To make it, I first brayered colour onto a tag with Distress Inks, and sprinkled water on the edges to bleach out some colour.


I then stamped my images, before colouring in some detail and blending some darker colours around the edges with Distress Inks.


I made the sentiment and decided to keep it white, but thought it needed a border around the edge, which I just did freehand (can you tell, ha ha!)  I put it on sticky tabs to raise it from the tag.


Lastly, I found some wool and fibres to decorate the tag.


That's all folks! See you next time!


Stamps used:

Raven Looking Up            SKU 20269
Birds on a Wire                 SKU 13039
Dream Big                         SKU19047
Cross Marks Background SKU 20165
Brick Background            SKU 19077

Other Items Used:

Distress Inks in Salty Ocean, Blueprint Sketch, Chipped Sapphire, Forest Moss, Twisted Citron and Lucky Clover.
Brayer
Sticky tabs


Thursday, April 22, 2021

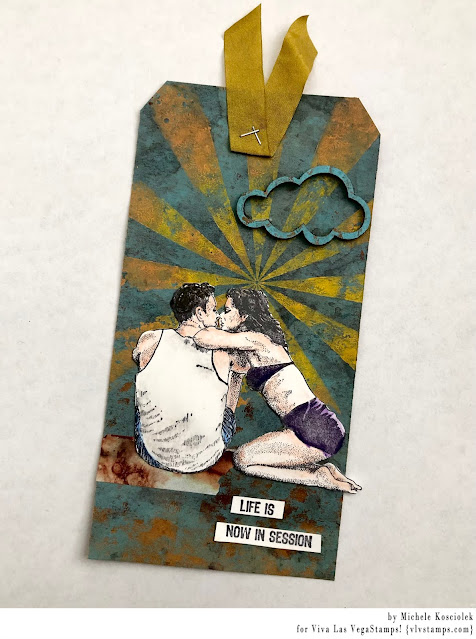
Life Is Now In Session

 It seems that my last couple of projects have been tags and it looks like I was inspired again to create another tag.  But aren't tags FUN??!

And of course I always like to have some painted papers handy to choose from.  This is Dina Wakley acrylic paint brayered on to a piece of Ranger kraft cardstock.  I LOVE the bits of kraft peeking through the paint!!!

I was just in sunny Florida so I have sunshine and blue skies on my mind!


Stamps used:  Couple Kissing, Expanding Rays Silhouette, Life Is Now In Session

Our couple is stamped in Archival ink and colored with Prisma Colored Pencils.  They are ground with a bit of Um Wow Studio rusty washi tape.


I stamped the rays in Distress Paint, mustard seed and ripe persimmon.  A little dab of broken china on our chip cloud just ties the sun and sky together!


I am certainly ready for more fun in the sun and DEFINATELY ready for life to be back in session!!


Until next time...get inky!!

Sunday, April 18, 2021

Inhale the future, exhale the past ► Majo

Good Morning, my friends,

 today I show you a condolence card. Sometimes it just needs one of them. I created it for a friend, she didn’t want the black & white regular one, so I “pepped” it up a bit.


 I stamped and heat embossed the flower on a piece of an old book page and distressed the edges. I stamped the sentiment, matted it and adhered everything on red cardstock. I put another sentiment on the inside as comforting words.


I have used the following stamps:

20036

19892

20224

 Please find time to craft during these difficult times, stay safe and happy