Friday, August 31, 2018

"The Ghost Ship"


Hello my VLVS! peeps ... I'm back!! I've been on a little holiday around Australia these last few weeks and so haven't really been able to post much for you. But .... I'm home now and I have a ripper under the sea art journal page I created using Kaitlyn Paltridge's new stamp designs.

 My art journal is an old story book so this page already had the title "The Ghost Ship" and a gorgeous old illustration of a captain on his ship with his crew. It was just waiting to be VLVS-a-sized!


Kaity's Aquarium Space Girl and Garden Space Girl designs were a perfect fit for this ghost ship theme along with the wonderful Humpback Whale!


Lots of background work with some acrylics and it got pretty busy so I stamped the space girl designs onto card stock and cut them out and glued them over the top so they would stand out as a focus on the page.


VLVStamps used:


Thank you for popping in today. I'll see you all again soon xx


Thursday, August 30, 2018

Thank YOU!

Hi ALL!
Michele here today with a thank you card...I celebrated a birthday recently so I had several to send out.  I still LOVE sending out thank you cards with special notes in them!  It is so much more personal.

OK, let's jump right in!


Stamps used:  Harlequin Diamond Background, Thank You, Creepy Creature Sitting.


I brushed Distress Ink in Broken China with the Nuvo stencil brushes, over the stamped background and then spritzed with water for some watermarks.

The creature is colored with Prisma Colored pencils.

I am off to write some special notes in my cards...
Until next time...get inky!

Wednesday, August 29, 2018

Feed your soul

Hello everyone, 

For today's post I have an art journal spread with a video ! 


I hope you will hop over the the VivaLasVegaStamps YouTube Channel and watch me make this ! 

You'll find it HERE

Or you can just click the photo below.


I have used the following stamps for this spread:


Thank you so much for stopping by today ! 


Monday, August 27, 2018

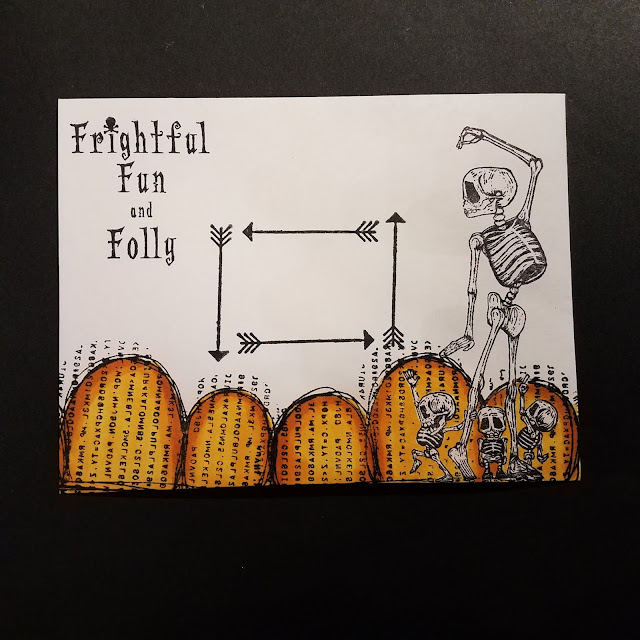
Frightfully Fun Mail Art Monday

Hello Crafty Friends!!!

It's almost time... and I've already got the Halloween itch. 

 The chill was in the air for a few days, and that's all it took. 
(Yes, I am one of those crazy fall people, and yes I love pumpkin everything.)


Ok, back on subject.
Today I want to share a super fun envelope for mail art monday. 

Stamps Used:
Below you can see all of my base stamping.
(I stamped the skeleton family first then, masked it off.)

Next, I used Blick alcohol markers to color my base boarder. 


Next, I inked my background with Tim Holtz Distress ink in- Mustard Seed, and Squeezed Lemonade.
Then, I added some stencil details with carved pumpkin Distress ink. 
(sorry the colors are a bit washed out in this photo)


After I finished this one, and loved it so much I decided to create a few more in other colors. 
(I have a few friends with different favorite colors)


Thank you for Joining me today!!! 
I hope you all enjoy this early fall inspiration!


Friday, August 24, 2018

Art journal page: Freaking Awesome! By Elina

Hi!
I just love playing with the VLVS! stamps on my art journal books! Here's my newest creation I made in my small Moleskine book:


Isn't that 'Whimsical Lettered Man' image awesome! This time I decided to color it with quite conservative colors, but I'm sure next time I'll choose a more unusual color combo. That cool image for sure tolerates bold color choises :)


For coloring the background I cut a simple mask from plain printing paper. While keeping the mask still in place I stamped some random cross patterns on top of the green ink, using the same Distress color.


I stamped and colored three 'Whimsical Lettered Men' on the same go, as I also wanted to create two ATC's. I think they turned out very nice, too!


For these projects I used the following VLVS! stamps:

Wishing you a wonderful weekend! Thanks for stopping by!


Thursday, August 23, 2018

Dragon Dreamer | Sue Plumb


Hi everyone!
Sue Plumb here today with my latest design team project for you. Today I am sharing a page I created my altered book art journal using the Aagar the Emotional (dragon) stamp as a focal point. I have been dying to use this stamp and I figured what better way than to give it an entire page in my journal.


I started my page by giving it a coat of gesso to prime the paper before using some Faber-Castell Gelatos to add colour. I simply scribbled randomly around the page before using a baby wipe to blend the lines out.


Next, I turned my attention to my Aagar the Emotional focal image, which I stamped onto smooth white cardstock before colouring with Faber-Castell watercolour pencils. I then used a water brush to blend the pencil lines out before cutting the image out. Once I had cut around the image, I used the same Gelatos as I had used for the background to colour the small amount of white space around the edges.


Once I had my dragon complete, I followed the same process with the Doodle Frame stamp, and set the pieces aside so I could add them to my page. I also stamped out some hearts with the Scribble Heart stamp, which I also coloured and cut out. 


Next, I turned my attention back to my page. I used the Ethos Shape stamp repeatedly around the page with black ink to add interest to the background before sticking down all the pieces I had prepared.
I used the She Was a Dreamer stamp to add the quote to my page; then Doodle Dots stamp with green ink to add some subtle detail and a Stabilo All pencil to finish off with a bit of shadowing and scribble.


Here's a closer look at the finished page...


Thanks for stopping by so I could share this with you. I hope I have inspired you to get inky too!


Stamps used:

Other materials:
- Colour Blast white heavy gesso
- Faber-Castell Gelatos
- Tsukineko StazOn ink
- Ranger Archival ink
- Faber-Castell watercolour pencils
- smooth white cardstock
- Stabilo All pencil

Sunday, August 19, 2018

Mail Art Monday ► Majo


Good morning, dear crafty friends!

Majo here today for the Mail Art Monday.


 I applied distress ink on my envelope, making sure to leave the space for the address label. 

I stamped the flowers in the same green with Distress Oxide as well as the stars in the sky. After stamping the beautiful bird, I added some brackets and another stamp on the “label". 

The “Make it happen” is a sticker from Tim Holtz.

The writing on the wings of the bird: 

Open up your heart to possibility and see the magic unfold before your eyes!” 

Beautiful, isn’t it?

Some close ups of the background …….


My envie is already on its way to ….. shhh: Surprise!

I used the following stamps:


Besides the stamps I used the Small Talk stickers form idea-ology by Tim Holtz.


 Have a wonderful start into the new week and Happy Crafting

Wednesday, August 15, 2018

Weird People

Hi Groupies!!!
We are closing in on the end of the summer and I want to know what kind of crafting do you do between now and the start of the holiday season??  Are you Halloween crafting?  Or are you working on your Christmas cards already???
Well I am about to get started on some Halloween crafting BUT first I have a fun card that is not holiday specific to share today.

Sometimes I just stare into my bins of Viva Las VegaStamps! to see what speaks to me and here is what happened.


I started with a piece of watercolor paper, stamped the Clown, masked it and painted over the image with Dina Wakley acrylic paint-cheddar.


With a Stencilgirl stencil and a baby wipe I removed some of the paint.


Then off with the mask.  I colored the image with Prima Colored Pencils.


Stamped the Spend Your Life sentiment and cut it into pieces.  I switched around some of the words to create my own sentiment.
Stamped the Cross Marks Background and Carved X's in the background to finish it up.

Let me know what you are working on!!
Until next time...get inky!!

Friday, August 10, 2018

Twins on an art journal page - By Elina

Hi!
Today I'm sharing with you my latest art journal page, filled with all my favorite elements: bright colors, lots of stamped patterns, and lovely main images (isn't that sheep stamp just adorable!):

My plan was to create a contrast between the colorful background and the quite monotonous main images. That way the page with lots of colors and patterns would not get too busy.

For coloring the background I used acrylic paints and a brayer. Once the paint was dry I stencilled white color on top (pattern stencil by Tim Holtz) and added different stamped patterns here and there. When stamping on acrylic paints I recommend to use a waterproof ink. We all have our own preferences when it comes to ink brands; my opinion is that on an acrylic paint surface StazOn works the best.

I have noticed that the 'Smear/Smudge' stamp has become one of my new favorite stamps: When using standing or sitting images on my projects, I prefer the characters to have something to stand on. This stamp is perfect for creating that kind of grounds!

With only one sheep image the page looked bit too empty. So the solution was to repeat the image, and to use two sheep instead of just one, Repetition usually works well on an art journal page!

For this art journal page I used the following VLVS! stamps:
Sheep with Legs
Bubble Wrap Texture
Punchinella/Sequin Waste
Rows of Numbers
Smear/Smudge
Cross Marks Background
Doodle Frame

Hope my page inspires you :)

Wishing you a wonderful weekend!


Thursday, August 09, 2018

Be a Mermaid | Sue Plumb


Hi everyone!
Sue Plumb here to share my latest design team project with you. Today I am sharing simple a 12x12" scrapbook page I created using one of my favourite stamps as a focus. I have recently been sick in hospital and unable to sit up and create; so a simple yet effective technique was just what I need to get my hands dirty again.


I decided to create this layout to document my daughter's achievements at her school swimming carnival last year, and what better feature shape than with a star? The Squiggly Star Collage is one of my absolute fave pieces of VLVS rubber, so I decided to use it multiple times.

I started by painting some scrap pieces of cardstock using Ranger Dylusions paints. I then stamped out my stars using black StazOn ink, then cut them out and set them aside.


Next, I got a fresh sheet of white cardstock, and used the Row of Distressed Lines stamp to add some structure to my page to begin working from. I kept the background to simple black on white as I wanted the colours of the stars to pop.


I used a small piece of Miracle Tape on the back of each star to adhere them around my page. Once in place, I used the Grunge 2 to stamp a number two onto each of the red stars, and the Grunge 3 to stamp a three onto the green ones to represent the second and third ribbons she won.


I then arranged my photos together, added some cardboard to the back and stuck them onto my page. I used the She Spread Her Wings stamp several times around my page, along with the Star Sliding stamp to reinforce the star theme. 


To finish off, I used the Always Be Yourself/Mermaid stamp to provide a focal quote and title; before splattering some Colour Blast 'Citrus' Colour Artist Ink around my page.
I then added my journalling using a Sharpie pen and stamped the date.


I was really happy with how this page came out with the bright splashes of colour against the white background. 


Thanks for stopping by so I could share this with you. I hope I have inspired you to get inky too!


Stamps used: 

Other materials:
- White Cardstock
- StazOn ink
- Ranger Dylusions acrylic paints
- Colour Blast Colour Artist Ink
- Sharpie pen