Showing posts with label scrapbook page. Show all posts

Wednesday, October 23, 2019

Hello Sweet Evil | Sue Plumb


Hi everyone!
Sue Plumb here to share my latest design team project with you. Today I am sharing a mixed media scrapbook layout I created with some of the creepy stamps from the most recent release and a photo of my sister and I dressed up for a "bad taste" theme night. 


I began my layout with a sheet of white heavyweight cardstock, and created a watercolour style background using Distress Oxides. I did this by swiping the ink pads on my craft mat then spritzing with water, before laying the cardstock over the top to absorb the ink. I did this first with 'Iced Spruce' then dried it off and repeated the process with 'Carved Pumpkin'.


Once I had my background colour in place, it was time to add some stamping! I started with the Palmistry Palm, which I stamped over the top of the Distress Oxides.


I then stamped the Pirassoipi Bicorn and the Poison Caution stamps onto my background as well, using black StazOn ink again.


Once I had the stamping done, it was time to add my focal image, which was the photo of my sister and I that I had cut out. I mounted the image onto some scrap cardboard to help pop it up from the page.

To embellish my page, I stamped out the Cross Statue stamp three times onto some black cardstock using embossing ink, then heat embossed the images using gold embossing powder.


I then fussy cut around the crosses and added them to my page around the base of my photo.


Next, it was time for my title. I love a mixed font title, so I used a Kinder Kreations chipboard word hello, which I also embossed with gold embossing powder; then the wood veneer word sweet from Corbett Creations; and then some Cocoa Vanilla Studio alpha stickers.


To add a little extra detail to finish off my page, I used the Sky of Stars Background stamp to add a few little stamped stars, then added a some wood veneer stars that I had coloured black with a Sharpie. I also added some small gold mist splatters.


And with that, my page was complete! Thanks so much for stopping by today so I could share this with you. I hope I have inspired you to get inky too!


VLVS stamps used: 

Other materials:
- Bazzill cardstock
- Ranger Distress Oxides
- Tsukineko StazOn ink
- Colour Blast 'Bling' Embossing Powder
- Kinder Kreations chipboard word
- Corbett Creations wood veneer word and stars
- Cocoa Vanilla Studio alphabet stickers
- Heidi Swapp gold Color Shine

Friday, August 23, 2019

Your Jealousy is Showing | Sue Plumb


Hi everyone!
It's Sue Plumb here today to share my latest design team project with you. Today I am sharing a mixed media scrapbook layout that I created whilst I was away at a craft retreat last weekend. It was actually created for a challenge that was on offer, which was to be inspired by a canvas created by my fellow Aussie VLVS teammate (and friend) Fiona Paltridge. I decided to design a scrapbook layout so I could document these fun photos of my brother and I as we shared a giant margarita.


To create my page, I began with a sheet of Bazzill Marshmallow cardstock. This is my preferred cardstock to use when I create mixed media pages, as with its heavy weight (240gsm) it takes a variety of media well with minimal warping. 

I started by applying some Micador watercolour paints randomly to my background, drawing on the colours from Fiona's piece for inspiration. Once the watercolours had dried, I then added some contrast colours using Dina Wakley acrylic paints which I applied with my fingertips.

To add texture to my page, I also added some torn strips of old book and music paper, and some pieces of tissue paper before adding yet more acrylic paint to help blend the papers in a bit.


Once the colour and texture was down on the page, it was time to add some stamping to help give the page some structure. (Unfortunately, as I had flown to retreat and was weight restricted for my luggage, I only had a small selection of my favourite stamps with me.)


The first stamp I reached for was the Typeset Scallop, which I stamped twice horizontally over the paint on my background using black StazOn ink. This gave my page a horizontal line that I could then anchor my photos to.


Next, I wanted to add some vertical structure to my page, so I used the Rows of Numbers stamp and stamped it near the top and bottom of my painted section. I also added a few scribbles with my Stabilo All pencil to further enhance the horizontal and vertical lines I had created.


Once I had the structural stamping in place it was time to add some layers of texture. I used a variety of materials for my layers - striped tissue paper; punchinella; paper doily and frayed gauze before adding my photos on top.


Once the photos were in place I also added some pieces of twisted coloured wire and some staples; as well as some small snarky phrase stickers.


At this point I thought the background needed some extra black detail, so I used the Waybill/Invoice Background stamp to add a little random text and lines around the edges of the focal area.


To finish off my page, I used the Cross Marks Background stamp to add three small patches of crosses to form a "visual triangle" around my photos. I further enhanced the crosses by using some yellow embroidery thread to hand stitch over a few of them. 
Then it was a few tiny watercolour splatters and I was done!


That's all from me today, I hope I have inspired you to pull out some of your favourite stamps and get inky too!


Stamps used:

Other materials:
- Bazzill Marshmallow cardstock
- Micador watercolour paints
- Dina Wakley acrylic paints
- Tsukineko StazOn ink
- Book, music and tissue paper
- Paper doily, punchinella, gauze
- Small phrase stickers
- Coloured wire, staples
- Embroidery thread
- Stabilo All pencil

Tuesday, July 23, 2019

She Was An Artist | Sue Plumb


Hi everyone!
It's Sue Plumb here to share my latest design team project with you. Today I am sharing a mixed media scrapbook layout that I created to document some photos from a recent kids art class that I taught. It was so much fun teaching the kids - they are so free in their approach and have no reservations when asked to do something.


I started my page by creating the background, which was inspired by the piece I had taught in the class. I used the beautiful bright Ranger Dylusions paints, which I applied to my cardstock using a silicone spatula.


Once the paint was dry, it was time to add some stamping. The first stamp I chose was the Whimsical Leaf, which I stamped out over the green paint on my page using StazOn black ink.


I then used the Leaves and Three Extra Leaves stamp to add more foliage over the green paint. This essentially provided a "frame" for my page.


Next, I wanted to add an "arty" quote to my page so I chose the Art is Anything quote by Andy Warhol, which I also stamped using the black StazOn.


Now it was time to add some papery background layers. I wanted to incorporate some art themed things, so I used some Jane Davenport collage paper that featured a paint palette print. I also used a paint sample card from my local hardware store; as well as a doily and some folded tissue paper.


Once I had those layers in place I then collaged on the Magic Maker Paintbrush that I had stamped onto some tissue paper before adding some frayed gauze for texture, then my photos on top.


With most of the main elements in place for my layout it was time to go and add some of the smaller details. I found two more art themed quotes I wanted to add - handmade with he{ART} and then I combined she was and an artist (which I ended up deciding to use as my page title).


I then added some embellishments to finish off my page. First, a handmade heart from Charms Creations, which I placed near the handmade quote. I also added some pieces of twisted coloured wire for extra interest.


Next, I added the Cocoa Vanilla Studio yay flair button and some wood veneer hearts that I painted white.


I also added a black wood veneer arrow that I coloured black using a Sharpie.


To finish off, I stamped the Scribble Heart, then added a few enamel dots dotted around the page and a splatter of white Dylusions mist.


That's all from me today, I hope I have inspired you to get inky too. Until next time, happy stamping! 


Stamps used:

Other materials:
- Bazzill cardstock
- Ranger Dylusions paints and mist
- Tsukineko StazOn ink
- Jane Davenport collage papers
- paint sample card, doily, tissue paper
- Charms Creations handmade heart
- Cocoa Vanilla Studio flair button
- wood veneer pieces
- coloured wire
- enamel dots

Monday, June 10, 2019

Es Neta | Sue Plumb


Hi everyone!
It's Sue Plumb here to share my latest design team project with you. Today I am sharing a mixed media scrapbook layout I created to document some fun photos of me that were taken at a local Mexican restaurant. 


For my page, I took my inspiration from the colourful striped blanket in the background of the photo. I began by adding some red and yellow acrylic paint to my cardstock, swiping each of them randomly across the page.

I wanted to draw in the striped pattern from the blanket to add structure, so I used the Row of Distressed Lines stamp several times horizontally down the page using black ink. I also used the Texture Background stamp vertically down the central line of my page.


With the black ink down over the paint, I also wanted to draw in a small amount of the green that could also be seen on the blanket. I used the Scribble Circle stamp with 'Mowed Lawn' Distress Oxide. I stamped the image three times in its entirety, but then also used one edge of it to stamp extra colour randomly down the page (as you can see below).


With my background colours in place, it was time to add some texture to my page. I gathered together an assortment of items to use as layers behind my photos - black & white striped tissue paper; a die cut black tag; a green paint sample card; some yellow punchinella; and some frayed gauze. I stapled the layers in place before adding my photos on top.


Once the photos were down, it was time to add some embellishments. I started by adding a round Charms Creations handmade circle alongside them, before adding the Curly Moustache that I had stamped onto white cardstock and cut out, on top. Behind that, I tucked a little die cut cactus and then a small die cut banner along the bottom edge of my photos. I also tied a little piece of green and white striped twine onto my black tag.


To finish off my layout, I stamped the Incredible As It Seems stamp multiple times; added the title "Es Neta" (which means "it's true" in Spanish) using Thickers; and then added my journalling at the bottom of the page using a felt pen.


Thanks for stopping by so I could share this with you. I hope I have inspired you to get inky too!


Stamps used:

Other materials:
- Art-C acrylic paints
- Tsukineko Staz On ink
- Ranger Distress Oxide
- Assorted layering materials (as specified above)
- Charms Creations circle embellishment
- Die cuts
- American Crafts Thickers
- Felt pen

Monday, May 27, 2019

What the Buck? | Sue Plumb


Hi everyone!
Sue Plumb here to share my latest design team project with you. Today I have an 8.5x11" mixed media scrapbook layout that features some photos of my daughter riding a mechanical bull that I paired with a super cool bucking horse stamp.


To create my layout, I started by making a watercolour style background using Distress Oxides (Tumbled Glass and Mermaid Lagoon).
I then added some stamping to my page using the Cross Marks Background and Bullet Hole stamps and black StazOn ink. I also added some small pieces of torn chevron print washi tape.


Next, I added some book paper and blue tissue paper to form a mat for my photos, before adding them on top. Alongside my photos I added a handmade felt and hessian chevron from Charms Creations.

For the feature embellishment on my page I chose the fabulous Cowboy on Bucking Horse stamp; which I stamped onto cardstock, coloured using alcohol markers and then cut out. I added some foam tape behind it to help pop it up from the background.


I then stamped the You Only Live Once quote several times across my page; added some wood veneer stars; my journalling; and finally my title, using a mix of Cocoa Vanilla Studio alphas and American Crafts Thickers.


That's all from me today, thanks for stopping by so I could share this with you. I hope I have inspired you to get inky too!


Stamps used: 

Other Materials:
- Miracle Tape
- Bazzill cardstock
- Ranger Distress Oxides
- Tsukineko StazOn ink
- Alcohol markers
- Book paper, tissue paper, washi tape
- Charms Creations chevron
- Wood veneer stars
- Cocoa Vanilla Studio alphabet stickers
- American Crafts Thickers
- Foam mounting tape, Sharpie

Monday, May 13, 2019

Clowning Around | Sue Plumb


Hi everyone!
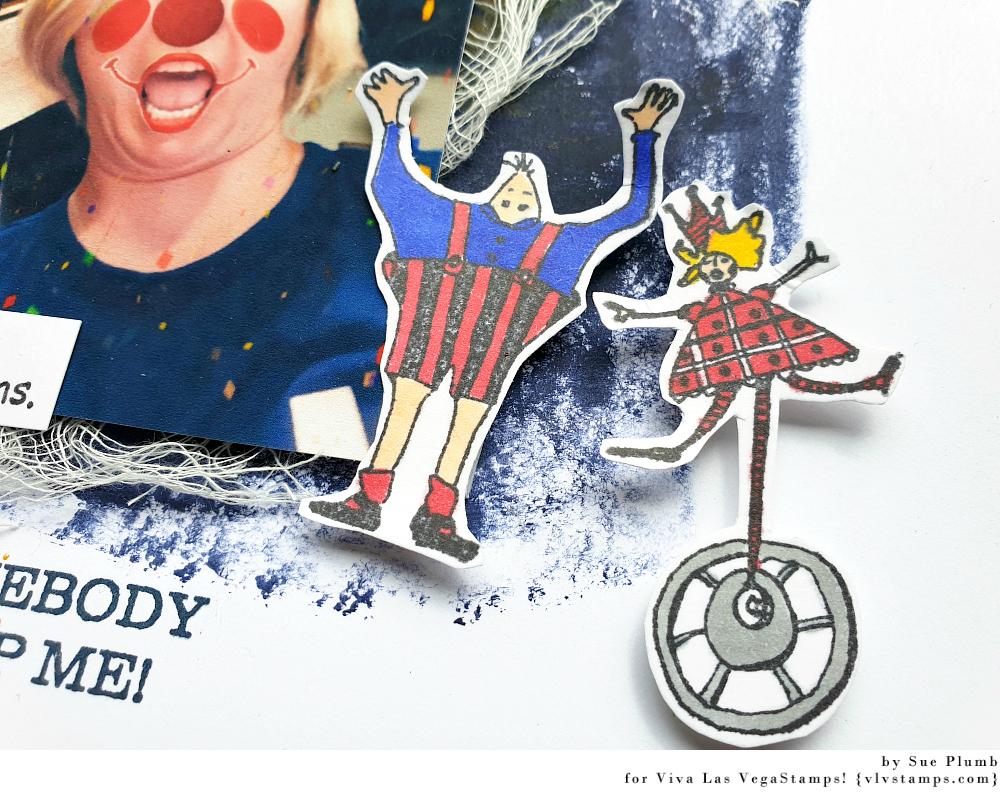
It's Sue Plumb here to share my latest VLVS design team project with you. Today I have a fun mixed media scrapbook layout to share that I created to document a couple of silly SnapChat selfies of my sister and I. (We just love clowning around! hehe)


To create this page I started with an A4 sized sheet of cardstock; then I mixed some Dina Wakley acrylic paints (I used a combination of 'Night' and 'Lapis') to get the right shade I wanted for my background. I applied it roughly using a spatula and set it aside to dry.

Whilst it was drying, I chose some stamps for my background. I wanted to continue the confetti theme from the photos and have the patterns cascading down the page, which I also planned to stamp using acrylic paint. 


I started with the Grunge Circles, which I stamped using 'Ruby' paint repeatedly down the page. I then used the Sky of Stars Background stamp with 'Cheddar' paint and followed the same line down the page.
I then switched to midnight blue ink and stamped the Smiley Face and Somebody Stop Me.


To go with the theme of my page, I stamped out a few images from plate #1383 designed by Mary Vogel Lozinak - Unicycle Lady; Man in Short Pants; and Director. I coloured each of the images using markers and then fussy cut around them. I also stamped the All Circuses quote. 


I added some frayed gauze to my page before adding my photos on top with the quote stuck along the bottom edge.


I then stuck the little characters across my page using foam tape to give them a bit of dimension. 


To finish off I added some scattered sequins for a bit of sparkle and I was done!

That's all from me today, thanks for stopping by. I hope I have inspired you to get inky too!

Stamps used:
- Grunge Circles
- Sky of Stars Background
- Smiley Face
- Somebody Stop Me
- Unicycle Lady
- Man in Short Pants
- Director
- All Circuses

Other materials:
- Miracle Tape
- white cardstock
- Dina Wakley acrylic paints
- Tsukineko Staz On ink (black and midnight blue)
- markers
- foam tape
- frayed gauze; sequins