Thursday, January 31, 2019

Ask Permission by Guest Leanne Jago

Hello Viva Las VegaStamps!,
It is my first time here as a guest designer on the VLVS inspiration team and I am so excited to be here. **Insert squeal of delight**…
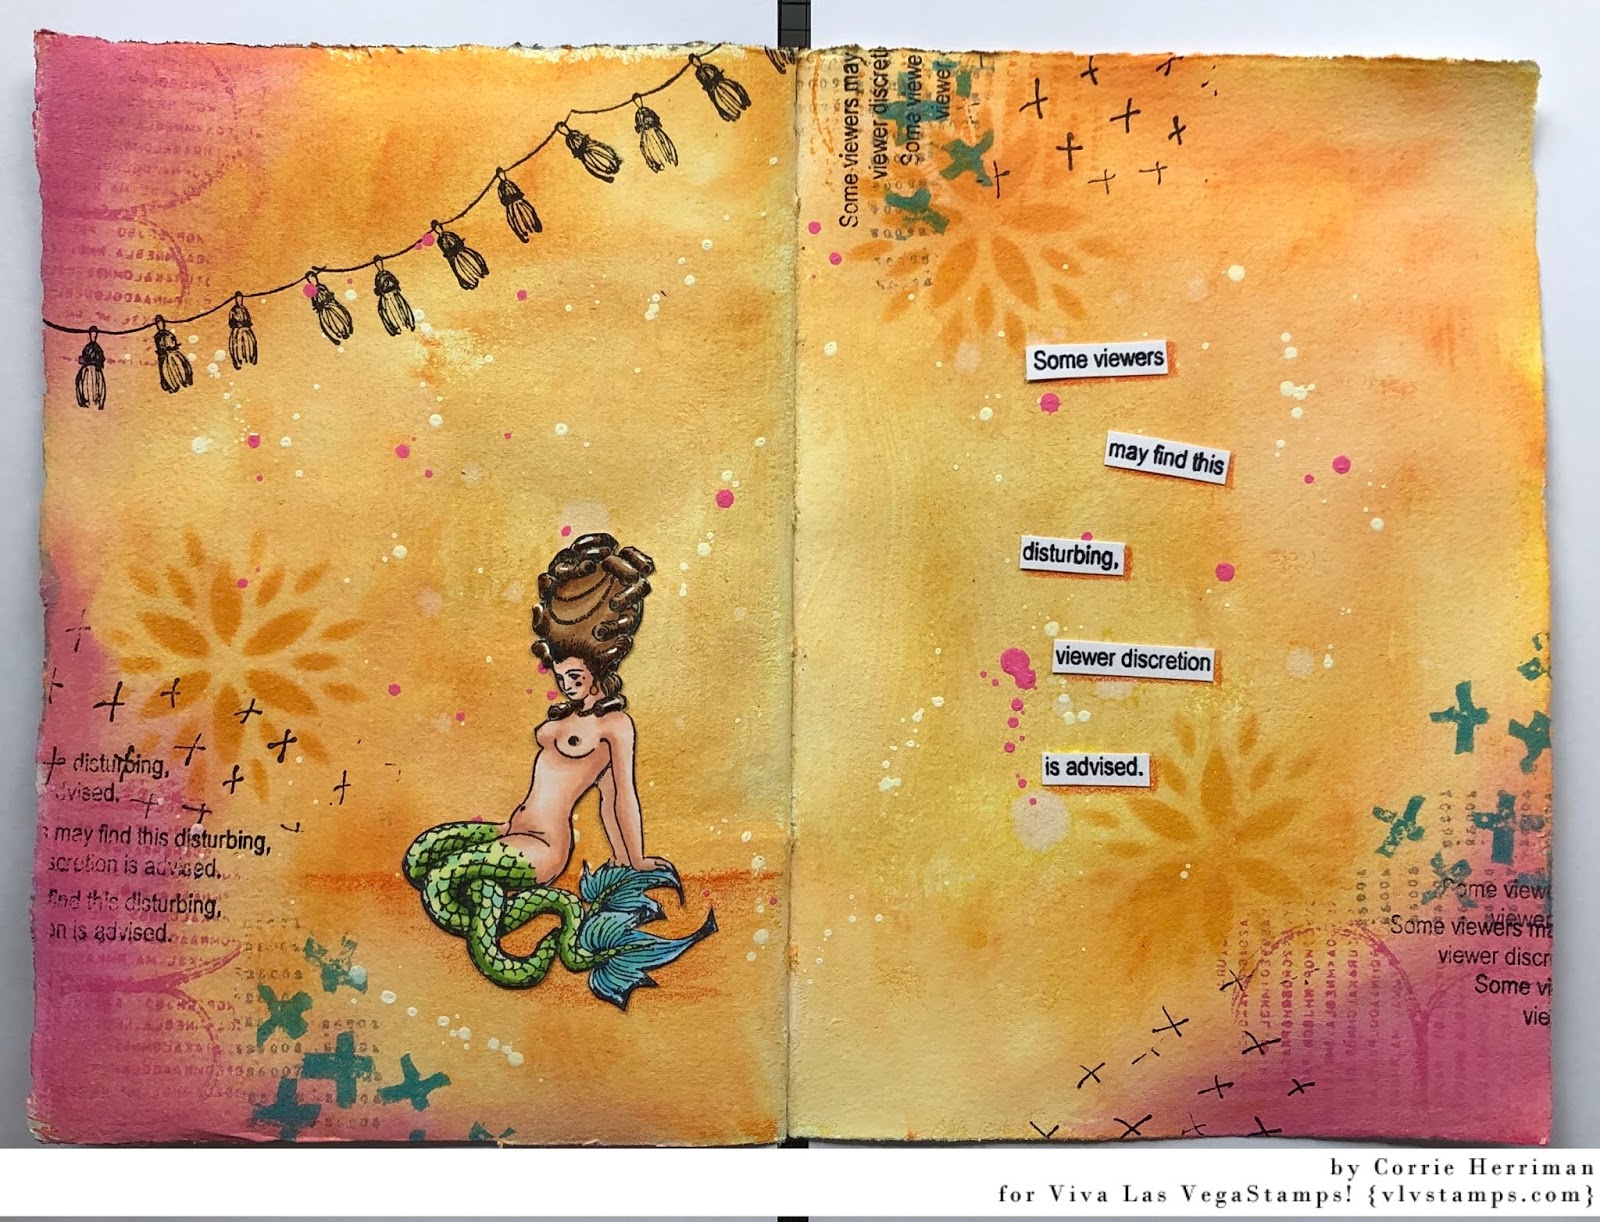
My first project I wanted to create a little mixed media piece.


Drawing inspiration from the January 2019 challenge inspiration board, combined with my love of Banksy inspired stamps and a sentiment to start the year of on a good note.  
Also, I wanted to take the time to remind myself that, as an artist I don’t need to ask permission to create whatever my soul and heart wants and desires at the time and to just enjoy the ride.


Here is a process video : 


VLV! Supplies

Other Supplies:
Index Card
Atelier Gesso Primer
DecoArt Media: Crackle Paint, Antiquing Cream Black
Liquitex Matte Gel Medium
Lindys Magical Shaker: Cowabunga Copper
Tissue Paper
Momento Ink Pad: London Fog
Tim Holtz/Ranger: Oxide Ink: Walnut Stain, Old Paper, Broken China
Stabilo All Pencil: Black
Liquid Correction Pen.

Thank you.

Monday, January 28, 2019

Art Journal Page by Jenn Engle "Love.Repeat."

Hey everyone! I have an art journal page to share with you today. I just love the hand carved look of the Ethos Woman by Tina Walker stamp, so I had to give her a page of her own. To see exactly how I made this page, you can watch the process video at the bottom of this post.


STAMPS USED:


STAMPS USED:


Other Supplies Used:
Dina Wakley Media Scribble Sticks
Archival Ink
Tim Holtz Grid Stencil
Stabilo Marks-All
Dina Wakley Media Washi Tape
Liquitex Acrylic Ink

Thanks for looking!
~Jenn


Wednesday, January 23, 2019

Viewer discretion

Hello everyone,

For today's inspiration I have done an art journal. I don't know about you, but I love art journaling although some would say is wasn't journaling as I don't actually journal usually. For me playing with inks and paints and other mediums is enough. So this is what I came up with:


This was great fun to make. I started with painting the pages with gesso. Next I thought about paint but decided to colour my pages with Distress Oxide Inks. I forgot how well this works. 
I started with rubbing the ink pads over the page; fossilised Amber in the middle, Carved Pumpkins next and some Picked Raspberry along the edge. I used a brush and some water to blend it. After drying I went back in with a blending tool and the same inks to make them a little brighter here and there. 
I also used a stencil and some more of the Carved Pumpkin ink to get some interests on the pages. 


Next I did some stamping using the same inks, adding Broken China for more contrast. I also used some Archival and StaZon. 


When I was happy with the how it looked a added splatters with paint pens and stamped my focal image and the sentiment. I coloured the mermaid and cut her out. I cut the sentiment in strips and adhered both to the pages. I did add some shading with a coloured pencil under the mermaid and around the words. 

I have used the following stamps:

20163 - Typeset scallop
20170 - Rows of Numbers
20162 - Carved Xs
20165 - Crossmarks background 
20150 - String of tassels
20152 - Fancy Mermaid
20100 - Some viewers 

Other supplies: 
Distress Oxide inks in 
Fossilized Amber
Picked Raspberry
Carved Pumpkin
Broken China
UmWow Studio stencil "Dahlia"
Ranger Archival Ink "Jet Black"
StaZon ink "Dove Gray"
Memento "Tuxedo Black"
Posca Paintpens in white and pink
Copic Markers

Thank you so much for looking today ! 


Tuesday, January 22, 2019

Your Compass by Cheetarah

Hi VLVS! lovers, it's Cheetarah here and I'm thrilled to be back as a guest designer this term. I hope the new year has started off well for you.

Today I would like to share an art journal page. It's inspired by this wonderful quote from Cat Kerr which is a stamp in the awesome VLVS! quotes range. It says "let fear be your compass, if it scares you, move forward." I think it's a bad-ass bold statement and definitely aligns with my new year's intention not to back away from new things even though they might scare me at first.


I have a washi tape that suits this theme also perfectly which says "you are here" and the dancing lady on top of it is moving towards unknown scary territories. The background has yummy mixed media stamps which is embossed gold over a black background. When you move the page in the light though, you get some interesting effects.


You can see an array of color (possibilities) when you shift the page into the light, which is made with the use of interference paints. While I was making this page I had the camera on so you can see the process of it in the video below.


Hope this inspired you to take out your VLVS! stamps and do a bit of art journaling.
Have an awesome day.

xo Cheetarah _____
VLVS! Supplies:
Numbers set SKU19659 Miracle Tape 1/8th inch Other Supplies: Deco art media black gesso
gold dye ink pad
Honey Pearl Embossing powder


Monday, January 21, 2019

Love for Ink Mail Art Monday


Hello fellow crafters!

MAIL ART MONDAY


STAMPS USED:


Here's my mail art project:


I made this happy mail for a friend in Germany, I chose these particular ink stamps because I love writing letters to my friends with fountain pens, just like in the old times. I stamped the images onto coffee dyed paper, cut them into a circular shape and sewn them. I also used brown distress ink, the bubble wrap texture stamp for the background and some authentic vintage ephemera to add more texture and eye candy. 


I love the texture and tri-dimensional look! I hope to provide some inspiration for you today and new ideas to use your viva las vegastamps!


Thank you so much for visiting!

Karen Tremblay


Thursday, January 17, 2019

Living on the Fringe...

Hello Again! 

Today I'm going to share some super fun inspiration for the
Viva Las VegaStamps Monthly Challenge


Top secret 
Fringe Scientist
Circulatory system
Coffee ring stain
Double coffee ring

Other products used:
Archival ink- jet black
Distress ink-gathered twigs, ground espresso
Versafine ink- vintage sepia
Tim Holtz-index clips and mini paper clips
Tim Holtz- remnant runs
Mica Tiles
A2 sized file card

Starting with my file card base, I stamped my main image "circulatory system" in versafine ink.


I used some ink smushing to distress my card with distress ink. I also edged the card using a blending tool.

On a separate piece of cardstock I stamped the top secret,  and fringe scientist. I used distress ink to grunge them up.


To add extra depth,  I stamped my evidence stamp lightly  as well as my 2 coffee ring stamps (See stamp list above).


Lastly, I added used various remnant runs, clips, and my sheet of mica to finish the card off.

Thank you for visiting!
Hope you are all warm and safe.


Wednesday, January 16, 2019

They were...

How is 2019 treating you so far???  GOOD I hope!!!  Now how about a little Viva Las VegaStamps! Inspiration!?!!???

Michele here today with a pair of tags.

These kraft tags started off with gelli printed background using Dina Wakley paints.


After the paint dried the animal heads were stamped in archival ink and the scribble border was stamped and colored with Posca Paint pens.  The the heads were masked so the background could be stamped.


 The animal heads were colored with Prisma Colored pencils.

A little outline stamping and doodling,,,


I used the same stamp for the sentiment on both tags...a little washi and a letter or two can be blocked off.


Some left over bits of one of my favorite May Arts ribbons to finish off the tags  AND there you go!

Until next time...get inky!


Monday, January 14, 2019

December WINNERS!

Hello folks : we were celebrating UGLY SWEATERS & all things Christmas this time last month, so check out our winners from December's Challenge.

Voted winner is :


She's used Bicycle Man


& the random winner is : Dar.

Ladies, please email me @ deedee430@gmail.com with your shipping address & we'll get you a grab bag in the mail asap!

Friday, January 11, 2019

Art Journal with Wire Butterfly by Jenn Engle

Hey everyone! I have a super fun project to share with you today using a classic, the Large Gossimar Butterfly.


Stamps Used:


I made the journal by just glueing random pages onto a piece of brown paper bag using PVA glue.
To make the cover, I started with one large piece that would fit all across the front, spine and back.


I collaged all kinds of vintage papers, masking tape, brown paper bag, and book text to my piece. Once that was dry, I used a palette knife to scrap gesso all across the piece. This helps to bring things together and tone things down a bit.


Once that was dry, I stamped the Large Gossamer Butterfly using distress ink. Then I used water on a paintbrush to move color around outside of the butterfly. To get a darker brown, I added some Sepia Fluid Acrylic by Golden.


Once I was happy with the way my bitterfly looked, I used some really thin jewelry wire to construct a butterfly. I really just tried to follow the curves of the stamp and then add extra loops.


I used my paper trimmer and just cut out the center of my butterfly. Then, I glued all the pieces to my book, keeping one wing on the front, one wing on the back and the body on the spine. Then, I glued my wire on using Glossy Accents.


My last step was to wrap some leather cord around my journal. For now, it's just for looks but once I started using my book the leather will keep it together.

Stamps Used:

OTHER SUPPLIES USED:
Vintage Ephemera
PVA Glue
Brown Paper Bags
Blick Gesso
Distress Ink
Golden Fluid Acrylic in Sepia
Jewelry Wire
Glossy Accents

Thanks so much for looking!
~Jenn


Thursday, January 10, 2019

Stay Cool | Sue Plumb


Hi everyone, happy new year! 
I am so incredibly excited and blessed to have the opportunity to stay on the Viva Las VegaStamps design team for another year and share my love of VLVS rubber stamps with you!

To kick off the new year, I have a 12x12" mixed media scrapbook layout to share with you that features a photo of one of my twin boys that was taken only a couple of weeks ago. I created this page to document how in a very short time he has gone from being terrified of swimming to loving being in the pool.

Here is my layout...


To create my page, I began with a sheet of white Bazzill cardstock and some Ranger Distress Oxides in Mermaid Lagoon; Cracked Pistachio; Twisted Citron; and Faded Jeans. I used the "packaging technique" to apply the inks - swiping the ink onto some plastic packaging, then adding a spritz of water before "smooshing" it down onto the cardstock. 


I started with the Mermaid Lagoon colour and then dried it off before repeating the process with the Cracked Pistachio and Twisted Citron. I love the layered watercolour style effect that it creates - perfect for my water themed page!


Next, I used the Faded Jeans Distress Oxide to add some splatters over the top. To do this, I swiped some ink onto my craft mat, then added water before soaking it up with my paint brush and splattering it over the top.


Then it was time to add some stamping! The first stamp I used was the Bubbles (Large Black), using Ranger Archival Ink in Paradise Teal. I added the bubbles in a vertical line down my page then added an extra group of bubbles where the left edge of my photo would sit. (This gave me the "visual triangle" I was looking for.)


Once I had the bubbles stamped out, I chose the Humpback Whale stamp for a bit of fun and to tie in with the water theme of my layout. I stamped the whale twice with the same teal ink, positioning it so that it was "swimming" through the focal area of the page and helping to draw the viewers eye in.


I also stamped the It's a whale of a tale... sentiment several times around the page, switching to black Staz On ink for that one.

With the majority of my background work done, it was time to switch to adding some papery layers and texture. I created a layered mat for my photo using an assortment of tissue paper, paper doilies, paint sample card, a tag, glitter cardstock, frayed gauze and coloured wire. I also added a few pieces of torn washi tape around the page.


Once the layers were in place I added some scrap cardboard to the back of my photo before mounting it on top. I also added a handmade heart embellishment from Charms Creations, and a flair button from Cocoa Vanilla Studio.


Then it was time to finish my page off. I added my handwritten journalling using a felt pen, then stamped the Let Fear Be quote underneath it using black ink. 


I also used my favourite Doodle Dots stamp to add further depth to the background. (How could you not love how this stamp looks?) 

The finishing touch was a few blue and green sequins from Cocoa Vanilla Studio scattered around the page.


Here's a closer look at some of the finished details...


(I am so in love with that background, and glad that I finally treated myself to some Distress Oxides for Christmas!)


You can see where I used my Tim Holtz tiny attacher to fix the wire to my page. I love the extra texture the metal staples add.


That's all from me today, I hope I have inspired you to get your stamps out and create something too. Until next time, get inky! X


Stamps used: 

Other materials:
- Bazzill cardstock
- Ranger Distress Oxides
- Ranger Archival Ink
- Tsukineko StazOn Ink
- Cocoa Vanilla Studio flair button and sequins
- Charms Creations handmade heart
- Assorted collage materials (as detailed in post above)
- Felt pens
- Staples