Saturday, March 31, 2012

New TAPE!!!

Have you guys seen the new tape that VLVS! is carrying.. EXCLUSIVELY?!

it's pretty amazing stuff.. they have four kinds..


and...

I have the pleasure of owning ALL FOUR tapes -- and get to show you today a project I made with the Strap tape!!!


I also used a selection of VLVS! Rubber stamps from the POSTAL section of rubber including the:


and the:

among others... I also used Memento Tuxedo black ink for my stamps and Miracle tape to secure my Echo Park paper down. 

It's a great little piece to give someone going away or to someone who travels a lot! Be on the lookout for more examples of this fab tape from the DT (and I'll be back with more, too!) -DeeDee

Thursday, March 29, 2012

Easy Masking Technique to Create a Painting using Viva Las Vegastamps!

Wow it's the end of March already!!! Susan here with my last post for my term on the Viva Las Vegastamps! Design Team and I have pulled a rabbit out of my hat for my last project!

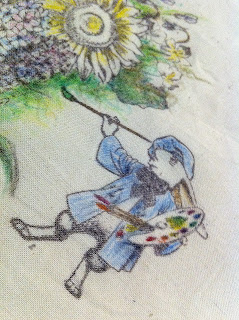
Did you know you can paint with stamps??? You can build up beautiful scenery with many individual stamps. I know it sounds daunting but it's pretty easy and I'm going to show you how! I recently received the new Easter Plate #1372 of stamps and there is this adorable Bunny Artist #18115 in a painter's smock and I knew exactly what I wanted to create...a painting using stamped images.

I recently treated myself a set of Derwent Inktense Pencils that I have been pining for since I saw a project made using these pencils by Lisa Fulmer. Now I can finally paint on fabric and get a watercolor effect -AND- it's permanent.

I needed to go through my stash of VLVS stamps to grab some of my floral stamps.


I am building up a large floral scape by masking with paper masks and multiple stamping using Bouquet #9680Hyacinth and Leaves #10301, and Sunflowers #9918 - and the Bunny Artiste will be painting them.

For this project I am stamping onto a cotton muslin. I first begin by stamping my florals multiple times on plain paper and trimming them out to make individual masks. I would have used post-it notes, but I didn't have any within reach. Start by stamping an image, then place mask over and then stamp again, slightly overlapping. I repeated stamping florals multiple times to build up a large floral scape. This required several masks {one mask for each stamped image in layering process} so the additional prep time of fussy cutting is well worth the reward of a beautiful piece in the end.


Please see accompanying image number to go along with written instruction/description.

Photo #1: Bunny Artiste stamped on muslin in brown Staz-On ink off to the right side of my fabric. Photo #2. Next I stamped one Hyancinth, placed a mask over and stamped another to the left. Then placed a mask over the second Hyacinth also. Photo #3: I repeated by adding Sunflower image stamped three times; applying a handcut mask after each stamping. Photo #4: Detail stamped images covered by my paper masks. Photo #5: After completing Sunflowers and masking, I stamped the Bouquet three times slightly angling around the other flowers. I started in the center, then reinked and rotated to stamp left and right sides. Photo #6: Remove the masks to see the full layered image as one scene. Now the completed image is complete and ready for coloring.


 Now I begin painting my scene with the Inktense pencils
and build up layers of color.


Then to get a softer, watercolor look, I used a waterbrush to blend out some of the color. This really brightened and intensifed the colors. I continued building up and blending the color with the water brush until I reached a point I was happy with. For a finishing touch - I added some white gel pen to add back in some highlight areas. Some of these were lost from bleed out when blending out the colors. Not a problem. The really nice thing about these Inktense pencils - after the first time you wet the colors, when dry - they are permanent. If you re-wet - they do not blend out any further. These will be fun to play with more on other projects.

HERE IS THE FINISHED MASTERPIECE!


I showed this to my pals at my local monthly Altered Book Club meeting and they thought I had painted this from scratch. They were shocked to hear that it was all stamped images. So this project is a definitely a winner! Off to create some more : )


I hope you have enjoyed my projects as much as I have enjoyed creating for the Viva Las Vegastamps! Design Team over the past six months...it's amazing how fast the time has flown by. Beginning in just two days there is a brand new design team starting and I am just as excited as you are to see what the new team will create. I won't be far away. You can keep up with me by visiting my blog, sbartist : painting in the dark HERE. 

One day left to enter the VLVS Theme Challenge for March! We are doing this just a little different this month. Trying something new. CLICK HERE for info on submissions. inLinkz your "BIRTHDAY" wishes for Terri Sproul creations using Viva Las Vegastamps! for a chance to win a $25 gift certificate at the VLVS online store. Don't forget to check out the Viva Las Vegastamps! store.

Stick around a while and see what our talented Design Team has been up to...thanks so much for visiting.

Have a crafty day! Sb

Promotions Page Update!

Just added a quick link to the Mary Vogel Lozinak presale boards in the promotions tab found HERE -- check often to find out the newest deals @ Viva Las Vegastamps!

Tuesday, March 27, 2012

A sad farewell.. but a bright beginning!


You've probably noticed a setting trend on the VLVS! Blog the last couple of weeks -- it is with a heavy heart that most of the team is retiring and new kids are here to show you their goods. So it's a sad farewell... AND a bright beginning :) 

It's also quite the bright beginning for me as I've just (last week) Started as an EMPLOYEE of VLVS! -- I'll be working behind the scenes setting up the fabulous stamps that you all purchase :) I'll also be dabbling in pressing the rubber! 

Its' quite fun and I can't wait to show you how things work behind the magical curtain :) 

But here is my last post as a Design Team member.. I will forever be a VLVS! stamp addict -- I enjoy the plethora of images as well as the amazing quality of rubber. Today I've brought you a piece that I have not shown on the VLVS! blog..  a "Brave the storm" style tag --


Using my absolute favorite stamp by VLVS! 


2 1/4 x 3

(don't forget you can get just cushioned or unmounted rubber, too!)

I stamped my trusty umbrella man on white cardstock with Memento Ink. 

The back of the tag is embossed with a TH die and distressed with distress stain. The clouds are hand drawn, and the raindrops and puddle are made with 3D Crystal Lacquer .. after the lacquer was dry I dabbed it with alcohol ink. 

So Brave the storm new kids comin' in! This is a wonderful company to work for, both DT wise and as an employee supplying you with your wildest stampy dreams! Also.. Brave the storm outgoing folks.. the ride was amazing and now we can relax and think fondly of our VLVS! DT days. Take on new adventures! Try new things! BRANCH OUT! I will miss you all!  ♥♥♥
-DeeDee

Sunday, March 25, 2012

Everything, everything.

Hello again! For today’s post, which is also my last post (for now), I wanted to use this great “Running Lady” stamp that reminds me of Marilyn Monroe. I stamped her on white cardstock, and then colored her with Copic markers. After that, I went over her with a Versamark pen, and then covered her with Viva Las Vegastamps! own Ultra High Gloss Embossing powder. I didn’t cover the shadow, only the lady. Then I used a couple of colors of Distress Ink to color the cardstock as you see in the picture.

I hope you have enjoyed all of my projects. You can see them all at anytime by clicking here. Take care and please be sure to come back to the Viva Las Vegastamps! blog where new projects will be posted every Monday, Wednesday & Friday. There's an all new design team starting in April and it will nice to see what new ideas they come up with! Good luck everyone.

Saturday, March 24, 2012

Meet our New Design Team

As amazing as our last design team was, I think this team will make us proud too.  Can't wait to introduce each of them to you and hope you check out their blogs and congratulate each of them.

Most of you know me:  I'm Terri Sproul the lucky one to lead this bunch of designer.  Each of the name is a link to their blog.  Please stop by and become a follower of their and see all the amazing stuff they create..


Friday, March 23, 2012

Art Journaling with Viva Las Vegastamps!

Hello everyone!
Aimee here, with my last post for VLVS!
I've had a GREAT time with the design team, and Wayne, and Terri.
I'll be re-applying in another 6 months for sure!!

So, this time I thought I'd do an art journal page.
I love to art journal. I've got two going right now, and just got a 3rd in the mail.
They are all different sizes, so I use the one whose size fits my mood.

 So... would you like to art journal with me?
Yes?
Yippee!!

On with the show:
SUPPLIES:
Journal or book to work in (mine is a Moleskin watercolor book)
Gesso
Spray mist (I used Memories Mist from Stewart Superior in Copper)
Pan Pastels (Turquoise, Green and Red)
Sharpie marker
Paper scraps
Black ink (I used memories ink)
Gems
Stencils
Crystal Laquer 
Extreme Glitter paint (Blue)
Tim Holtz Filmstrip Ribbon
Xyron "X"
Scissors
Heat gun
Paint brush
Spray sealer (I use Krylon Workable Fixative)
Paper towel
Markers/colored pencils/or crayons
Stickers


 Paint a thin coat of gesso on your journal page.
 Rub some turquoise Pan Pastel on the page.
 Add some Green pastel.
Blend and add till you like it. Then spray with Fixative.
Dry with heat gun.
 Lay a stencil on your page, and paint with gesso.
Lift stencil, and blot with paper towel.
Dry with heat gun.
 Add a second stencil and use Red pastel.
 Cool, isn't it!
 Place stencil on page again and use a little gesso. 
You'll end up with a light pink.
Remove stencil, dry with heat gun.
Spray lightly with fixative. Dry with heat gun.
 Paint some Extreme Glitter on the left side.
Dry with heat gun.
 Lay down a third stencil, and spray with Memories Mist.
Dry with heat gun.
 Seriously, are ya loving it??
 Add a little Sharpie doodling!
 Stamp Caped lady on page and on a scrap piece of paper.
Paint a little gesso along the bottom. Dry with heat gun.
Stamp words.
Add some color to the Caped lady on the page- legs, neck, hat.
Color the arms on the lady on the scrap paper. Cut out the body section.
Run body through Xyron and add to page over stamped image.

 Add scrap papers.
Put some Crystal lacquer in a cup. Add some Terri Sproul mixer
Paint this onto the body of the Caped Lady.
Spread some around her, and around the words.

Run a piece of Filmstrip Ribbon through the Xyron and add to page.
Place stickers on the filmstrip.
Add gems using Crystal Lacquer.

Here's your wiener!
My Sammy enjoying our first spring outing. 
We're very fortunate to live near a wonderful park.
He LOVES the swing.

Thursday, March 22, 2012

Ten New Plates O' Rubber - Order NOW and save 20%

http://www.vlvstamps.com/pre-order.html is the link for 10 New Plates O' Rubber you can order now and they should be in stock in 10 days... save 20% by pre-ordering... lots of new Steampunk and fun people for your stamping enjoyment.

Tuesday, March 20, 2012

VIva Las Vegastamps! and Stretching Your Stamp Dollars!

There are at least six ways to make your stamp dollars go further at Viva Las Vegastamps! First, if you like unmounted stamps, purchase acrylic blocks and buy unmounted rubber.   
Couldn't do a post without a birthday card or two for Terri!!

Second, you could buy a Pound o' Rubber!  YES, a whole POUND!  It is a grab bag and you don’t know what you are going to get.  For the price you sure get a BANG FOR YOUR BUCK.  You have to be willing to gamble a little... I have gotten 4 grab bags and have only had 3 duplicate stamps.  I am addicted to grab bags!!!  If you want to start out small there several sizes of grab bags to choose from!  
Third, watch for pre-orders on the Viva Las Vegastamps! online store.  There is usually something that you can pre-order and get a substantial savings.  Sign up for the news letter to get the latest news! 
The fourth, is what I am going to share with you today.  That is using the same image with different sayings!  Find an image that is versatile, like the Easy Dog Rider, then look for sayings that will work with that image. If you are on a budget when you start your stamp collection and you aren’t a gambler  this may be the way to go! 
All stamps in the samples are from Viva Las Vegastamps! All images were stamped with Stewart Superior Memories Black Ink and heat embossed with VLVS! Ultra High Gloss Embossing Powder... a little color was added to the images with COPICS.  All papers are scraps from my stash!
Stamps:
The fifth, is to check out the Plates o’ Rubber... worth the price for the number of stamps.  These are two of my favorites that I purchased last month! 
 This is one of the latest Steampunk plates (#1378)!!!

The sixth way to make your stamp dollars go further 
is join the monthly challenge... 
there is still time this month.  
This month the theme is "BIRTHDAY" 
GO HERE to learn more!!!  

I almost forgot to mention FREE RUBBER!
Just post our Blinkie on your Blog or Website and get a FREE Grab Bag of Unmounted Rubber... details on our blog at http://vivalas.blogspot.com

If you have a chance stop by and check out my blog.
THANKS LYNEEN