Showing posts with label DeeDee. Show all posts

Friday, October 16, 2015

Witch Postcard {Monthly Inspiration} by DeeDee

Whoop! DeeDee here today to inspire you for our monthly challenge. Have you seen the beautiful entries already linked up??? Hopefully I can inspire you to link up yourself!


I was drawn not only to the color combo, but also the sort of whispyness of the tree branches and the big bold circles in the background. So I got out some of my favorite supplies and set to work on this beauty:


I created big bold circles with some distress ink and a stencil. I mimicked the tree branches with some background stamping and used all my elements to create the same color combo. There's a bit of stitching, layering, fussy cutting, inking, chipboard use, splattering, misting, and more. I invite you to visit my blog for more details. 


For those of you who have signed up for our Fall Harvest themed Postcard swap you may be interested to know that this will be my postcard! Do you like to swap? Join our facebook group to keep an eye out for our next swap. And don't forget to stop by and enter to win some rubber, too!


Monday, May 04, 2015

Challenge Inspiration - Her Wings by DeeDee Catron

Hi folks! :) DeeDee (Marketing and Artistic Director for VLVS!) here today to inspire you for our brand new challenge

The challenge mood board is :


I loved the color scheme, the boldness and the patterns. I also adore butterflies but moved away from the actual image and more towards a sentiment that was imagery heavy. 

I was having a hard time in the beginning trying to use so much red, BUT, it only gave me the opportunity to show you just how "loose" your inspiration can be. So without many more words, here is the piece I worked up: 


The base is an old piece of music note ephemera. I prepped it with two coats of clear gesso. This not only sealed the paper, but also made a sturdier primed base for me to work on top of.


Then I dove right in with some mark making using found objects (in this case, a recycled bangle) and some Golden fluid acrylic. A bit of water and working around in the background gave me this washed look.


Then there's a bit of dripping and dropping and some journaling with a fine liner.


After I had the background complete I got to work on the middle of the circle with some beautiful Golden Fluid Acrylics in Magenta and Orange. Using my fingers, the two colors and a tiny bit of water I worked up the bright bold red I was looking for. I finished everything off with the most important piece... the winged sentiment. I stamped Her Wings Were Made Of in archival ink by Ranger on watercolor paper. I trimmed it apart and glued it down with Matte Medium. Then I was done! :) 

Now stop on over to the Mood Board post and link up to win!

Thursday, November 27, 2014

VLVS! & Die-Namites Dies Blog Hop Day 4

Welcome to day FOUR of the Christmas Blog Hop between Viva Las VegaStamps! and Die-Namites Dies.


All week long our Design Team is hopping with the Die-Namites Dies Design Team to bring you tons of Christmas inspiration just in time for the holiday! Be sure to visit each day and leave comments on all the posts involved, because there ARE Prizes to be won! Two big prizes full valued at $50 full of DIES and STAMPS!

Today I bring you a card in traditional red and white :


If you follow our blog you'll know that I recently posted my attempt at a CAS styled card... well here's another! Christmas cards should surely be under way and I'm still trying to figure mine out... maybe this is it!! I used the Cardinals and Holly from Die-namites and the brand new Musical Background from Plate 1451. The paper is from Glitz and Canson, and the ribbon is May Arts.

Please stop by the Die-namites blog to see what they're up to! Don't forget to leave comments to be entered to win.

Monday, October 27, 2014

TCW and VLVS! {A blog hop}

Hello friends! Welcome to the blog this week where we're having a big ol' delicious blog hop/product swap with those fantastically talented people at The Crafter's Workshop.


Visit through the week to be inspired and see tons of projects featuring The Crafter's Workshop stencils and Viva Las VegaStamps! rubber stamps. Be sure to comment along the way and be entered to win prizes at the end :) 

Today we have DeeDee up with a tag:


Stop by her blog for all the details and visit The Crafter's Workshop blog to see what those talented artists are up to. We'll see you back here tomorrow for more projects by our Design Team.

Monday, October 20, 2014

A Simple Wish

Hi everyone :)

DeeDee here today! I'm always very fond of "CAS" cards (Clean and Simple) because they SEEM like they should be quick to put together, and quick to get the point across, and perfect for little notes here n there. That being said, I can never do them. EVER. 

However, that doesn't mean I don't attempt them. So, here is my stab at a CAS card for a local friend who was doing some healing : 


The base of the card is Nature Walk from 7 Dots Studio with a layer of punched watercolor paper on top. There's a bit of gray watercolor paint in the next layer (Which I think puts me over the CAS limit already! hah.) 


Then I've taken the Blowing Dandelion with Extra Seed and stamped only the seed across the card in two colors; Versafine Black and Versafine Smoky Gray from our friends @ ImagineCRAFTS. The sentiment was hand written on coordinating watercolor paper and adhered down.

Are you any good at CAS cards? I feel about midway successful with this one. I'll be giving them a go again soon :)

Monday, September 29, 2014

Stamps on ATCs

Hey stampers, DeeDee here :)

Recently I've been joining in on a few ATC swaps. It helps me hone some of my skills to work on a small space. Today I've got two ATCs to share. 
 

The first is a Harvest Moon ATC. I started by coloring some watercolor paper with Clearsnap Smooch Spritz. After it had dried completely I spritzed a StencilGirl stencil with the same spritz an dstamped in the top left corner. My harvest moon is the Full Moon 2 3/4 x 1 3/4 in archival black ink. I finished off the ATC with chipboard bats, some ribbon, and a hand drawn border.


The second ATC was button themed. The base for this card is watercolor paper as well. It has been distressed with Distress Ink and water. I stamped the Weathered Tree in Archival ink black and Be True in Versafine smoky gray. The leaf has been covered in gesso and layered with a metal flower, Amazing Crafting Products resin, Clearsnap glitter, May Arts Ribbon and UmWowStudio chipboard buttons.

I'm much happier with the 2nd than the 1st, but was happy to send both out :)

Sunday, August 24, 2014

StencilGirl & VLVS! Day 1

It's time for another amazing Team Up! This time we're pairing Viva Las VegaStamps! pink rubber stamps with StencilGirl stencils.


Starting today and trucking on through Friday we'll have loads of inspiration from blogs all over the net using both products in unison. We have lots of pieces to share and can't wait to hear what you think.

Sneak peek from Glenda Tkalac:


Sneak peek from DeeDee Catron:


Today's hop list:

And what's a big ol' delicious hop without some PRIZES?!??!?! 2 prizes to be won TOTAL -- so join us ALL WEEK LONG and hop to see the fabulous projects. Let each designer know what you think -- then you're entered to win, every comment is another chance to win. Easy peasy right? 


Both prizes consist of $25 in StencilGirl Products and $25 in VLVS! unmounted rubber stamps.

Thursday, July 24, 2014

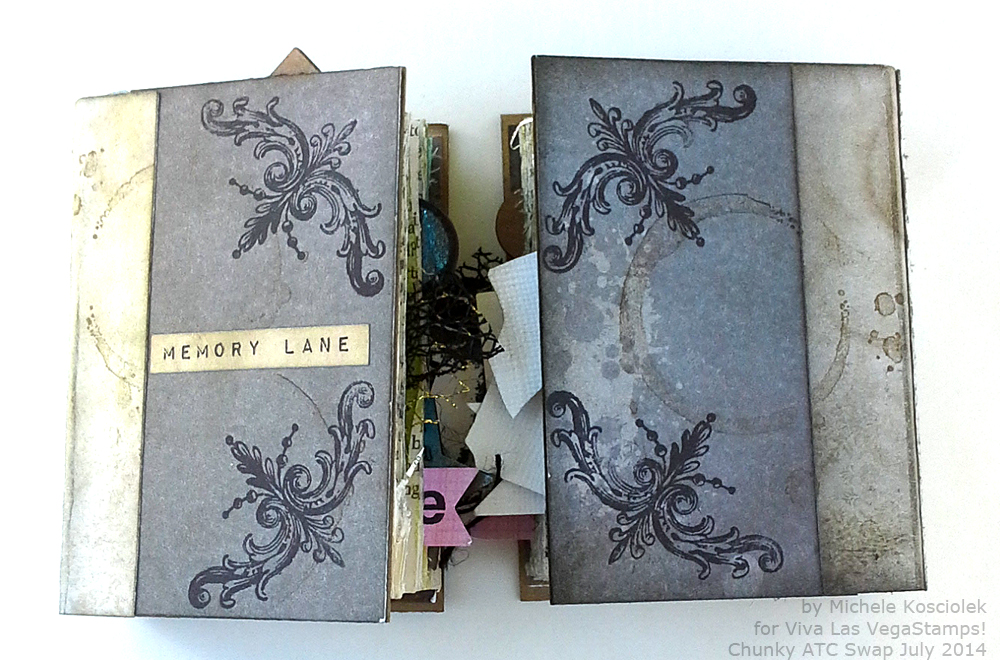
Chunky ATC Swap results

Hi stampers :) DeeDee here today! I shared a sneak peek on our Instagram account a little while ago showing you the Chunky ATCs that were arriving here on my desk. Well today I get to share with you the entire collection! We have some AMAZING ATCs to share, so get to seeing. In alphabetical order we have chunky ATCs from ....


What do you think?!???!?!?!

SO GOOD RIGHT?

:)

Leave these ladies some love, and join us in our facebook group to keep an eye out for our next swap.

Monday, July 14, 2014

Time2Stamp {Chunky ATCs + stamping tip}

Hey folks :) I'm not sure if you're aware but every couple of months the VLVS! fans and myself (DeeDee here!) participate in an art swap of some sort. Right now Chunky ATCs are due to be arriving on my desk all week long. You can join our facebook group where all swap info and signups are posted.

Today I'd like to share with you my own Chunky ATC + a video tip on using old fragile / vintage / delicate papers without being in fear of them tearing, breaking or downright disintegrating. lol.


My little Immortal Seeking doll has Bat Wings in archival black. They've been stamped on an old book page, and to reinforce the image so that my wings aren't so delicate I've prepared them accordingly. Please watch the following Time2Stamp video for that info:


I've also used the new Penny Farthing in archival ink.

And the Clockface on the back as a bold statement about time slipping by and seeking the immortal path. The first two stamps were stamped on different kinds of paper, but the clockface has been stamped directly to wood. So grungy and great.

Other supplies : Amazing Crafting Products, UmWowStudio, Ranger Ink Distress Ink and Paint, Michaels Drawer Pulls, coffee, vintage card catalog card, netting, staples, Dymo Label Maker.

Join me on my own blog for more shots and details on the creation process.

Monday, May 12, 2014

Pan Pastel Feature

Hello stampers!! DeeDee here today to introduce something a little extra fun this week. For the next five days (through Friday) the Viva Las VegaStamps! Design Team will be featuring Pan Pastels in all their stamped goods.


The following was taken from the Pan Pastels website : "PanPastel Colors are professional artists’ quality soft pastel colors packed in a unique pan format (cake-like). The special qualities of PanPastel Colors mean that artists can blend and apply dry color like fluid paint for the first time.


All PanPastel Colors are made using a unique manufacturing process requiring minimal binder and fillers, resulting in rich, ultra soft and super-blendable colors.


Each color is loaded with the finest quality artists’ pigments for the most concentrated colors possible. The colors have excellent lightfastness and are fully erasable. Uniquely, for pastel color, they can be mixed together for a complete painting palette."

So let's get to it shall we? I thought we'd start the week off with a Time2Stamp video showing you how to make this :


So watch this video all about creating this tag, including a fun technique in the beginning to create this pan pastels background:


Supplies: 
Pan Pastels, Black cardstock, Canson watercolor paper, May Arts Canvas Ribbon, Versamark by IMAGINE Crafts, Archival by Ranger, Distress ink by Ranger, E Brad, Tim Holtz Spinners, thread, fixative.


Keep coming back through the week to see all the great bits we have using Pan Pastels with our Viva Las VegaStamps! Rubber!

Tuesday, April 29, 2014

Vintage Art Journal Spread

Hi Stampers! DeeDee here again, today. This time sharing a project of my own, using a splattering of old and new stamps!

Did you see this post on Saturday talking about the new Art Journaling classes we're doing? Well I've been wanting to really fill up my new journal with all types of pages.. and so today I have a double spread to share, that really is just sort of all my favorite techniques and styles. 


The page base is a sheet of Nature Walk from 7 Dots Studio, with layers of stamping and gesso, coffee, distress ink and more. 


Up in the top right corner I stamped the Cracked Background in Memento gray flannel. I have tons of ink pads in different colors, but it's tough for me to break out of stamping black. I found this gray was a nice subtle alternative, without losing interest in the rubber stamped image. You can also see, in the very corner, where I stamped the Writing Background in archival ink. At this point I did find it to be a bit heavy for the vintage feel of the page, and so I covered it up a bit with gesso, just letting the stamp peek through. 


Below this tag you can see some more stamping in gray, this time the Color Wheel Lines. Notice in the top left corner... that's the brand new Waybill / Invoice background. It's been stamped in Versafine Toffee and whitewashed with a thin layer of gesso. It helps lighten the stamped image allowing it to blend in a bit to the background. Handy when you don't have a lighter colored ink pad.


On the left hand corner is the new Butterfly Specimens stamp in a nice heavy black Archival ink. It helps balance out the spread. 


And one last final photo here.. I snuck in the 23.24.25 tape measure stamp from Plate1430. It's been stamped in that same gray used earlier in the page. 

There's tons of media mixing going on here, including ink types (Archival by Ranger, Memento, Versafine,) mists (Tattered Angels mixed with coffee,) coffee stain (Which I totally picked up from this post by Natasha, SO COOL,) gesso, patterned paper (7 Dots Studio,) Golden Gel Medium, Tim Holtz tissue tape, Prima flowers, My Minds Eye brads, UmWowStudio chipboard, 7 Dots Studio and Sizzix die cuts, and more. 

Wednesday, March 12, 2014

Apocalypse Frame - ATC BASH

Hey folks!! Hope you're enjoying our ATC Bash so far. There is so much diversity on our team, I thought it would be a great way for everyone to showcase their talents and styles in a similar way. It also poses quite the challenge to work on such a small scale. 


So far you've seen Mary's and Glenda's. Today it's DeeDee here and I bring you my own ATC:


My ATC base is an index card covered in drywall tape and metal tape. The two have been layered over each other and stacked up. I used various tools like a pen, clay tools and an embossing stick to create faux rivets, staples and other textures. 


You can see the textures really well in this photo. I then completely covered the metal tape with Distress Paint in Black soot. Using a dry paper towel I buffed the paint off until it was left only in crevices and as a small covering on the raised surfaces. The chipboard film reel you see on top is a sneak peek at a piece coming up from UmWowStudio. It has been covered in Amazing Clear Cast resin from Amazing Creative Products.


My Man in Gas Mask has been stamped on a piece of 7 Dots Studio paper in Archival Ink by Ranger and adhered to the underside of the resin film reel with Heavy Gel Medium. I then put the two pieces together with fixative and adhered a couple of faux screw tops to the corners.

Join us over the next two weeks to see more ATCs and wonderful uses for our rubber stamps.