Showing posts with label Be True. Show all posts

Thursday, April 06, 2017

Art Journal: Be True. Be You. - by Cheetarah


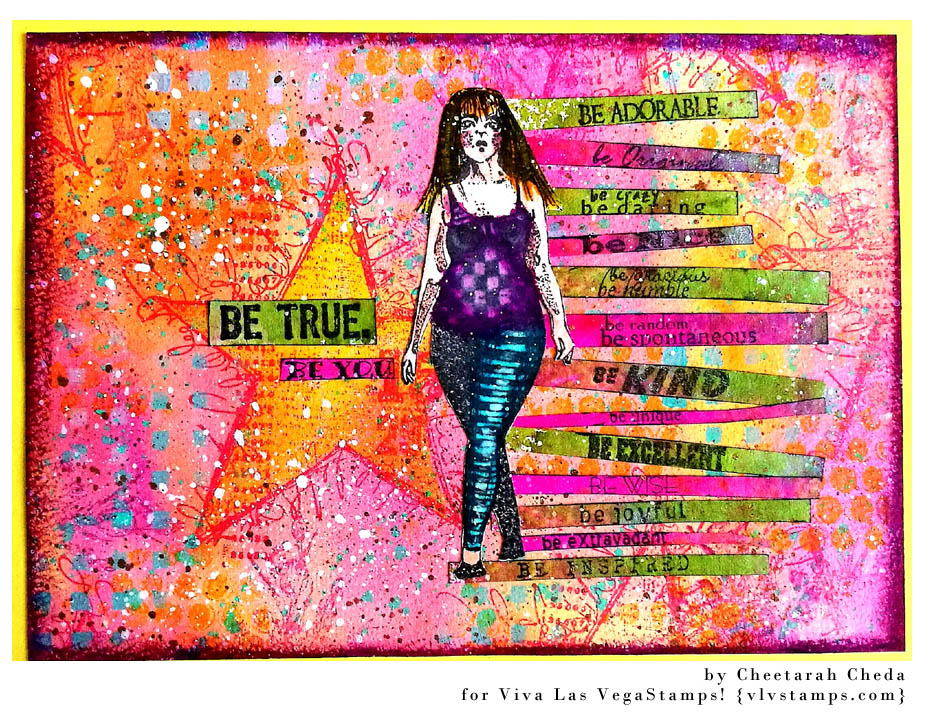
Hi all, it's Cheetarah here and I'm glad to be back with you today to show you an art journal page I made with some lush VLVS! rubber stamps and spring time inspired colors. My main image is this gorgeous Whimsical Lady designed by Mary Vogel Lozinak and the Be Adorable text stamp. A full list of stamps is at the bottom of the post. 


I first started off with coloring a piece of 6x4 inch water color paper with Ecoline in orange and Magenta. Then took a squared stencil and dabbed some mixed Golden Phthalo green with Paper Artsy Hint of Mint paints through it with a make -up sponge. Then stamped squiggly star collage on the left with Staz-On cherry pink and colored that in with ZIG Wink of Stella golden yellow so it stands out with a sparkle! I also randomly stamped the star stamp on various places as well as some other mixed media stamps. 


The sentiment was stamped with Memento tuxedo black on a separate piece of paper which was covered in Dylusions sprays in magenta green and turquoise. I then cut the sentiment out in strips and chose the above layout for them. The lady was also stamped on watercolor paper and colored with tombows and blended with a water brush. I wanted the phrases to have a "tumbling down" effect and that she walked over the last phrase. 


I also stamped "Be True." sentiment on the watercolor paper and adhered that to the left side over the star. On the "Be adorable" stamp you have the phrase "be young" and I just cut off the "ng" to have it say "Be You" and I love text stamps because they are versatile this way :) Lastly spattered some Liquitex INKS! in bronze and white over the page as well as the phthalo green/mint mixture. I darkened the edges with a purple distress crayon. Matted it on yellow card stock and is ready to be adhered to my art journal. 

No matter what anyone says you are supposed to be, be true to yourself. 

Thank you for stopping by today!

VLVS! used: 

Others:
Stencil from the Crafter's Workshop 
Golden Phthalo Green Blue paint
Paper Artsy Hint of Mint paint
Staz-on inks cherry pink, pumpkin and mustard
Memento tuxedo black 
dylusions sprays 
ecoline 
liquitex inks 
tombow markers 
distress crayons 


Monday, September 29, 2014

Stamps on ATCs

Hey stampers, DeeDee here :)

Recently I've been joining in on a few ATC swaps. It helps me hone some of my skills to work on a small space. Today I've got two ATCs to share. 
 

The first is a Harvest Moon ATC. I started by coloring some watercolor paper with Clearsnap Smooch Spritz. After it had dried completely I spritzed a StencilGirl stencil with the same spritz an dstamped in the top left corner. My harvest moon is the Full Moon 2 3/4 x 1 3/4 in archival black ink. I finished off the ATC with chipboard bats, some ribbon, and a hand drawn border.


The second ATC was button themed. The base for this card is watercolor paper as well. It has been distressed with Distress Ink and water. I stamped the Weathered Tree in Archival ink black and Be True in Versafine smoky gray. The leaf has been covered in gesso and layered with a metal flower, Amazing Crafting Products resin, Clearsnap glitter, May Arts Ribbon and UmWowStudio chipboard buttons.

I'm much happier with the 2nd than the 1st, but was happy to send both out :)

Wednesday, November 06, 2013

Be true

Hi guys.. Karen here with you again, Hope you have had a wonderful week.. Today It's  my turn to share with you my swap tag made using some amazing 7 Dots Studio .

I love all of their paper lines and find it so hard to pick which ones to use.  But for this one I've decided to use the reverse side of Deep Water from the 9th Wave collection.


- the colours in this line are just stunning!


I started off by covering my tag with the Deep Water paper.. I used the top left hand section to cover my tag so that I could get some of the more plain and the grungier sections of the paper on the one tag.
 
My next step was to ink up some VLVS Rubber...
 
 
Coffee Ring Stain 2 3/4 x 2 1/4
 
stamp with Distress Ink, I used both Walnut Stain and Black Soot at once to give it a bit depth. I then did the same with the Chicken Wire
 
Chicken Wire 3 3/4 x 4 1/2
 
 stamp, and randomly stamped both on the tag. I also stamped Be True
 
Be True 3/4 x 1 1/2
 
on a piece of the Deep water paper the same way to use in the ornate frame. The ornate frame has been painted with Antique Linen Distress crackle paint, and inked with a bit of black soot distress ink when dry.
 
The next thing I did was of course to sew around the edges with my trusty sewing machine.. To finish off I added in a fussy cut butterfly coloured with distress markers ,some wire and twine, a metal corner, and number and some gorgeous Star Confetti from UmWow Studio..


So don't forget to drop on by the 7 Dots Studio Blog for a visit!
 
 I'll see you a bit later in the month, Thanks so much for stopping by today..
 
Happy Stamping xxx


Tuesday, July 23, 2013

Be True.

Hi Everyone.. Karen here with you again. Thank you so much for all your kind words and welcome on my first post. I have another tag to share with you again today.. I do most of my creating on tags, I think  like the challenge of working in such a small space.
 
I had an idea floating around in my head.. and this was the end result.


I've used three stamps this time,
 
Winged Pigs/Small 2 1/4 x 2 1/2
 
Italian Sonnet Background 4 1/2 x 3 3/4
 
Be True - Off new plate 949
 
Be True 3/4 x 1 1/2
 
I've stamped the Italian sonnet background all over the tag, then used distress ink around the edges as well as a bit of machine stitching. ( another thing you'll see I love to do!) The different elements in this one stamp make it a perfect background stamp.
 
 
Stamped and coloured the little winged pig, added some Distress Stickles to his wings and a little crown. - he just makes me smile!
 
 
To finish off I've added in a bit more of my idea-ology embellishment stash,  some flowers, a few bits  from my sewing box and used my labeller to add in some strips of random numbers. I've also used a bit of Miracle Tape on the back of my label maker strips, to help hold them down.
 
 
Thank you so much for stopping by and visiting the blog today. Hope to see you all again very soon..
 
Happy Stamping - Karen