Tuesday, August 30, 2022

Their footprints ..... ► Majo


Hello, my friends,

 this time I have to show you a card, I rather don’t have to create, but sometimes it happens, and a furry friend goes over the rainbow bridge.


This time it’s a little dog who spent more than 17 years on my best friend’s side. So sad.

 Anyway, I felt like I had to give her the card, so she knows I think of her.

Some close ups, so you see the beautiful images better.


I used several stamps from our nature line:

 14088

19330

20146

14102

16685

19887

20439

And the sentiment from the second card I made.

20436


Have a good time, and stay safe.

Luv ya ♥


Friday, August 26, 2022

Pale moonlight by Tracy Blackwolf

 Hello  friends!

I am here today with a new art tag for the blog. I love space so I hope you enjoy this tag-


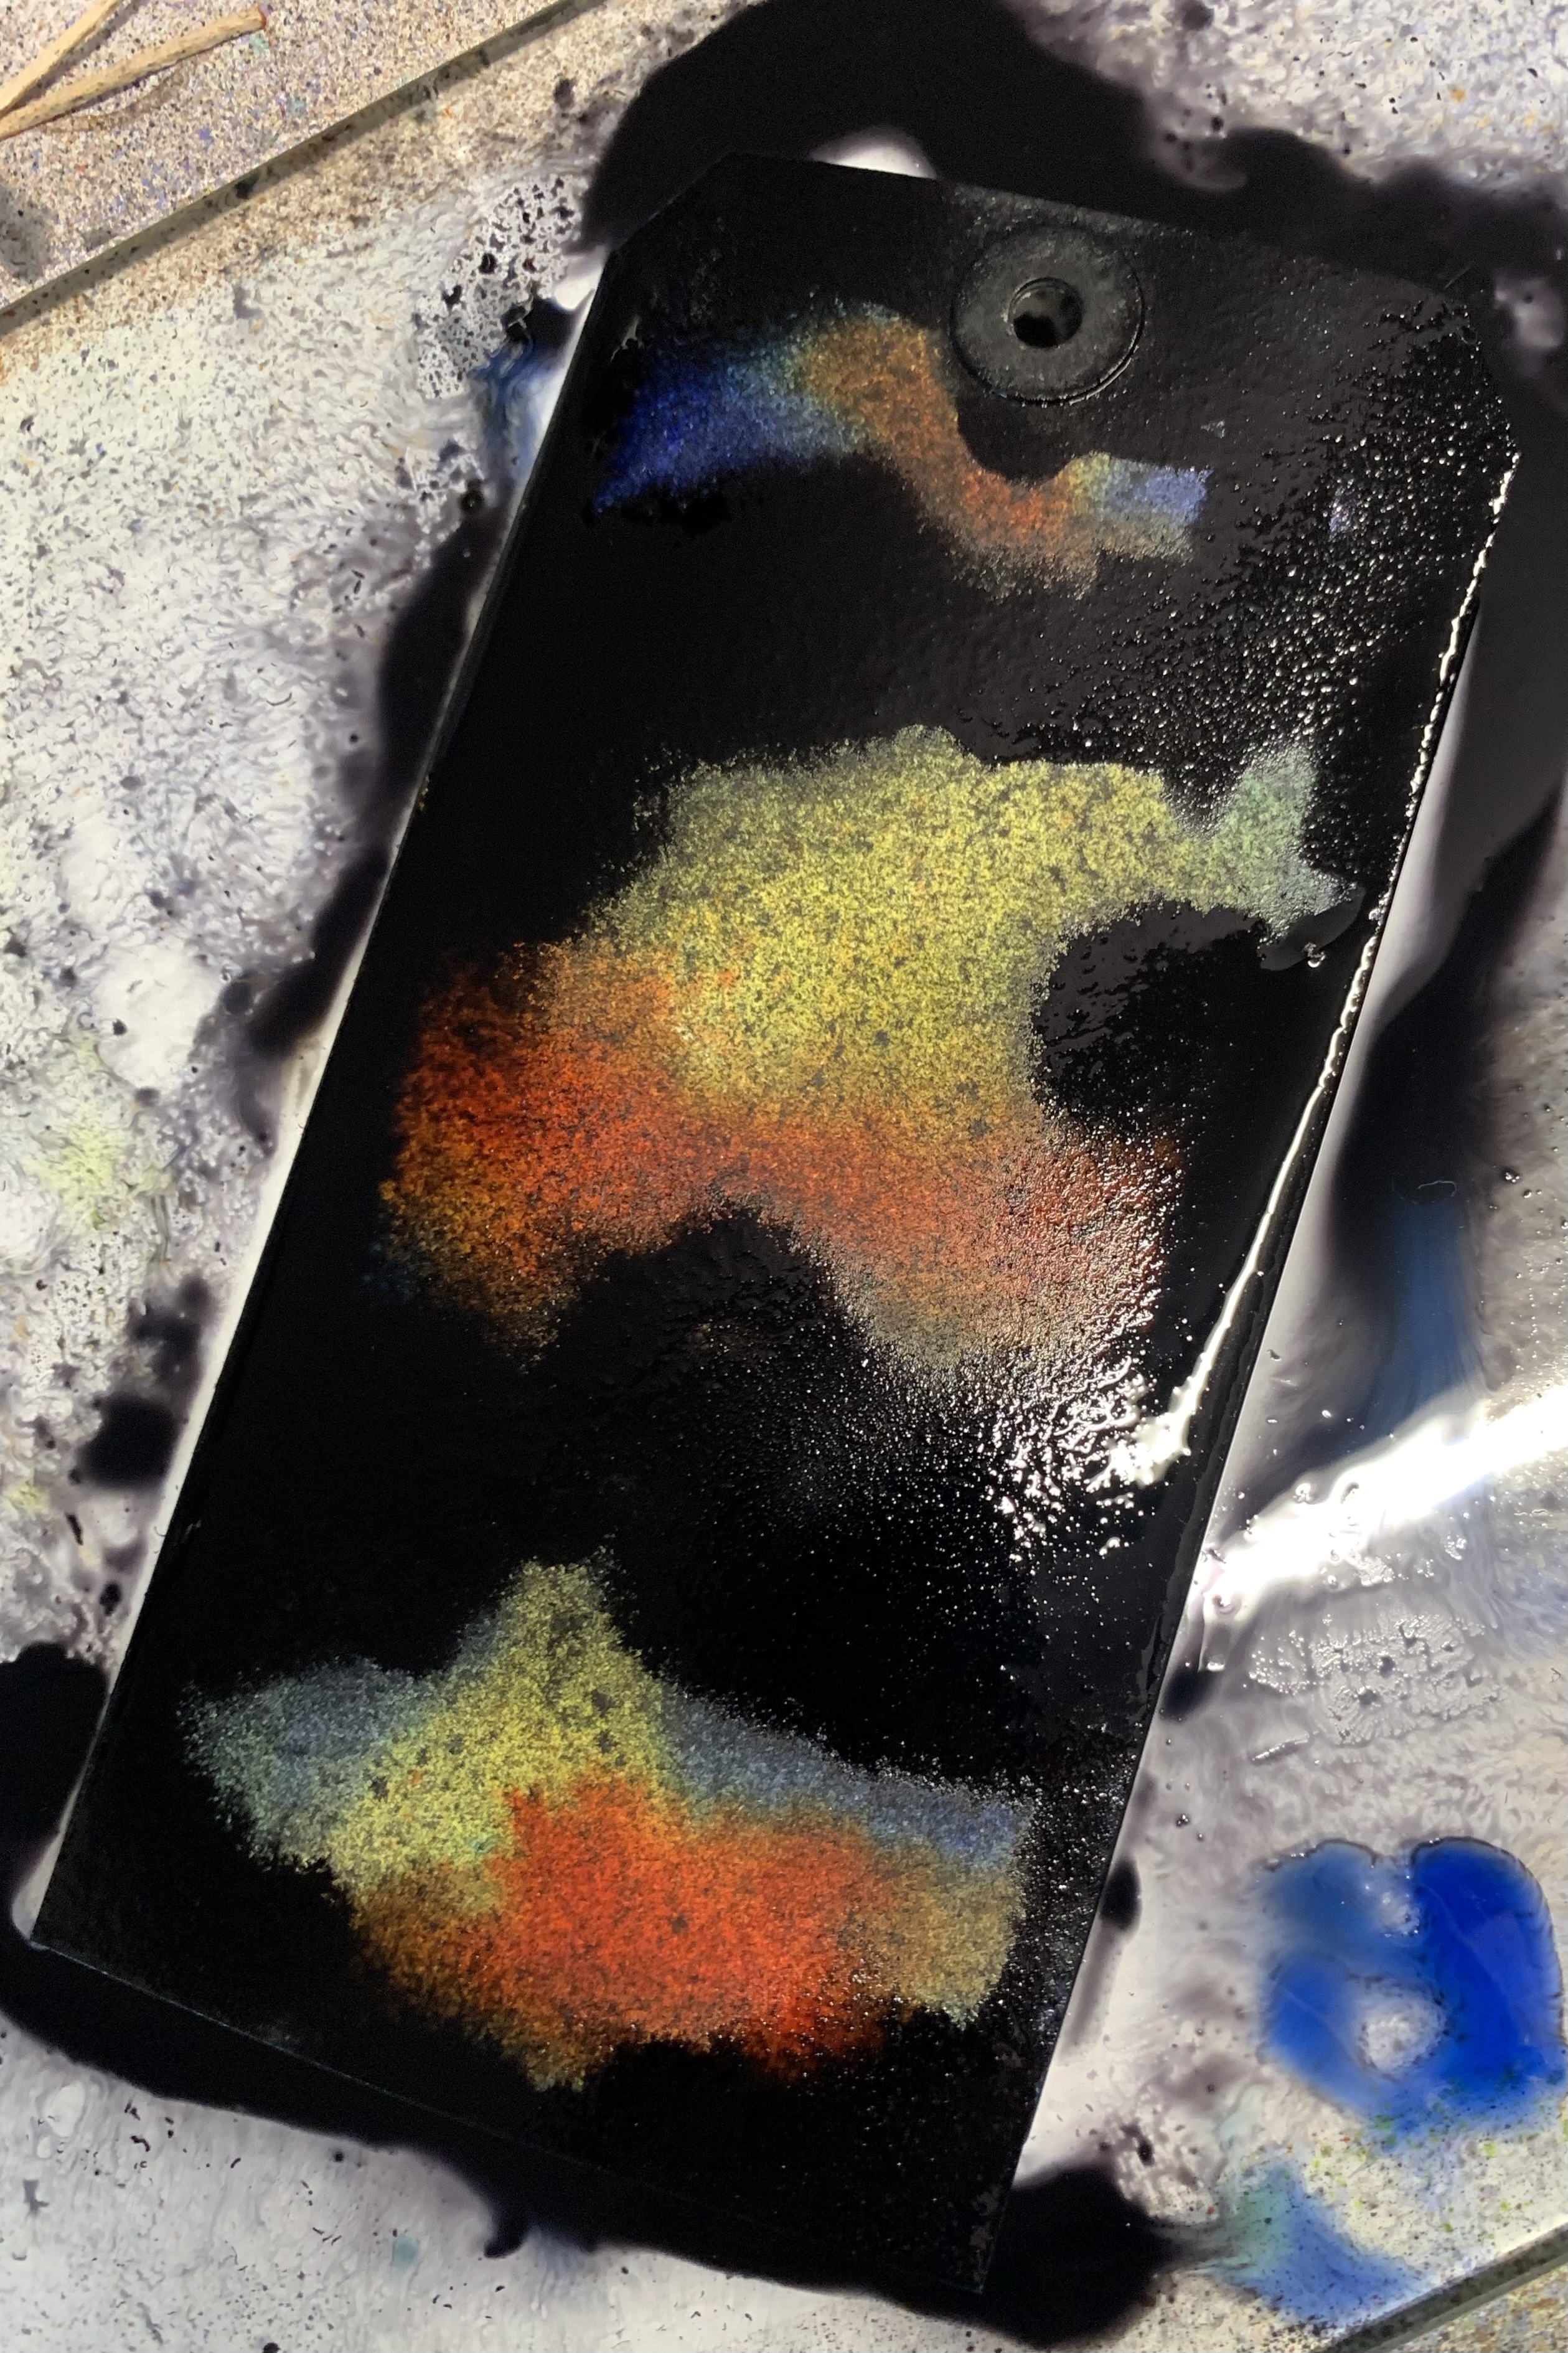
So this kind of tag is fun to do because you don't really know what you'll get until the end when its dry. And if you hate it , keep working it. This is why I use 110 pound paper or higher- I make these really wet and the paper can handle it. So to start, I try to figure out where I'm going to want my "nebulas" or light areas. Then leave them light as you can.

I dry the yellow and blue most of the way at this point. Then I start to add darker colors.

I need some red in there for sure- I like cracklin campfire for this as its a red orange.

You can dry it a bit at this point but not too much, were going to add the black now and you want it to blend while still keeping the light areas.

keep that yellow spray handy and also your water spray bottle. some places may need a bit of water to help blend. Now you can start drying more. spray on some yellow if things are getting too dark. Things will definitely lighten up when dry all the way through. This will be totally wet for a while. When the black is dry you can spray on more light colors if you like, even some pink looks good in there.

When dry, or mostly dry, You can splatter on some white pigment ink from a re inker for the stars. I used a gel pen as well.
You will also want a regular qtip to make the white smoke or gas among the stars and if you want the glow effect on the stars. The key with this is to dip the qtip in the white ink and then dab most it off on a paper towel . You want it pretty dry to get the right effect. Then just dab away. Its a bit fussy but so worth it. Too much in one spot, get a clean qtip and keep dabbing.
I cut out my stamped image and needed the swing ropes to be longer so I stamped the ropes and yes, I cut them out and attached them to the image with glue. I know- crazy. Then I painted her with the sprays using a paint brush. Put some foam tape behind her as I wanted her to stand out.

See how much it lightens when dry! I did add a few spays of colors in here between dryings.
Now for the moon, well I don't have a VLV moon stamp so I used The Christmas ball for my moon. I just needed a bit of it- works great!

Play, play play with this technique. You will get something different every time. If you hate what you have, walk away, let it dry and come back later and spray more light colors~ you'll  end up with something great I bet!
Until next time, Keep stamping!

Stamps Used:

Pale moonlight   19351

Christmas ball    9234

Banksy Swing Girl   19425

Other Supplies:

Distress ink sprays: Salvaged patina, squeezed lemonade, cracklin campfire, black soot, spiced marmalade, mustard seed, twisted citron, picked raspberry, blueprint sketch

While gel pen, silver sparkle gel pen

White pigment reinker

foam tape, qtips

 #8 tags TH


Monday, August 22, 2022

FREAKY LITTLE THING - Fran Chalmers

Hello everyone! Today I have made a little postcard.


To make the background, I smooshed Distress Inks in Hickory Smoke, Black Soot and Spiced Marmalade on my mat with water, drying between layers. I then added a bit more ink with brushes to deepen the colour, and went rounnd the edges with Black Soot.


I used only the word "Freaky" from the sentiment stamp by masking off the rest of the words,  and stamped it randomly on the card in grey


I added background stamps to add some interest


I stamped my main image on thick paper, coloured it with copics and cut it out to add to the card.


I then added the sentiment to finish it off


Stamps Used:

Whimsical Horned Boy 19688

She was a freaky 19684

Writing triangles 19571

Library return dates 20342

Other items:

Distress inks Hickory Smoke, Black Soot, Spiced Marmalade

Versafine Clair Grey Mist and Nocturn

Copic Pens

Memento Tuxedo Black Ink

Hope you like it! See you next time :)


Saturday, August 20, 2022

Fremdkörper (feel out of place) by Arwen

 Hi Lovelies

I'm back on the Blog with a new postcard.


And that's the way, I made it:

1.) Choose this sheet of paper. It's from an old book, which belonged to my grandma.


2.) Before I started, I cut the paper into the right size (postcard size)


3.) I used color sprays. So it looks more older.


4.) Close-up


5.) Time to stamp! :)


6.) At last , I choose some browns to add some silhouette stamps. That's it!


All stamps, I used:

- Banksy Marionette Girl

- Wildflowers Silhouette

- Wildflowers Silhouette

- Wildflower Silhouette

- Long sterm with leaves

- Flowers on stems


other stuff:

- Staz on

- Distress Oxide

- Tombow

- Lindy's Color spray

- Dylusions Color spray

- black cardstock

- SU stampin' pad


See ya soon :)


Sunday, August 14, 2022

She spread her wings ► Majo


AMF - Art Meets Function ….. again!

 Today I show you a canvas I made for the front door. I started by applying ink with different stencil and stamped the butterflies on a piece of tissue and glued it to the panel. 

I applied Decoupage fluid and stamped my sentiment, starting in the middle, going up without reinking.


The little name tag is computer generated. 


I applied acrylic paint on the edges and painted to whole canvas again with decoupage fluid to make it water-resistant.

 Two little wooden charms finished off my project.

 I used the following stamp:

Butterfly Specimens19415 from Plate 1440

Sentiment 19634 from Plate 1459

Have a great summer, and find time to craft!


Luv ya ♥


Friday, August 12, 2022

Winged Victory by Tracy Blackwolf

 Hello Everyone!

Today I have done a mixed media canvas panel. Its a great wat to incorporate stamps into your mixed media works.

So for this project I used the finabair moulds and quick cure resin. I made my frame and a set of wings, Painted them with white gesso and once dry I painted with picket fence crackle paint.
Once that was all dry, I used a stencil and modeling paste to give some texture to the background. Just put some paste on aa pallet knife and "butter" your stencil on top of the panel. clean your tools before moving on. If you are impatient like me, you can carefully use a heat tool to dry it.


At this time I used hot glue to glue my frame onto the panel. I use an exacto knife to make hash marks on the back to give it some tooth since the resin piece is so smooth on the back. Then put my hot glue on. Then add the wings. I then Used three colors of spray stain to spray at random over the whole thing.
Just add until you are happy. Then Dry with heat tool if you want. the colors change a bit when dry for sure.
This is when I start adding moss. Both chunky and powder like green- you can find at the craft store in the miniatures isle. I use any clear dry  glue for this. When you're happy with the moss application, You can do the final step of adding your stamped and colored or painted  image. I used hot glue again as I didn't want it falling off since there is so much texture going on. I put glue on the upper body and just at the bottom and that is it! Finish with a bit of chunky moss at her feet and she's done.

I hope you enjoyed and that you have more ideas for all those stamps! Until next time- Stay arty!

Stamps Used:
Nike Statue   18974

Other Supplies:
Distress spray stains- Vintage photo, Forest moss, Iced Spruce
Distress re inker: Weathered Wood
Glimmer mist spray: Light Rosewood, Antique brown
Moss: Model- bushes, Model green grass
Finabair mould: Baroque Frames, Amun And Bast
TH crackle paint - picket fence


Monday, August 08, 2022

WE COULD BE HEROES - by Fran Chalmers

Hello again everyone!

Today I've made a boy or man card using Banksy stamps!


I made the background by smooshing Distress Inks in Hickory Smoke and Rustic Wilderness, drying between layers.


 I stamped my main image onto the card, then some background stamps around the image in Versafine Clair Morning Mist and Memento Olive Grove..


I also stamped the main image onto thick paper and coloured it in and fussy cut it out.


I used some washy tape and then stuck the main image onto it, grounding the image.


Lastly, I embossed the sentiment on the corner of the card and mounted the whole thing on black card, which I then stuck onto my card blank.


I would use this card for a man or boy and I hope you like it.

Stamps Used:

Banksy Soldiers Painting 20651 

Carved X's 20162

Cross marks background 20165

We could be Heroes 19966

Other Items Used:

Distress inks in Hickory Smoke and Rustic Wilderness

Memento Ink in Olive Grove

Versafine Clair ink in Morning Mist and Nocturn

Polychromos Pencils

Washy Tape

Black Card

See you next time!