Friday, September 27, 2019

Mixed Media Card by Preeti D.

Hi friends :)
Hope you are doing well.
Preeti Datta (Dutt Preety) here from the VLVS! Design Team. 
For today's post, I've created a Mixed Media Card
I've used some gorgeous VLVS! Rubber Stamps here.


First, I cut a panel of 300 gsm watercolour paper to create the card base. To colour it, I used Lindy's Gang Squirts and Sprays in shades of purple and pink. Dried the panel & stamped around it's edges using Versafine Onyx Black Ink and VLVS! Stamps- Overlapping Circles by Corrie Herriman, Row of Scribble Squares and A Drawing Is. Then, deckled and distressed the edges of the panel.

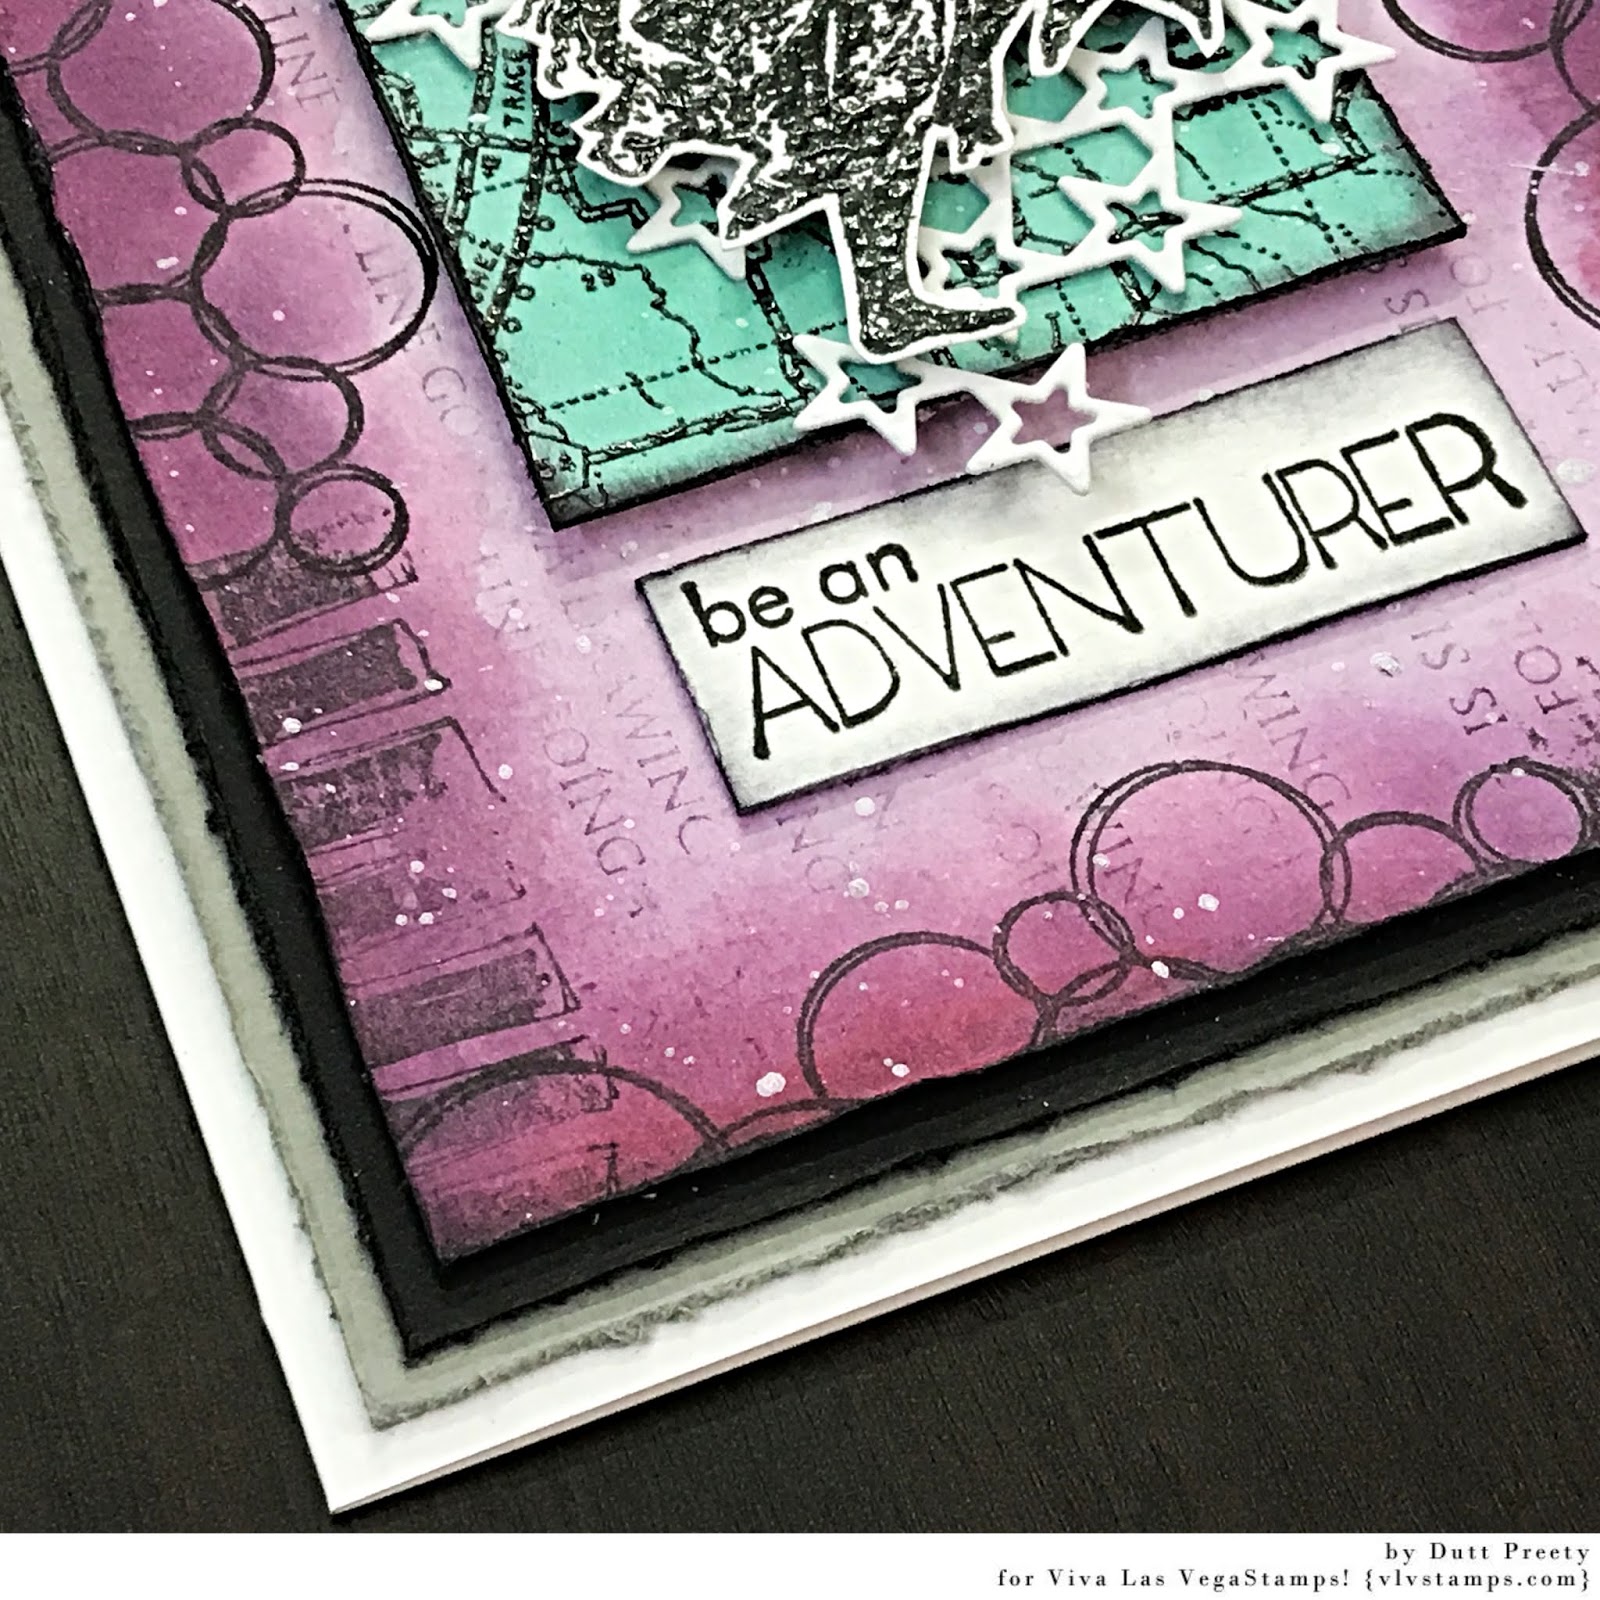
Stamped and heat embossed a few small panels using VLVS! Map Background Stamp in black and then coloured the panels with Lindy's Gang Squirt in teal colour. Then deckled & distressed the edges of these small panels with black ink. 

For the focal element, stamped & heat embossed in black the beautiful VLVS! Dancing Lady Stamp and fussy cut it. 

For the sentiment, stamped the VLVS! Be An Adventurer stamp in black onto a watercolour paper panel and distressed it's edges in black

Next, die cut a starry design die using white cardstock and cut paper mats for the card. In the end, gathered all the elements, created a visually pleasing composition and adhered everything using a strong glue. Used 3D foam tape under some of the layers to create dimension. Created white ink splatter to integrate all the elements. Finally, adhered all the layers to a 5 by 7 inch white card base.

VLVS! Supplies:


Other Supplies:

Lindy's Gang- Squirts (Polite People Purple & Loonie Toonie Teal), Autumn Maple Crimson Shimmer Spray & Black Forest Black Embossing Powder
Tsukinenko- Versa Mark Watermark Ink Pad & Versafine Onyx Black Ink Pad 
Fantasy Dies
Tim Holtz Distress Inks 

Thanks a lot for your precious time :)
Stay Blessed!
Preeti

Thursday, September 26, 2019

A Ray of fucking Sunshine ► Majo

Good morning, Peeps!

Majo here today to show you an ATC with my newest favorite stamp, the lid lady. I have wanted this image for such a long time, and always forgot to place it on my order.

Well, let me tell you how I made this.


 I stamped the main image with Ranger Archival black ink and applied masking fluid.

I inked the ray background stamp with Distress ink in three differet colours: Fossilized Amber, Cracked Pistacchio and Barn Door.

I added the constitution stamp for more texture and stamped my sentiment on scrap paper which I adhered with pop dots to my card.

The lady was coloured with Koh-I-Noor Moneluz pencils after I rubbed off the masking fluid.

Some close ups ....


I have used the following stamps:

Lid Lady - 997
 

 Remember, the challenge at our Facebook group is underway for a few more days!


Have a great time and Happy Crafting ♥

Wednesday, September 25, 2019

Scribble That Shit Out - Art Journal Page | Sue Plumb


Hi everyone!
Sue Plumb here to share my latest design team project with you. Today I have an art journal page that I created to showcase one of the brand new stamps from the new release plate #1517, which features some fabulous arty scribble-style faces. I wanted my page to represent the creative thought process, and how therapeutic art can be.

To create my page, I started with some loose white cardstock that I had cut down to an A5 size, with the intention of punching it and putting into my art journal binder once it was complete.


I began by applying Mustard Seed Distress Oxide using a foam blending tool to the cardstock. I then took an Aboriginal inspired stencil from StencilGirl that featured a rippling wave style pattern, and applied Carved Pumpkin Distress Oxide using a sponge dauber through the stencil over the top.


For the focal image on my page, I first stamped out the Large Lightbulb using black StazOn ink onto another piece of cardstock. I then used a water brush and the Mustard Seed and Carved Pumpkin Distress Oxides to colour the light bulb image before cutting it out. 

I then repeated the process with the Tina Walker Scribble Girl with Curlers and Earrings stamp; using Barn Door; Spun Sugar; and Mowed Lawn Oxides to colour it in before cutting it out.


In keeping with the style of my chosen feature lady, I used the Scribble Circle stamp and stamped it directly onto my page background. I then took the light bulb I had already prepared and positioned it in the circle so that it was surrounded by what appeared it to be energy flowing from it.


Next, I stamped the Scribble That Shit Out phrase stamp (also from new plate #1517) along the bottom edge of my journal page. I then took my scribble lady and added some cardboard to the back of her before sticking it down slightly overlapping the light bulb in the background. (This represented her "ideas".)


I was so happy with how this page came out and I am crushing on those new scribble ladies from Tina - I expect I will be using them again very soon!
Thanks for stopping by so I could share this with you, I hope I have inspired you to get inky too.


Stamps used:

Other materials:
- Cardstock
- Ranger Distress Oxides
- Tsukineko StazOn ink
- StencilGirl Aboriginal Stencil

Thursday, September 19, 2019

You Are Beautiful - Mini Inspiration Book

Hello everyone....
I am back with a project that I love.. 
Mainly because it actually worked out how I saw it in my head..
So Here is a Run through of the finished piece. 
If you want to watch me make the whole book, from start to finish be sure to check out the 
YouTube Link at the end of the photos.... 
And since I used a BUTT-TONNE of stamps after each photo I will link the stamps for that page....
But full list of background stamps at the end... 

Banksy Marionette Girl (sku: 19971)

You are beautiful (sku: 19832)

Leaves Blowing from a Tree (sku: 19177)

There is a universe (sku: 20034)

 Banksy Swing Girl (sku: 19425)

Alis Volat Propriis (sku: 20033)
Banksy Girl Floating with Balloons (sku: 19421)


 Let Fear be (sku: 20029)
Banksy Marionette Girl (sku: 19971)

I’m afraid to move (sku: 20032)

Banksy Girl Fishing in Paper Boat (sku: 19939)

You are beautiful (sku: 19832)

Dancing Lady (sku: 19183)


Handmade with Art (sku: 19831)

Background Stamps.....

Plate 1471 (sku: plate1471)

Row of Chevrons (sku: 19829)

Doodle Circle (sku: 19823)

Writing Chevron (sku: 19824)

Doodle Dots (sku: 19827)

Squiggly Star Collage (sku: 19822)

Waybill/invoice Background (sku: 19416)

Other materials used:
Stazon: Jet Black ink pad
Memento: London Fog ink pad
Ranger Distress Ink pad: Weathered Wood; Dusty Concord; Wild Honey; Tattered Rose; Vintage                                                 Photo
7 Dots Studio: Dreamscapes 9mm
Resined Dress Pattern; Book text; Calico 
Liquitex Matte Super Heavy Gel Medium 
Dina Wakley Soft Gel Medium 
Atelier Gesso Primer 
FW Acrylic Ink Rowney Blue.


Don't forget to check out the Process Video


Live with Respect,
Leanne xo

Wednesday, September 18, 2019

Whimsical Wednesday

Hello Again Crafty Friends!

Today I want to share a fun little art journal page using Viva Las VegaStamps.
(this would also be perfect on an envelope)


Stamps Used:
Whimsical Leaf
Whimsical Tree Lady

I started by stamping the leaf and masking them off between each stamping.  Once all of my wanted leaves were stamped, I stamped the whimsical tree lady.


I removed the masks and used various alcohol markers to color my images. 


With everything colored, I re-masked off the leaves, then I used Distress oxide ink in mustard see to ink the background. 
(I just lightly inked around the lady rather than masking her off)


Next, I used one of the Tim Holtz layering stencils, and Picked Raspberry distress oxide ink to add background depth. 


I used a black ink pen to start adding that art journal feel.


To finish everything off, I used white distress stray stain and a white gel pen. 


I hope you all love this mini art journal page... 
Now to add a little journaling or a quote stamps... 
Tough decisions!


Tuesday, September 17, 2019

Follow your heart

Hello everyone,

Today's VivaLasVegaStamps! project is a card. I used my favourite colours too !


and here's how I made it:


I used Distress Oxides and the 'smooshing' method.. 


This is the result. I love those bright colours ! 


Next I added white acrylic paint through this Um Wow Studio stencil called 'Chunky Heart Stencil' and went around the hearts inside the stencil with a white paint pen. 


I also rolled over some more white paint with a brayer. Next I randomly stamped the background using the same Distress Oxides and some black Versafine Clair ink. 


I chose this bunny for my focal point, he is going to carry the heart. I stamped it in pink but later changed it to black. 


I coloured the bunny with Copics and added more shading with coloured pencils, cut him out and cut his arm loose. I then tucked the heart underneath. 


I then assembled everything together. I also added some pink splatters and a doodle line along the edges of the card panel. Lastly I adhered the panel onto a white card base measuring 5"x7". 


I have used the following stamps:

Other materials:
Distress Oxide inks - Carved Pumpkin, Picked Raspberry and Mustard Seed
Um Wow Studio stencil 'Chunky Heart Stencil'
White acrylic paint
Posca paint pens in white and pink
Copic Markers
Coloured pencils by Caran d'Ache
Versafine Clair Nocturne, Memento Tuxedo Black
A piece of washitape

Thank you so much for stopping by today ! 


Monday, September 16, 2019

Canvas Panel "Dreamer of Dreams" by Jenn Engle

Hey everyone! Today I have a canvas panel to share with you. I used one of my all-time fave stamps Dancing Lady.

 STAMPS USED:


If you want to see exactly how I made this, you can watch the process video at the bottom of this post.


 STAMPS USED:

Other Products Used:
Lindy's Stamp Gang Sprays
Lindy's Stamp Gang Magicals
Finnabair Moulds
Polymer Clay
Golden Glass Bead Gel
Copic Markers
Tim Holtz Chipboard Phrases
Seed Beads
Sequins
Clear Droplets

Thanks for Looking!
~jenn