Saturday, December 30, 2017

Delight in the Little Things by Cheetarah


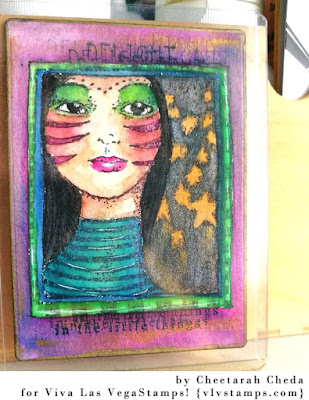
Hi all, it's Cheetarah here with my last post as part of the DT this term. It has truly been a blast! I've got a little ATC to share made with wonderful stamps from VLVS! and watercolors. I have used this gorgeous Whimsical Star Girl in frame by Mary Vogel Lozinak as focal point. She is the perfect size for an ATC. 


I started out by stamping her onto watercolor paper using Memento Tuxedo Black and colored her in with watercolors. I used different brands but started off the basic set colors from Sennelier which you can see on the right. I found that using watercolors to color a block stamp like this (where there is a lot of detail in the stamp) you can really make the image pop!

Here is a side by side of the stamped image and the water colored image next to it. What a transformation, right? A few tips to this technique: Make sure you work on thick (preferably a cotton blend) water color paper; Stamp your image lightly, let it dry completely before applying color and use a small #1 of #0 round brush for the details. Just let the water and color do it's magic!

I die cut the ATC with my nesting die and added some gold accents to it with a marker. Then stamped "Delight in the Little Things" on the top and bottom of the image. 


I have put it in a protective sleeve and it's on a shelf above my desk as an inspiration card to remind me to delight in the little things as they matter most. 

Stamps used: 

As I said at the beginning, it's my last post for the DT this term, as next year I am doing a new studies so don't have much time for many other things, sadly. Designing for VLVS! this year past has absolutely been amazing, was honored to be a part of it! Hope you liked the projects I shared with you as much as I enjoyed making them. 

With this I am wishing you all a wonderful 2018 with delightful cherished little moments filled with joy and happiness. 

Best wishes!

Friday, December 29, 2017

Whimsical Watercolor Tags- Video by Susanne


Hi my dear Viva Las VegaStamps! Friends!

I have two whimiscal watercolor tags for you today which are created with Brushos, the Leaf Lady and the Letter Man stamps.


I have a video tutorial for you today! Enjoy!


Here are some close-ups:


Thank you for stopping by today!
xx Susanne


Supplies:
Viva Las VegaStamps!
Wire Rings
Stars
Butterfly Specimens
Others:
Brushos: Turquoise, Ost. Blue, Orange, Vermillion
Liquid Watercolor: Purple, Black
Sizzix Embossing Folder
Crealies Banners

Friday, December 22, 2017

Merry Christmas

Hello everyone,

Today I have a quick Christmas card to share. I filmed to process so you can see how I made this. It is very simple but not simple enough for me to stamp the sentiment straight ! LOL... Hope you can forgive me !

I have used the following stamps :


Here is the link for the tutorial:


Thanks for stopping by today ! 


Tuesday, December 19, 2017

Jingle Bells


How about a little challenge inspiration??
Michele here today with a card inspired by the December Inspiration Challenge.

Image may contain: tree, plant and outdoor

This one really spoke to me and I can up with might just be one of my favorite stamped scenes this year.


Viva Las VegaStamps! used:  Covered Bridge, Christams Tree in a Car, Jingle Bells

These two images were really made for each other!

The snow was created with opaque Mister Misty.

I just love how the white space creates the perfect snow.


Thanks for spending some time with us today and I hope you are inspired to join our challenge this month.
Merry Christmas to all!!
Until next time...get inky!

Monday, December 18, 2017

Christmas Mail Art by Fiona

MERRY CHRISTMAS TO YOU ALL!! 

Today I'm sharing a little gift box I have decorated ready to send to a special someone using the awesome Viva Las Vegastamps!

I have created a short process video for you on how I made it.


I love to personalize my gifts for my loved ones.


I up-cycled this little box by adding some hand made paper using the Viva Las Vegastamps!


Here is the video for you to watch. Enjoy!


I would like to wish you all a very merry Christmas and i'll see you all again in the new Year xxx


Thursday, December 14, 2017

Mail Art with Shanna


Hi everyone. Shanna here. I hope you all are staying safe and cool or warm. I am here today with my newest VLVS creation.


I altered an envelope with gesso and then painted it white. Then I sprayed it with some bloom spray. I then stamped the the Skinny Fir Tree with black ink. 

Next I rubbed the whole envelope with an embossing pouch that makes it not sticky. Stamped December 25 with versa mark ink. Then heat set the embossing powder to melt down.

I did the same thing with the Wire Rings. 

So check out some close ups and thank you for stopping by. 


Stamps Used:

Other Items Used:
Envelope
Prim Bloom Spray
Versamark Ink
Embossing Powder
Black Ink


Wednesday, December 13, 2017

Mini Art Journal Cover by Jenn Engle

Hey everyone! Lately, I have been making a whole bunch of mini art journals. It can get a little tedious but my favorite part is decorating the covers. For this cover, I used a few of my favorite mark making stamps.

STAMPS USED:


Single Star


The cover for my journal is just a sheet of cardstock that had a very light gelli print on it. There was barely any color on the page, so the first thing I did was apply quite a few colors of acrylic paint with a brayer. I just added layer after layer until I was happy. I applied my paint without drying in between layers. If you do that, you have to be careful of your paint choices so you don't mix the wrong colors and end up with mud. I mainly used magenta, yellow, and light blue. All those colors mix well together, so I wasn't worried. 

Next, I added a number stencil with blue acrylic paint. Then, I started my stamping. I used a dark green and grey ink for my Single Star, a pink ink for my Cross Marks Background, and black ink with my Carved Xs .

I wanted to push back some of that stamping, so I brayered some more paint onto my page. I made sure I kept my layers very thin and sheer so you can still see the stamping.  
My last step was to add my main stamp, Art is Anything Andy Warhol. Also, I added some black splatters.  


My cover has a flower button and rainbow ribbon for a closure. It is stitched to a piece of canvas for the spine.  

And that is it for my journal cover! If you have an questions at all, please let me know in the comments and I'll get back to you as soon as I can. 


STAMPS USED:


Other Products Used:
Acrylic Paint
Brayer
Archival Ink
Number Stencil
India Ink
Mini Art Journal


Thanks for looking,
Jenn 

Tuesday, December 12, 2017

Embossing Resist with Brushos - Tag by Susanne

Hi there!

I have a tag for you today with an embossing resist technique and Brushos! It's happening very often, that people asking me what I do with my tags? Well, I use them sometimes as a simple bookmark, I glue them into my art journal I use them as a tag topper or even to decorate my shelf.


For this tag I started by stamping the "Scribble Circle" with VersaMark ink and embossed it with gold metallic powder. After that I used Brushos (Sea Green and Purple) together with water and created the background. The inside of the Circles is colored with Yellow and Alizarin Crimson. The embossed images build a nice border, so the colors will not blend into each other, if you are a little careful.
To add a bit more texture and interest to the background, I used the "Spirit Animal" stamp together with a matching ink. I stamped it randomly onto the background. I used the "Rows of Numbers" and stamped it into the circles.
The tag is adhered to a slightly bigger one from Kraft cardstock. I finished it up by adding the "Deathhead Moth", a Tim Holtz sticker and a tiny arrow.

Thank you for stopping by today!
Have a wonderful Christmas time, xx Susanne.


Supplies:
Viva Las VegaStamps!:
Spirit Animal
Deathhead Moth
Scribble Circle
Rows of Numbers
Others:
ColourCraft Brushos
WOW! Metallic Gold Powder
Archival Ink
VersaMark Ink


Monday, December 11, 2017

Mail Art Monday - In the pale Moonlight by Cheetarah


Hi every one it's Cheetarah here to inspire you with this winter wonderland themed envelope for this week's Mail Art Monday! It started to snow a lot this weekend and it inspired me to create the above envelope for you. Let me show you how I made it. 

I've taken an envelope and masked the address part off with a post it tape. Then applied these colors of distress Oxides over it and finished with a mist of water and some splats of black soot. 

Then took Picket Fence distress stain and spattered on the envelope with a small brush to create some snowflakes. 

Then stamped fir trees with Memento Paris dusk and also with London fog above the first row of trees to create some depth. 


Then on the bottom I stamped the city silhouette with memento tuxedo black and darkened it with a Higgins black marker to get a stark silhouette on the foreground. Added some gold accents to the windows and reflection in the black aria's. 

Some more stamping in the top aria and took the masking tape away to accentuate the blocked off part for the address. 

I wanted to use this woodland critter by Lesley Woods as my focal point so I colored with copics, promarkers and added shimmer with wink of stella. Then fussy cut and adhered it to the envie. 

Lastly accentuated with a white gel pen and doodled a border around it and some more golden accents in the city silhouette. 

Stamps used: 
  
Thanks for stopping by and have a great day!


Friday, December 08, 2017

Sneak Peek at My Christmas Cards

Hey Groupies!!
Michele here today with more holiday crafting! 
Today I am sharing my 2017 Christmas card design with you.  I am so excited about this stamped scene...oh these Viva Las VegaStamps! images make me SO happy!

So here is the card...then I will share the process with you.
 

Just a couple of images but  OHHHH do they pack a punch!
STAMPS USED:  Christmas Tree in a Car, Christmas Trees Large, Christmas Wishes.

I started by stamping my focal point in archival ink.


I stamped and cut a mask.


Then stamped the next image.


Then stamped and cut another mask.


The I inked around both images with Distress Oxide inks.


Then peeled off the masks...


I finished up with some water spritzing and splattering of Distress Stain (Picket Fence).  The images are colored with Prisma Colored pencils.

The white space creates the PERFECT snow!


I have been thinking about adding some sparkle with my Wink of Stella pen, what do you think?


I am so happy with the color combination and how the images POP. 
Now I better get busy because I have another 24 to make!  I limited myself to 25 of this design...how many cards do you make for the holidays???

Until next time...get inky!!