Showing posts with label love. Show all posts

Friday, February 07, 2025

Love by Cathy N

 Good morning, Cathy here with a love card for you.


                                                                      Stamps Used:

                                                               12304 Love

                                                                3936 Valentine candies

Today's card is very simple to do. I randomly stamped Valentine candies all over the background. I then colored them in with copic markers.


Next, I stamped Love saying in black ink and I heat embossed it. I layered it on black and added it to the front. 


Friday, September 04, 2015

Wild Thing.

Hello, Mary here, and today I have a little something wild to share with you.

My 19th anniversary is this month and I've been trying to find some inspiration for the card I wanted to make for my husband.  A few days ago, he mentioned---out of the blue---how much he loved animal crackers.  BINGO!!

I have a stamp set for that...


I began by grabbing my Animal Crackers stamp set and stamped a few of the critters onto my card base with Memento Tuxedo Black ink.  A little bit of shadowing added with some Copic markers and I was ready to add texture with stitching.


There seemed to be too much white space, so I grabbed my Heart Outline stamp and did some generation stamping to create a sort of bokeh effect.  A little splattered glue sprinkled with glitter adds some serious bling!!

I finished it off with a typed 'WILD THING, i think I LOVE YOU' sentiment and a few punched out hearts and clear sequins to really pump up the sparkle.  It's the perfect mix of us!  He likes the crackers...I like glitter...HA!!

 And because I was sooo diggin' these stamps, I decided to stamp out a few more.  I left these plain, so I could personalize them when the time comes---like 'CONGRATS on your new wild thing' for a new baby??  Yup!


And that's it for me!  Now, go grab your favorite VLVS rubber and get crafty!!

xx Mary

Tuesday, February 10, 2015

Love is in the air!

With Valentine's Day coming up I thought it only appropriate to make some ATC's showcasing love, because I'm sweet like that, and who doesn't love love??

This first ATC I used a lot of texture and layers like molding paste, acrylic embellishments, paper, stickers, mist and Goosebumps.  I also used the man and woman symbol stamp and the hearts stamp.
 and here is a close up of the yummy textures and layers:
 This next ATC I used the birds on a wire stamp and the couple kissing stamp, along with a rub on, patterned paper and some acrylic embellishments.
and last but not least, a romantic ATC featuring the young couple kissing stamp along with patterned paper, clear printed tape and some stickers:
Happy Valentine's Day everyone and I hope you enjoyed my projects.

Saturday, April 13, 2013

Don't Forget Baseball Season-Pick Me Ups!

Hey there VLVS friends, 
It's Pinky today sharing a fun card project with you. 

You know baseball season is rampant in the Hobbs home and I 
think it's so important to let my boys know that even in mid sports season
win or lose they are completely awesome!

I knew it would give my boy a giggle and a lift for the day. 
See? Not all my snarky stamping is for evil! haha
 I used some very sporty Kraft papers to create this sports themed
card and I just know my little man is going to love that mom made him a card too!
  1. Trim out 9X6 Cardstock.
  2. Use bone folder to fold card in half at 4.5".
  3. Trim out dark blue cardstock base ay 4.5X6".
  4. Trim out patterned paper to 4"X5.5". 
  5. Adhere card front to each other using Miracle Tape. 
  6. Pop out Jillibean Soup Game Day Chili die-cut.
  7. Use Clearsnap Ink to stamp Viva Las VegaStamps My Daily Routine Stamp onto die cut.
  8. Trim out pennant shape.
  9. Adhere to card using pop dots. 
  10. Adhere extra die cuts. 
  11. Add stickers from paper pack. 
Give with a cookie and a smile! Watch your child's face light up.
Until next time, I hope you enjoyed this spirit lifting card!


Products Used:
Jillibean Soup Game Day Chili Collection
Clearsnap Ink
Cardstock

Monday, February 18, 2013

I'm Not Weird.....

Good morning Viva Las VegaStamps friends!!
Pinky here today with a fun project to share!

So, what do a mustache stamp, triangle banner stamp, 
and an "I'm not weird. I'm just gifted" stamp have in common?


 Ok nothing I know.....except that they go really
 well together on this fun little layout! 
When I tell you that Viva Las VegaStamps makes a stamp for every occasion
I really do mean it! Even for my warped little life!

Raising 3 amazing boys can be a laugh a minute and when I saw this mustache
paper from Bella BLVD I just HAD to dig into my VLVS stamp stash
and grab the Mustache stamp, and use it for my layout!

You know stamping is especially fun on 6X6 layouts, they are a great
gateway into stamping on full size layouts. 

I definitely used my handy dandy Miracle Tape- it is amazing! You need to try it. 
To create this layout you just need to:
Trim layout base to 6X6"
Trim out mustache paper to 4.5X5.5"
Trim out extra paper to 5X2.6"
Adhere papers using Miracle Tape
Adhere photo (2.5X3") using same Miracle Tape. 
Stamp VLVS Mini Handlebar Mustache onto paper in brown ink
Trim out mustache using scissors
Stamp VLVS Triangle Banner Stamp using same brown ink
Trim out using scissors
Stamp VLVS I'm Not Weird  using same brown ink onto cream paper
Trim out in shape of banner
Apply stamped images onto layout using foam pop dots
Add title! 
That's it! So adorable and a memory for the books! 

I hope you enjoyed today's post! 

 Supplies Used:
VLVS Triangle Banner Stamp 1X2 Item 19043 Plate 918
VLVS I'm Not Weird 3/4X1 1/4" Item 16338 Plate 1302
VLVS Mini Handlebar Mustache 3/4 X 1 1/4 Item 18806 Plate 1423
Miracle Tape
Patterned Paper
Clearsnap Truffle Ink
Westcott Scissors
American Craft Thickers
Mister Huey's Mister

Monday, February 04, 2013

Don't Be Afraid To Stamp A Scrapbook!

Good morning VLVS friends!

Pinky here today with a fun stamped project....a LAYOUT!
The number one thing I hear from my friends about stamping is 
"Oh I don't make cards so I don't stamp" but I am here to tell you that
it is amazing to stamp on a layout!

I LOVE LOVE LOVE being able to create my own images/die cuts 
and really personalize my scrapbook pages! 
Here I simply used this amazing (and new) "Be Adorable" stamp- I stamped it
in bright cherry red ink onto a textures cardstock, and created my own pennant. 
This is just one of 1000 ways to create you own stamped images for a layout. 
 It really adds something to the layout that I would have a hard time creating
with just an alphabet sticker set or journaling. 
I encourage you to go give it a try today!
Come one all you scrapbookers! Let's play with stamps and get our fingers messy!

Happy Monday my friends, until next time!

American Crafts Ink
Scraptastic Kit Club Feb 2013 Kit

Wednesday, December 05, 2012

Christmas Card & Gift Set

Merry Christmas all you Viva Las VegaStamps fans! 

Pinky here today with a gift and card project using the incredibly crisp and clear VLVS stamps!
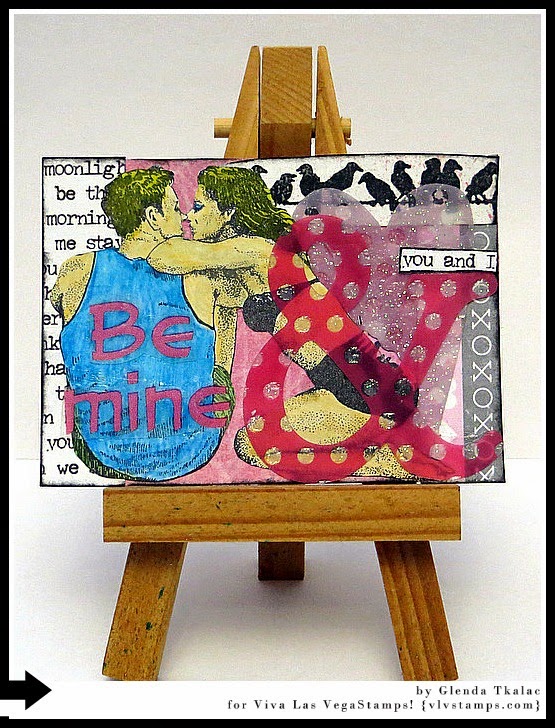
I have been playing with enamel powders and decided to create not only a card 
but also a gift canvas. I cannot get over how incredibly clear the VLVS stamp even
while using embossing/enamel powders. See for yourself how clear it is. 
 For this card I 
1. Stamp the VLVS image onto cream card-stock using embossing ink.
2. Sprinkle gently using embossing enamel. 
3. Heat set using heat gun.
4. Trim out stamped image. 
5. Trim out 7X7 cardstock.
6. Coat card-stock with enamel ink and enamels.
7. Heat set entire page. 
8. Trim paper to proper size- use border punch to create decorative border. 
9. Using Miracle Tape-adhere stamped image to punched cardstock. 
10. Adhere metals to card corners.
11. Adhere card face to card base. 
I followed the same steps for the canvas pictured below except
instead of adhering it to the card base I adhered it to the canvas that
I had used embossing enamels on. Then I added the ribbons. 
When you want a clear stamped image, you know you can trust VLVS! 

Until next time!


Products Used:
Globecraft Piccolo Enamel Powder
Momenta Metals, Patterned Papers
Ribbon, Viva Decor Pearl Pen, Border Punch by Fiskars


Wednesday, February 22, 2012

TH Inspired Tag using VLVS! Swirls

Hey Everybody!! DeeDee here!! Have you seen the 12 tags of 2012 TH is now doing?? 

well I wanted to participate.. but As a design team member for VLVS! it is our duty to promote as much VLVS! as possible, and it's QUITE easy when you love a company as much as I do VLVS! The images that Wayne and CO produce are just ... the best. so I took on TH's tag challenge.. but with a VLVS! twist.. 

First.. Pick a background! 

I chose a combination of three stamps:

Swirl 3/4 x 1 1/4 - $5.00


Then.. grab your tag and stamp them in WHITE ACRYLIC PAINT. I stamped them sort of haphazard all over.. and I wasn't careful about covering the entire stamp in paint either.. it sort of made this.. fun swirly collage with an almost foliage resemblance! 

Give the paint ample time to dry and then ink your tag. I used Spun Sugar Distress Stain.. and sponged some Festive Berries and Brushed Corduroy ink over it. spritz with water.. and wipe the ink off of the painted parts!! Background CHECK!

(here's a closeup of the background)

I then embellished with a 3D heart made from punched hearts that I folded in half and glued sides together. There's a bit of old pattern wrinkled up underneath the heart.. and I used some vintage lace and snug hug for my trim embellishes! 

The Cupid was hand cut, inked and crackled! What do you think?? Aren't the VLVS! Stamps just SUPERB! they do the same thing as tim's giant stamp, but only BETTER!! 


Let me know what you thiiiiiiiiink!! -DeeDee