Showing posts with label Valentine's Day. Show all posts

Thursday, February 06, 2020

Love is a work of (he)art

Hello everyone,
Valentine's day is near and although that's not a typical occasion for me to craft for, I did a small art journal page that I want to show you.


I am working in various journals at the same time so I can always choose between different sizes and substrates. This one here is a small disc bound journal. The panel has the size of a standard card (4 1/4 x 5 1/2"), so if you'd like you could easily turn this design into a mixed media card.


Recently, I did a project where I needed some hearts that I cut with a Bigz die and so I had this piece with negative hearts left. And as I'm trying to waste as less as possible, our challenge team came to my mind.
I cut the paper to size as well as a watercolor paper to create the rear background. I did this by using a text stencil and some modeling paste, just wanted something subtle.


In the next step, I added some Lindy's Gang sprays to both layers: Creme Brulee Cream to the paper with the modeling paste, Cowabunga Copper and Cocklebells Coral to the layer with the hearts.


Also, I inked up the edges of the hearts with black Archival Ink and a finger dauber. This created a nice little contrast.


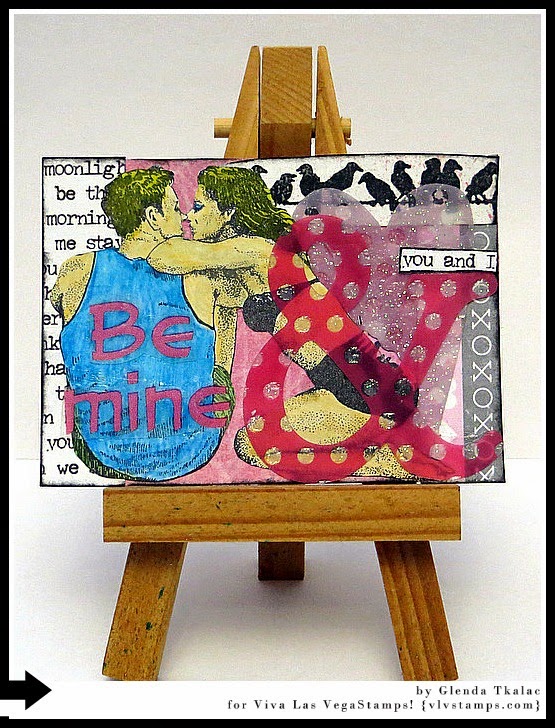
Now the fun part: some stamping! I stamped the "Girl in Princess Costume" with Versafine ink and the sentiment "Love is a work of heart" with red Archival Ink. Also, I added a few "Hearts By Cat Kerr" to my panel.


I colored the little girl with watercolor and did some fussy cutting. Whenever I cut out an image directly and without leaving a little white border, I use a black pen to get rid of the white edges so the image blends in better.


I also cut the sentiment to pieces, inked up the edges in the same color I used for stamping and matted them onto some black card stock so they don't get lost in front of the background.

To complete my page, I adhered the two panels to each other using matte gel. I added the girl (underlaid with some black thread) and the sentiment pieces with foam tape. As a last step, I glued the page into my black journal which gives some extra bite. And here are some more photos of the completed project:


I used the following stamps:
Girl in Princess Costume (19536)
Hearts By Cat Kerr (19978)
Love Is A Work (14691)

Other materials:
- Paper (Sheena cardstock, watercolor paper, black cardstock)
- Stencil "Aria song" from 13@rts
- Modeling paste
- Sizzix Bigz Die Tim Holtz - Heartfelt
- Lindy's Gang Starburst Sprays (Creme Brulee Cream, Cowabunga Copper, Cocklebells Coral)
- Archival Ink (Jet Black, Vermillion)
- Versafine Ink Onyx Black
- Watercolor
- Black thread


See you soon & happy stamping!


Monday, February 03, 2020

Two Valentine's cards in one with Josefine

Hello everyone! This is Josefine and today I wanted to share an idea for quick Valentine's cards (since it is close to the 14th and such).

I started by creating two card bases. In my case these are 7"x3.5" (folded), but any size would have been fine. I then stamped the Squiggly Heart with a light grey ink. For this technique, I used my Misti stamping tool, because I will stamp that heart a couple more times onto the same spot, and the Misti allows me to do that.

Next, I needed a bit color - pink shades, of course - and instead of just applying it, I used my smallest Gel Press and mono printed the paint on top of the grey heart. My goal was to add only small spots, so I didn't press the paper entirely onto the Gel Press but dabbed it onto small areas instead.

Nest, I lined up the card base in my Misti again and stamped the heart in a dark black.

Now I fuzzy cut the inside of the heart.

I'm not using the cut out for this project, but I kept it. You never know.

Then I used the card base with the cut out heart as a stencil. I put another card base (in the same size) underneath the original one and blended some more ink shades on top.

This way, I now had a wonky heart on the second card base and just had to stamp the heart one more time. Again, easily done because I just had to align it on my stamping tool.

And here are the two cards I made. One is a see through card (I'm thinking about adding a picture in the middle here). The other is a one-layer card with a sentiment on top. And both together make two quick and simple Valentine's card - two in one ;)

Stamps used:

Thanks so much for stopping by. I hope you liked my two quick cards and now have a good idea for some quick cards - in case you still need some.


Have a great week.
Josefine

Monday, January 07, 2019

Queen of Hearts Mail Art Monday

Hello Crafty Friends!!

Hope you are having a fabulous
Mail Art Monday!


Stamps Used:
(all 3 main stamps are on this plate <3 )


Today I want to share a little Valentines themed happy mail!


I just love this sassy queen! I started by stamping my beautiful queen and quote in memento ink on my A2 card base and envelope.  I used blick alcohol inks to color my queen. I masked off the queen then used Distress inks in Picked raspberry, worn lipstick, and festive berries.  I used Tim Holtz layering stencils to add extra details in the background. 


On the envelope I stamped my hearts in distress ink, festive berries. Using the same color, I stamped the french writing on the card background. 


To finish everything off, I flicked some perfect pearls mist in heirloom gold. 


I hope you are all inspired to create some fun mail art and Valentines love. <3 


Thursday, February 12, 2015

With Love.

Hello, Mary here, to share a sweetly stamped Valentine I've created for my Sweetie.


For the background, I've just inked it up with Distress Ink and water and then stamped the Medium Doily slightly off the edge to add a bit of interest.


To complete my background, I then stamped the Heart Outline nineteen times---one for each Valentine's Day we've spent together.  A quick dusting of Perfect Pearls adds a touch of sparkle without any glitter to flake off.


I then stamped Young Love and colored them up with my Copic markers.  These cuties look like the Campbell Soup kids from days gone by and SO remind me of my husband in his baby pictures!  A bit of fussy cutting and I glued the image down.


To finish off my card, I've stamped the {With Love} sentiment and stitched on a few vellum hearts to add a bit of dimension.  I love how you can still see the background and hearts through the vellum.

Thanks so much for stopping by today.  Now, go grab your favorite rubber and make something sweet to give this Valentine's Day!!

Tuesday, February 10, 2015

Love is in the air!

With Valentine's Day coming up I thought it only appropriate to make some ATC's showcasing love, because I'm sweet like that, and who doesn't love love??

This first ATC I used a lot of texture and layers like molding paste, acrylic embellishments, paper, stickers, mist and Goosebumps.  I also used the man and woman symbol stamp and the hearts stamp.
 and here is a close up of the yummy textures and layers:
 This next ATC I used the birds on a wire stamp and the couple kissing stamp, along with a rub on, patterned paper and some acrylic embellishments.
and last but not least, a romantic ATC featuring the young couple kissing stamp along with patterned paper, clear printed tape and some stickers:
Happy Valentine's Day everyone and I hope you enjoyed my projects.

Thursday, February 06, 2014

Be mine

Hello all, Nataliya is here :)
Valentine's Day is coming and it's time to make a card for a loved one!
I made ​​this mini, of course with a butterfly :)


I love volume, multilayer work and always use 3D adhesive tape.


To create the background I used this VLVS!:

Lace Background 2 1/2 x 6 1/2

Harlequin Diamond Background 4 1/2 x 5 3/4


Wings is a stamp with clear embossing powder.

Have a love's day!

Sunday, February 12, 2012

You're no longer the man I met on the internet!


Hello again! Since Valentine’s Day is almost here, I thought I would make a fun card for all the people who are not looking forward to it. I am sure that most people can relate or know someone in the situation where their dream date turned out to be a dud in person, or not so great once you really got to know them. Anyway, because so many people are finding love on the internet by chatting on social networking websites like Facebook or sites like Match.com, I thought that this stamp was especially funny, and I just had to use it in a project this month!

Click here to see this stamp in the Viva Las Vegastamps! online store.

I made this card using a black A2 sized card. For the background, I chose a pattern that made me think of a comic book. I thought this pattern looked like the colored pixels you see when you look very closely at a picture in a magazine or newspaper. I colored my stamped image with Copic markers and then I assembled the card as you see in the photo. I put the matted stamped image on pop dots to be sure that it would stand out against the busy, but appropriate, background paper.

Be sure to keep coming back to the Viva Las Vegastamps! blog for more great ideas for their fun stamps. If you want to see my other Viva Las Vegastamps! projects, feel free to visit my blog at Create & Craft. Happy Valentine’s Day everyone. Thanks for stopping by!

Saturday, February 04, 2012

"Giving a Basket of Amore" using Viva Las Vegastamps! and new Sakura Terri Sproul Mixers

Happy Saturday Everybody! It's Susan here with my top of the month project to share. Love is in the air and Valentine's Day is just around the corner. So I am sharing a "Basket of Hearts" Amore card I've created using Viva Las Vegastamps!...AND...the brand new Terri Sproul Mixers by Sakura Hobby Crafts. These are powders and glittery goodness to be added to Sakura Crystal Lacquer.


And guess what??? Viva Las Vegastamps! will be the very first retailer to carry Terri's new line. I got to meet our Fairy Craftmother last weekend at CHA in California...she is fun and fabulous - just like in her videos! So keep a lookout for these SUPER NEW products in the VLVS Online Store soon!!

This is Terri and I just prior to the CharityWings.org Flash Mob!


For today's project I used two stamps from Viva Las Vegastamps! Basket of Hearts #405 and Woven Thatch Background #10153. I started off with a sheet of wine colored cardstock and I stamped both images with Stewart Superior Memories Regal Burgundy Pigment ink and embossed using VLVS Ultra High Gloss embossing powder. I also stamped the section of the hearts in basket onto lavender and pink cardstock and embossed. Then I gave it detail with Sakura Terri Sproul Mixers!!! For the woven thatched background of the basket and the handle, too, I mixed some of the Yellow Pearl Jewel Effects Mixer with Crystal Lacquer. It went right over the embossed stamped image and kept the detail. Then I mixed up Red Pearl Jewel Effects Mixer and painted in hearts on the pink and lavender paper. One color takes on an entirely different life when painted on different colored papers - especially dark papers.

The mixers stay transparent while adding shimmer and a touch of color. You have total control of the intensity of the Mixers color, by adding a little or a lot of the powders to Crystal Lacquer. AND it dries quickly, too!!! I for one am the queen of Stickles {glitter adhesives} and really don't use them for most projects because of length of drying time. Now that I've played with the new Sakura Terri Sproul Mixers...I can't see why I would ever use them {Stickles} again. I am totally hooked! Did I mention there are 30 different colors and additives in the Mixers line. I had this piece of scrap paper with a heart and the word "Amore" that I also accented by layering strokes of yellow and red Mixers with a paintbrush. This really made the sentiment "POP". I fussy cut and paper pieced the hearts in the basket and finished assembly of card with coordinating patterned paper scraps and a sheer organza bow. I now have a lovely Valentine for my special someone!

It's a new month which means a new VLVS Theme Challenge for February! Submit your "LOVE" theme creations using Viva Las Vegastamps! for a chance to win a $25 gift certificate at the VLVS online store. CLICK HERE for info on submissions. Don't forget to check out the Viva Las Vegastamps! store.

Don't forget to browse around a little while to see what our talented Design Team has been up to.

Thanks so much for visiting & if you would like to see more of my creations please visit my blog, sbartist : painting in the dark HERE. Happy Saturday : )

Sunday, January 08, 2012

What Was I Thinking?


Valentine's Day is coming soon! I am sure that most of us, at least one time in our lives, could relate to this card. Some people will go buy a nice mushy card, but in the back of their mind they'll be thinking "I need that card that Joe Morgan made!" Anyway, it's just for fun, because Valentine's Day isn't all about hearts and flowers for everyone. Sarcastic people like me would prefer that we skip it and have Halloween twice a year instead. So on to my card!

I used two Viva Las Vegastamps! for this project:
Hugging Lovers
Looking Back Over the Years

For my background, I used a conversation heart embossing folder to dry emboss pink paper. I stamped the sentiment on white and used a decorative punch to punch it out. I stamped the Hugging Lovers stamp on white and colored it with Copic markers and then fussy cut it out. I assembled the card as shown with some green and pink ribbon behind the sentiment and I also inked the edges.

I hope you enjoy my card and at least got a good laugh from it! Viva Las Vegastamps! has a ton of sentiment stamps for everything. I get ideas just by reading them!


For more of my project ideas, visit my blog on Create & Craft.