Showing posts with label Ranger Distress Markers. Show all posts

Friday, May 22, 2015

It's Time to Cut the CAKE and your Stamps!!!


Hello everyone! Susan here with a tutorial using Viva Las VegaStamps! and some birthday cardmaking fun! There is a great challenge over at the Sisterhood of Snarky Stampers "C is for Cake" and I just couldn't "resist" playing along - LOL!


I've had this "Chicken Crying" stamp for a while now and I've been dying to use him. Today is the day!!! I inked him up with some Versafine black in and embossed him with VLVS! Ultra High Gloss Embossing Powder. Then while the stamp was still wet, I stamped and cut a quick post-it note mask.


With my quickie mask in place, I repeat the process with the "Cake with Candle" stamp. I also make a quick mask of the cake so I can do something with this plain white background. I don't want to cut out and paste these onto something else... I'm going to work around my grouping and it's pretty easy.


On my craft sheet I smooshed out a few colors of Distress Paint spritzed with a bit of water, then blended with my brayer. With my post-it masks in place, I rolled the color over my images. I picked up more color and reapplied until it was to my liking.


Now to add some music to my background! Using some blue dye ink I stamp the "Sheet Music Background" #19557 over my layers.


Before removing masks, I added one more stamp to ground my scene - the "Smear/Smudge" #19573. Now it's Reveal time!! A little paint got under my mask and I'm perfectly fine with that.


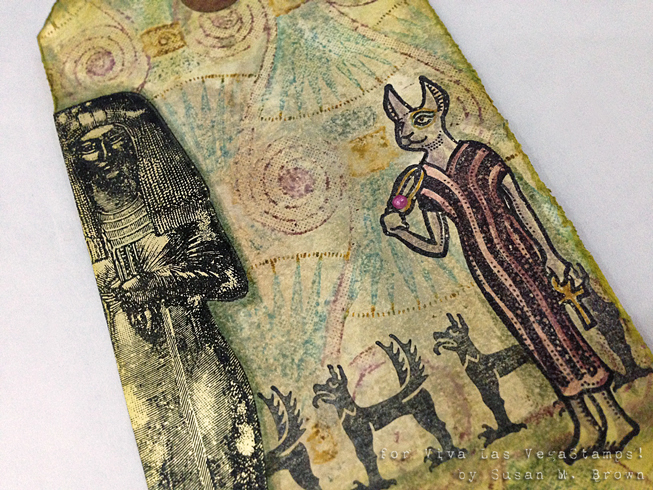
Now it's time for some color with Ranger Distress Markers and a little glittery shimmer!


I need to make a quick sentiment and I don't want to cut and paste words together in this case... so I give you a TIP – I'm cutting my stamp, "Happy Birthday from One Old Buzzard to Another!". I gently cut "birthday" and "another" apart from the phrase and lined them up on my block. Don't be afraid this is very liberating!!


I stamped onto the edge of my creation so it matches and give it a kiss of embossing powder for some POP! I made the ... by tapping the back end of a paintbrush into the ink using as a stamp.


I trimmed everything, layered with mats and Miracle Tape and I have a fun birthday card ready to go! This is so going to my sister who's birthday is next week... she's cracking the big 4-0.

"It's My Party and I wanna Cry"


• • • • • • • • • • • • •


Other Supplies: white, teal and blue cardstocks; Ranger Distress Paint, Ranger Distress Markers; Sakura of America Gelly Roll® Stardust® Pen, paper trimmer; sticky back gems; and May Arts trim.

• • • • • • • • • • • • •


Thanks so much for dropping by! It's a holiday weekend and that brings a SALE at the VLVS! store... CLICK HERE for details. Also are you a fellow rubber addict?  Here's your chance to join the design team {CLICK HERE for details} and stamp til your hearts content!

If you would like to see more of my creations please visit my blog, sbartist : painting in the dark HERE. Hope you have a fabulous day!!  Sb

Tuesday, October 29, 2013

Welcome to a Winter Wonderland... October's 12 Tags of 2013 Viva Las VegaStamps! Style!!!


Welcome to Viva Las Vegastamps! Susan here today to with my take on T!m Holtz' October installment of the 12 tags of 2013. I had to break the Halloween habit... and finally move on to the winter holidays. And since I am creating a winter version of this tag... I also am adding a splattering technique to give the effect of snow falling for the Craft Stamper Take It, Make It Challenge #5.


On a 4" x 6 1/2" section of off white cardstock, I created the marbelized background using Ranger Distress Paints (colors Weathered Wood, Crushed Olive, Dusty Concord and Antique Linen). I applied a second layer of just Weathered Wood and Antique Linen to tone down the bright colors.


I heat set to dry completely. Using an ink blending tool I applied Broken China, Weathered Wood and Iced Spruce Distress Inks around the edges. I completed the background by splattering with a brush Picket Fence Distress Stain.


I needed a frame for this month's tag technique and I don't have one for this purpose... BUT... I do have a lacy oval frame stamp (Doily #18849) that would be perfect. I could use Ranger Embossing Ink and a glue heat embossable powder to add the Distress Glitter... NAH! I want MORE DIMENSION. So I'm got out my Amazing Mold Putty and made a border mold of my stamp.

**WARNING** You need to thoroughly cover your stamp with petroleum jelly to protect your stamp - the rubber of the stamps and Amazing Mold Putty touching are reactive with each other. Watch closely and limit the time of stamp in contact with mold putty and remove it as soon as curing is completed.


As you can see here with stamp removed from mold. Some of the Amazing Mold Putty has stuck to stamp, which I cleaned off with soap and water immediately so the detail of my stamp is not clogged up and to stop any reaction the two compounds may have.


Now with a mold of my decorative border stamp - I filled it with Creative Paperclay® and let it cure. When paperclay is dried I inked and covered with Ranger Embossing Ink and heat embossable glue powder; then dredged in Antique Linen Distress Glitter. I went back with Vintage Photo and Broken China Distress Inks to add some depth and color to the edges.


I stamped several stamps (see list below) creating a collage scene using Weathered Wood Distress Ink and also Stone Grey Staz-On Ink. I really love how the Distress Ink just fades into the painted background giving subtle depth. I stamped snowflakes (see list below) with the embossing ink and applied the heat embossable glue powder; then applied a blue iridescent glitter to give the snowflakes shimmer.

Welcome to a Winter Wonderland...


The finishing touch was a Tattered Angels vintage icicle chipboard embellished with Distress Inks and a combination of blue iridescent and Antique Linen Distress Glitter. I accented Santa Collage #18933 with a little color using water brush and Ranger Distress Markers. Because of warping and to give the tag some stability to support the frame and icicles, I mounted the tag to chipboard with a section of Miracle Sheet cut to size and I embedded a sheer organza ribbon to act as a hanger from the top.

• • • • • • • • • • • • •

Viva Las VegaStamps used: Small Snowflake #18945; Medium Snowflake #18947; Large Snowflake #18946; Jingle Bells 10686; Early in Morning Swahili Script #1692; Christmas Trees Large #18942; Christmas Trees Small #18941; Santa Collage #18933; and Doily #18849 (oval lace border used to create mold). Supplies used: Cardstock; Stone Grey Staz-On Ink; various Ranger Distress inks and Picket Fence Distress Stain; Ranger Embossing Ink; various Ranger Distress Paints; Miracle Tape, Diamond Glaze Dimensional adhesive; Creative Paperclay®Amazing Mold Putty; Antique Linen Distress Glitter; Iridescent Blue Glitter; Ranger Distress Markers; and Heat Embossable Glue Powder.


Thanks so much for dropping by. Have you entered the monthly challenge - you have two (2) days left to make a creation using the inspiration and your stash of VLVS! stamps... you could win more RUBBER! CLICK HERE for challenge details. Also, you definitely want to subscribe to the blog feed and to the Viva Las VegaStamps! newsletter to be IN THE KNOW of everything going on at the Viva Las Vegastamps! store. There's so much amazing inky inspiration to see!

If you would like to see more of my creations please visit my blog, sbartist : painting in the dark HERE. I'll be back soon with another stamping adventure!  Sb

Thursday, August 08, 2013

Tag ARTifact from the Pyramids... 12 Tags of 2013 for August Viva Las VegaStamps! Style!!!


Welcome to Viva Las Vegastamps! Susan here today to share my take on T!m Holtz' 12 tags of 2013 for August... but done totally Viva Las VegaStamps! Style. Grab your shades... were heading to the Egyptian Pyramids to find some creative treasure.


First on a sheet of freezer paper {because my teflon sheet is currently handling a resin project}, I applied side by side three Ranger Distress Stains - Brushed Pewter, Old Paper, and Antique Linen. I misted my #8 manila tag with a light amount of water then dragged the tag through the puddle of ink. I tapped off the excess liquid and then heat set to dry. 


I built up the layers of color with three applications using the same technique above and heat set to dry between layers. The brushed pewter gave a subtle metallic shimmer over the tag that looks like aged sandstone. I overstamped the "Basket Egyptian Goddess" #6101"Mummy Case/Female" #5806 and "Stylized Dog Border" #9827 using Staz-On Black ink. I also stamped each on acetate and a scrap paper to create masks for layering and scene building.


I prepared my masks, two on acetate and the others on paper and adhered to my tag with some removable adhesive runner. The colored image will not appear where the masked areas are. This process of building scenes is a bit time consuming with fussy cutting - but the end results are AMAZING!


I mounted the "Nile Flower Background" #1657 stamp and then began coloring with Ranger Distress Markers adding different colors directly onto the stamp. This is a detailed pattern, so I had to concentrate coloring similar sections. This was quite fun and relaxing coloring this large background. I remoistened the marker applied to the background stamp by breathing on it then stamped onto the tag. 


The "Mummy Case/Female" #5806 was not as clear as I liked on the painted tag, though I did stamp clearly - so I stamped it again onto a brushed gold cardstock, fussy cut and adhered with my Miracle Tape right over the top. This did the trick! The gold gave the pop and extra bling that I desired. I went around the edge with a distressing tool for a frayed effect and rubbed edge with a couple colors of Distress Markers. To finish off - I added a pink pearl gem, some additional hand coloring and some ribbon to the top and bottom and this tag looks like it's an artifact straight from the Egypt.

Tag ARTifact from the Pyramids...


•••••••••••
Supplies used: STAMPS - "Basket Egyptian Goddess" #6101, "Mummy Case/Female" #5806, "Nile Flower Background" #1657, and "Stylized Dog Border" #9827. Other supplies: #8 manila tag; Staz-On Black inkMiracle TapeRanger Distress Markers; Ranger Distress Stains - Brushed Pewter, Old Paper, and Antique Linen; water brush; brushed gold cardstock; pink pearl gem; and ribbon/trim.

Thanks so much for dropping by. I invite you to play along with the monthly challenge - make a creation using the inspiration and your stash of VLVS! stamps... you could win! CLICK HERE for challenge details. Also, you definitely want to subscribe to the blog feed and to the Viva Las VegaStamps! newsletter to be IN THE KNOW of everything going on at the Viva Las Vegastamps! store. There's so much amazing inky inspiration to see!

If you would like to see more of my creations please visit my blog, sbartist : painting in the dark HERE. I'll be back soon with another stamping adventure!  Sb

Tuesday, July 02, 2013

Anyone Have a Quarter??? Having Some Hot Summer Fun at
Viva Las VegaStamps!!!


Welcome to Viva Las Vegastamps! It's July and it's time to turn up the heat for some summertime fun! Susan here today with a hot little number just in time for the 4th of July... this is one of those times that a stamped image is worth a thousand words - and a good belly laugh, too! Did you know that among the over 20,000 stamps in the Viva Las VegaStamps! catalogue... there's a section of "NAUGHTY" stamps, too. 


I recently received this "Nudie" girl in a grab bag from VLVS! and I knew exactly how I wanted to use her. She's like a 50s pinup girl and goes perfectly with my coin-operated "Space Ship" – I fondly remember these outside so many stores when we were kids.


I have always wanted to try some stepped folded cards and this project is perfectly showcased with a specialty folded card. I used my paper trimmer and Scor-Pal to easily form a "Center Step Card" base to mount some patterned paper scraps received from my scrap swap group {we gather up our scraps and trade for a new stash of scraps}.


I stamped "Space Ship" #9191 on plain white cardstock, masked with sticky notes and then stamped "Nudie" #748 using Staz-On Black ink for a waterproof image to hold up to my hand-coloring.


I just returned from a crafty road trip to attend the StampFest in Orlando this past weekend with my sister and Mom where I came across an interesting little gadget called an "action wobble". I never heard of these before - and they are so GREAT!!! Action Wobbles are a one-of-a-kind self-adhesive collapsible spring that adds motion and dimension to flat objects for a unique 3D effect. They add FUN to anything creative and are my newest addition to my supply arsenal.


I hand-colored the image with Ranger Distress Markers and my water brush. For the space ship, I applied Brushed Pewter Ranger Distress Stain on my craft sheet and picked up color with my water brush to apply to my image. I fussy cut out the image and cut apart space ship from the stand. I adhered the stand to card base with Miracle Tape, then layered the ship with the Action Wobble
She's ready for another ride... Anybody have a quarter???


•••••••••••

Supplies used: STAMPS - "Nudie" #748, and "Space Ship" #9191. Other supplies: white cardstock; Staz-On Black inkMiracle TapeDiamond GlazeRanger Distress Markers; Water Brush; Brushed Pewter Ranger Distress Stain; Star gem stickers; patterned paper scraps; paper trimmer; Scor-Pal and an Action Wobble disk.

Thanks so much for dropping by. We have a BRAND NEW Viva Las VegaStamps! Design Team - so you definitely want to subscribe to the blog feed and to the Viva Las VegaStamps! newsletter to be IN THE KNOW of everything going on at the Viva Las Vegastamps! store. There's so much amazing inky inspiration to see!

If you would like to see more of my creations please visit my blog, sbartist : painting in the dark HERE. I'll be back soon with another stamping adventure...and my round 5 projects I made to play along with the Gallery Idol Competition. Did you take the challenge???  Sb

Wednesday, May 29, 2013

I Dare You... to Take a Chance and Stamp!


Welcome to Viva Las Vegastamps! May is over tomorrow - where did the month go? Susan here today for some super fun birthday cards. What do crafty pals do when they are already pushing the time envelope??? They dare each other to do something WILD and CRAZY... just for fun.


DeeDee, our team leader and I have dared each other to enter the Gallery Idol Competition. If we make the top twenty selected that move on to round two tomorrow - we will be entering JUNE MADNESS. I am on the edge of my seat waiting to hear and see what the next challenge will be. And even if we don't make the cut - we are still going to complete all the challenge round themes. It's going to be a blast!


For the first round audition round theme was birthday cards for kids and teens. So FUN! This was a challenge - BUT - with the my huge stash of Viva Las VegaStamps! at my disposal, I was able to enter some really fun cards. This fun card using "Hippo with Party Hat" #1454 is one of my entries. I had about five different cards in the works and she made the cut. I made my own tissue tape with Miracle Tape and Miracle Sheets. The colored tissue comes with a tissue wrap with the printed "happy birthday" on it; except for the yellow. The yellow tissue section I created by stamping the "Happy Happy Birthday" #10479 stamp repeatedly in Milled Lavendar Ranger Distress Ink. The green tissue at the top is recycled from a gift I received {I've been having fun using this craftily}. I fussy cut an hand colored my party girl with my Ranger Distress Markers and grounded her on a strip of grey spotted washi tape. I finished her off with some eyelash googlie eyes - no card is complete until you add some GOOGLIES! The bright colored tissue really makes the party girl pop.


Now for another card using "Alligator Present" #9129. This is so fun and festive! I didn't enter this one, but one can never have too many birthday cards on hand. I just totally fell in love with this stamp and it made me laugh out loud. It has a blank little tag in the image and the "Don't Freak Me Out" #18327 fit perfectly in it's place. Stamped in black on yellow painted paper with Mustard Seed Ranger Distress Ink and hand colored with my markers. I added some shimmery details and polka dots with my Gelly Roll Stardust pen. The border is the "Happy Happy Birthday" #10479 stamped about 10 times to create a pattern stripe using Clearsnap Colorbox Khaki Green Dye ink.

**TIP FOR THE DAY** Try out different themed stamps for different occasions. Play around and have fun! Cut your images apart to use just a section, or stamp a repeating pattern. This gives you endless possibilities with your stash of rubber.

Aren't these cards fun with just a few stamps???

Now for a DARE... I challenge all of you to play along, too and share your Viva Las VegaStamps! creations with us on the Viva Las VegaStamps! Facebook page. The Gallery Idol challenge will be announced sometime on Friday... we can't wait!
•••••••••••
Supplies used: STAMPS - "Happy Happy Birthday" #10479, "Alligator Present" #9129, "Don't Freak Me Out" #18327, and "Hippo with Party Hat" #1454. Other supplies: cardstock; Staz-On Black ink; Miracle Tape; googlie eyes, photo corners; Ranger Distress Markers; Milled Lavendar & Mustard Seed Ranger Distress Inks; Clearsnap Colorbox Khaki Green Dye Ink; Gelly Stardust Pen and a water brush.

Thanks so much for dropping by. Have you seen what the Viva Las Vegastamps! Design Team has been up to or dropped by the Viva Las Vegastamps! store lately? There's so much amazing inky inspiration to see!  If you would like to see more of my creations please visit my blog, sbartist : painting in the dark HERE. I'll be back soon with another stamping adventure... Sb


Get all the details HERE -- hop to it, the deadline to apply is June 7th at midnight pacific standard time. You know you want to be a part of this team... go ahead - give it a try!

Saturday, May 11, 2013

Take a PEEK... and Don't Forget the SUNSCREEN!!!


Welcome to Viva Las Vegastamps! It's finally the weekend... which means time to get creative. Susan here today for some weekend stamping fun. I have to admit... I HAVE TOO MANY STAMPS!!! So many that I can't make up my mind what I want to use. Does this ever happen to you? 

I have so many ideas... yet too many stamps – and they just keep coming! So where to begin. I grab a pile of rubber and a handful of sketches and I just get to it and let the creative juices flow. But I'm not really in the mood to make cards today. As some already know, I am the head counselor over at Anything But a Card Challenges – and the current challenge has been "make an A.T.C.". You know A.T.C.'s {a.k.a. artist trading cards}. Well I love making mini masterpieces so today I'm sharing a fun A.T.C. If you would like to play along today is the last day of the challenge - CLICK HERE to check it out {there's a couple familiar faces on the team over there also}.


I live in South Florida and one of the iconic images here is this old Coppertone signage. Upon doing some research I found out the "Coppertone Girl" sign was recently relocated to a new location at 7300 Biscayne Blvd in Miami.


Well I happen to have this stamp in my stash - "Dog Pulling Alien Bathing Suit" #2531. This will be a fun twist on the iconic theme and perfect for a brand new A.T.C. {especially since sunbathing these days might leave you looking like an ALIEN - LOL!}.


I'm going to pair this up with this "Train to Florida" #18199 and only use the sunburst and type and lover part of the right hand side. To do this I am going to color directly on my stamp using my Ranger Distress Markers.


I started with some section of book pages that I have leftover from an altered book I cut a niche out of. This particular paper is about three pages were glued together from some other crafty experimenting. I liked how it looks like stacked pages. These are the perfect size and base for an A.T.C. I primed the book page with a gesso wash, then applied Ranger Distress Stains in Picket Fence and Antique Linen. After heat setting, I'm ready to stamp. I stamped the alien with black StazOn ink, so it would be waterproof against the hand-coloring and blending with the distress markers.


**TIP FOR THE DAY** If you only want a section of your image, apply ink to stamp with a marker for detailed application. This gives you precise placement of ink when a traditional masking technique will not work. This also is a great way to add different colors to one image in a single application. Before stamping, just remember to give a "Huff" of air onto the stamp to re-moisten the ink. This opens up a whole world of versatility to your stamp stash.


To soften the edge and have the image fade out, I removed some of the ink with a paper towel before stamping onto my A.T.C. base.

Who knew aliens are really PURPLE???


My completed A.T.C. – all hand-colored with a vintage beach feel. I finished off the top with a photo corner. So much fun and only using two stamps and my markers. Now I'm ready to hit the beach!!!
•••••••••••

Supplies used: STAMPS - "Train to Florida" #18199 and "Dog Pulling Alien Bathing Suit" #2531. Other supplies: sections of book pages; Staz-On Black ink; Miracle Tape; photo corner; Ranger Distress Markers; Ranger Distress Stains - Picket Fence and Antique Linen; Gelly Stardust Pen and a water brush.

Thanks so much for dropping by. Have you seen what the Viva Las Vegastamps! Design Team has been creating or dropped by the Viva Las Vegastamps! store lately? There's so much amazing inky inspiration to see!  If you would like to see more of my creations please visit my blog, sbartist : painting in the dark HERE. I'll be back soon with another stamping adventure... Sb


Get all the details HERE -- hop to it, the deadline to apply is May 30th at midnight pacific standard time. You know you want to be a part of this team... go ahead - give it a try!