Showing posts with label 20165. Show all posts

Monday, May 20, 2024

No.7 mini slimline card by Cathy N

Good morning, all Cathy here with a slimline card. 

I started out with some watercolor paper. I used 2 different pink distress inks, and I made the background.
I then took the cross marks background and stamped in a pink distress ink. After that I took the grunge 1787 writing background and the writing and scribbles collage and stamped it on the background. 

Next, I added the rose image layered on black cardstock to the top and a pink dyed ribbon to the bottom and then I added it all to a mini slimline card base.

                                                                  Stamps Used:
                                                          20165 cross marks background
                                                          17545 grunge 1787 writing background
                                                          20695 writing and scribbles collage

Friday, March 13, 2020

Shopping your stash - Alcohol Ink Art with Josefine

Hands up if you have craft supplies that you've bought a long time ago and then never really knew what to do with it. Probably not just one thing, but several, right? One of those items for me are alcohol inks. I like the effects but everytime when I attempted a project I never knew what to do with it. So, again I was looking through my random craft stash and grabbed my alcohol inks (and between us, I have quite a few bottles...). This time, I was determined to make something with it. Ha!


A few weeks back, I found small panels for the use with alcohol inks at my local Hobby Lobby. They were on sale and I decided that this is the sign for me to try it one more time. As you can imagine it took me a few more weeks till I then finally decided to use them. 

First panel, and I added a few drops of alcohol ink with the blender. The colors looked nice, but I was not really convinced. Texture was missing, so I went with the Police Tag and some Alcohol Lift ink. And voila, much better.


Of course, I had to experiment with a few layers of alcohol ink. You can see that my fingers started to switch colors too.


One more panel. Different color scheme now. But I'm starting to see why people like them.


I ended up with five different panels. All using a mix of alcohol inks and alcohol pearls. I guess, it is quite fun. But then again - what to do with them? 


So, I continued with the Alcohol Lift ink, but a different pattern. The Punchinella/ Sequin border looked really nice.


For whatever reason it took some time for all that ink to dry, so while waiting, I stamped the Pair of butterfly wings onto a scrap piece of paper, fuzzy cut it out and adhered it behind a paper doll. At this time, I wasn't sure what to do with it.


I actually let the alcohol panels sit over night and continued with some more texture the next day. Trying white pigment ink turned out to be very interesting. The partial scribble adds a fun feeling to it.


Adding one more item from my "lost craft stash" - glow in the dark embossing powder. By now, I knew that I wanted to create a cohesive piece with these 5 art panels, so one had to have a sentiment on it. Since I had the paper doll ready to go, I thought this "you are beautiful" sentiment works well.


A few more extras, like this stitching lines on the border of two of the pieces and some cross marks using colored archival ink and white pigment ink interchangeably. 


And at the end, I adhered them to a small, long canvas. As you can see, I added a bit of foil to one of the alcohol inked panels. I did that while it was still wet. Just a bit more glimmer, that's all :)


Here you can see in a bit more detail the dimension that the different stamp techniques added - a mix of lift ink and stamping on top with colored and white ink.


And of course, the glow in the dark sentiment. Pretty neat.


Thanks so much for stopping by. I hope you enjoyed my little experiment using craft supplies that are usually hidden somewhere in my craft room.

Stamps I used:


Tuesday, February 25, 2020

Clean and simple art journal pages with Josefine

Hi everyone! Can you believe it's the end of February already? So much to do and not enough time in the day. Does that happen to you? I'm in the middle of several projects at work, doing my MBA, life in general - sometimes there is just not enough time to craft. But crafting is what keeps us sane, right? That's why I wanted to share some "clean and simple" (CAS) art journal pages with you that can be done in a few minutes. Just some fun, crafting, mess - and at the end, happiness.

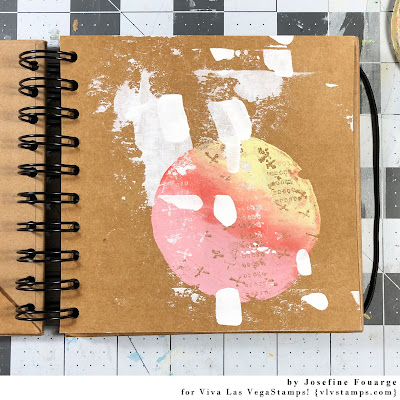
To do that, I found a small art journal, so it feels less daunting to start. A small page is easier to fill, at least that was the idea. I added just a bit of white paint as my first layer.


Next, I used my small, round Gel Press, added three little paint drops to it, and spread it out. Then I used the "Cross Marks" and "Row of Numbers" stamp to remove paint from the Gel Press. Because I didn't want to waste it, I stamped them onto the next page.

To incorporate the mono print a bit more into the background, I used my palette knife to scrape a bit more white paint on top of it.

I added a few additional marks using a white gel pen and then stamped "Witch with Scarf on Broom" on top of the page. 

For the sentiment, I stamped the "Black is the new Black" stamp onto a separate piece of paper, crumbled it up a bit, and then adhered it to the page.

And here is what I did with the second page. I also added a mono print with the same colors, but then stamped the "Scribbled Circle" on top in a slightly darker color.

For my focal image, I stamped "Death riding Pegasus" onto a piece of tissue paper and adhered it onto the page. Unfortunately, the tissue paper didn't disappear far enough into the background, so I had to get creative.

First, I added some white, watered-down, paint to simulate a cloud...

and then I added the "I'm not afraid" sentiment around it. Now it's barely noticeable.

Here are the two CAS art journal pages. I hope you enjoyed them and got some ideas for your quick projects when you have just a few minutes time.


Thanks for stopping by!


Stamps I used:


Thursday, October 10, 2019

Art Journal Page by Preeti D.

Hi friends :)
Hope you are doing well.
Preeti Datta (Dutt Preety) here from the VLVS! Design Team. 
For today's post, I've created an Art Journal Page.  
I've used some gorgeous VLVS! Rubber Stamps here.
I was inspired by Banksy Style graffiti art and tried to depict a grungy, old wall.

I've used a wall stencil here to create the background.

  I've used 2 colours of distress oxides to create the old, worn out, grungy look. 


VLVS! Supplies:


Other Supplies:

Maremismallart Stencil - Stoned Wall
Finnabair's Heavy White Gesso, Heavy Black Gesso
Ranger's Archival Inkpads- Jet Black and Potting Soil
Tim Holtz Distress Oxide Inkpads - Iced Spruce and Vintage Photo

Thanks a lot for your precious time :)
Stay Blessed!
Preeti

Thursday, October 03, 2019

Spooky - Halloween/October Challenge 2019

Hello everyone,
welcome to SPOOKY...
Halloween 2019.
You might have guessed but this months challenge is.....
HALLOWEEN!!! (Insert spooky music)....
so for this project I've created a little tag and Step by step instructions...
 starting off with a Dylusions Tag, I added some magazine pieces, and then layered
a Kinder Kreations Tree stencil (KK1657) with Modelling Paste.
 allowed it to dry and then covered it with Black Gesso 
 Then I got out my first of my Halloween stamps
this super cool and slightly rude 
Skeleton Family (sku: 19206)
with black Stazon Ink. I stamped 3 of them because I wanted to layer them up.
 Fussy cut them out, with each layer taking a little more away.
 I coloured the last one with Tim Holtz Distress Oxide in Carved Pumpkin
The top two I just used Gel Medium
and for the bottom set I used some foam mount to add a little more dimension
 Next I went back to the background and stamped
Fancy Spiderweb Corner (sku: 19208)
in the bottom corners with Distress Oxide in Hickory Smoke
added some Lindy's Gang Angel Wings Sapphire Embossing powder and heat set it.
 Then I added the "stars"

Cross Marks Background (sku: 20165)
with Distress Oxide in Wild Honey and Embossed 
with Lindy's Gang Adobe Fire embossing powder
 next up I added the 
Full Moon (sku: 18911)
with Distress Oxide Blueprint Sketch and Embossed 
with Lindy's Gang Desert Moon Turquoise
 I added some fibres to the top and stitched the edges 
 then I added my Layered up Skeleton Family 
(which I added a wash of Distress Oxides: Hickory Smoke and Iced Spruce)
and finished off with 
Spooky (sku: 19735)
with Wild Honey and Embossed 
with Lindy's Gang, Adobe Fire powder. 
I also added some colour to the background tree with Silks Acrylic Glaze Nutmeg
 the final product...
Don't forget to check out the Facebook Groupies page and Load your Halloween creations
to enter the October Challenge ( #oct19)
"Spooky"


VLVS! used:
Skeleton Family (sku: 19206)
Fancy Spiderweb Corner (sku: 19208)
Cross Marks Background (sku: 20165)
Full Moon (sku: 18911)
Spooky (sku: 19735)


Other materials used:
Dylusions Tag
Magazine Text
Kinder Kreations Tree Stencil (KK 1657)
Matisse Black Gesso
Stazon Jet Black Ink Pad
Ranger/Tim Holtz Distress Oxide: Hickory Smoke, Wild Honey, Blueprint Sketch, Iced Spruce,                                                                  Carved Pumpkin
Silks Acrylic Glaze Nutmeg
Thread

Live with Respect
Leanne xo