Showing posts with label You are beautiful. Show all posts

Friday, March 13, 2020

Shopping your stash - Alcohol Ink Art with Josefine

Hands up if you have craft supplies that you've bought a long time ago and then never really knew what to do with it. Probably not just one thing, but several, right? One of those items for me are alcohol inks. I like the effects but everytime when I attempted a project I never knew what to do with it. So, again I was looking through my random craft stash and grabbed my alcohol inks (and between us, I have quite a few bottles...). This time, I was determined to make something with it. Ha!


A few weeks back, I found small panels for the use with alcohol inks at my local Hobby Lobby. They were on sale and I decided that this is the sign for me to try it one more time. As you can imagine it took me a few more weeks till I then finally decided to use them. 

First panel, and I added a few drops of alcohol ink with the blender. The colors looked nice, but I was not really convinced. Texture was missing, so I went with the Police Tag and some Alcohol Lift ink. And voila, much better.


Of course, I had to experiment with a few layers of alcohol ink. You can see that my fingers started to switch colors too.


One more panel. Different color scheme now. But I'm starting to see why people like them.


I ended up with five different panels. All using a mix of alcohol inks and alcohol pearls. I guess, it is quite fun. But then again - what to do with them? 


So, I continued with the Alcohol Lift ink, but a different pattern. The Punchinella/ Sequin border looked really nice.


For whatever reason it took some time for all that ink to dry, so while waiting, I stamped the Pair of butterfly wings onto a scrap piece of paper, fuzzy cut it out and adhered it behind a paper doll. At this time, I wasn't sure what to do with it.


I actually let the alcohol panels sit over night and continued with some more texture the next day. Trying white pigment ink turned out to be very interesting. The partial scribble adds a fun feeling to it.


Adding one more item from my "lost craft stash" - glow in the dark embossing powder. By now, I knew that I wanted to create a cohesive piece with these 5 art panels, so one had to have a sentiment on it. Since I had the paper doll ready to go, I thought this "you are beautiful" sentiment works well.


A few more extras, like this stitching lines on the border of two of the pieces and some cross marks using colored archival ink and white pigment ink interchangeably. 


And at the end, I adhered them to a small, long canvas. As you can see, I added a bit of foil to one of the alcohol inked panels. I did that while it was still wet. Just a bit more glimmer, that's all :)


Here you can see in a bit more detail the dimension that the different stamp techniques added - a mix of lift ink and stamping on top with colored and white ink.


And of course, the glow in the dark sentiment. Pretty neat.


Thanks so much for stopping by. I hope you enjoyed my little experiment using craft supplies that are usually hidden somewhere in my craft room.

Stamps I used:


Friday, July 06, 2018

Paper Bag for a special occasion ► Majo


Good Morning, dear crafty friends!

Today I'd like to show you a paper bag I decorated with a stamped panel. 

My friends daughter just finished school a week ago and she's a bit lost on how to proceed with her future. Collage, new job, Sabbatical, just relax for a while? Well she doesn't know yet.

So we took care of the fun part and bought several coupons for her. Some just small and silly ones, i.e. coffee at Starbucks or a burger at one of the burger stations etc. 

Some little cards also have "wise" phrases for the future :)


 I applied Mixed Media paint from Dina Wakley (Ranger) with a brayer and added distress ink in coordinating colours before stamping.
 
Here are some close ups of the background stamps I used, of course my most favorite, the doodle dots among the doodle leaf and the heart pattern circle, designed by my teamie Tera.


I stamped the bell jar and the little girl and fuzzy cut it. After colouring her I added the sentiment stamp for  a bit of texture. 

I added the the butterfly wings and the sentiment, it seems so appropriate for a girl finding her way into adult life.


Stamps I used:


Thanks so much for stopping by today, have a wonderful weekend and Happy Crafting ♥

Friday, October 20, 2017

Guest Blogger : Sue Plumb x2!

Did you wonder if you were going to get a DOUBLE dose of Sue?? because YOU ARE! and in fact.. you'll be getting a TRIIIIPLE DOSE! Today we have a 2nd project from the fabulous Sue Plumb! You can view more about her in the first post HERE.

Sue has put together a really incredible art journal spread for us!


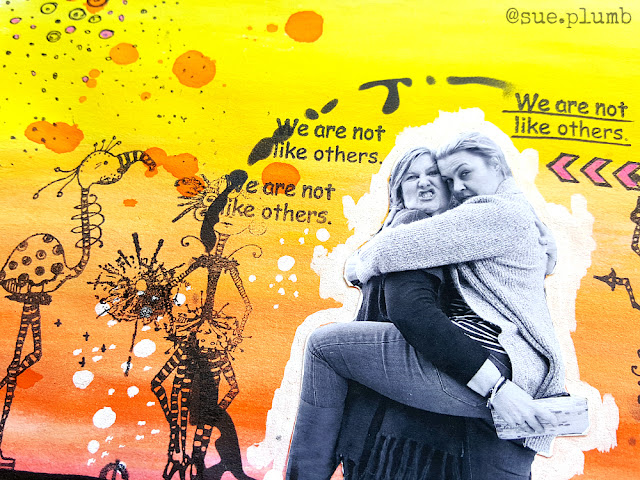
"This is art journal page I created featuring a photo of me with VLVS design member Fiona Paltridge that was taken at a recent retreat.


I started by laying down my bright background colour before adding the stamping directly onto the page. 


I wanted to created a page where I could feature some of the fabulous Mary Vogel Lozinak whimsical "freak" stamps from plate #1383; so I created this to represent a shooting gallery, with myself and Fiona as the main targets. 


Wednesday, August 09, 2017

Art Journal Page Tutorial by Susanne

Hi there!

Susanne here today and I'm sharing a step by step art journal project. This one is made in my homemade traveler's journal. I used gelli printed papers as my base pages.


Use gel medium and adhere the mixed media die cuts to the page. Cover it with a layer of gesso. Stamp the main image and the sentiment on tissue paper, cut it out and adhere it to the page.


Now it's time to add colour with Brusho powders. I sprinkle the pigments onto my page and spread them arround with a wet brush. I am adding colour until I am happy with the result.
While I am drying the colours with a heat tool I am spritzing water droplets with the Distress Sprayer onto the page to create some more texture.


I make the Dancing Lady pop out more by adding a shadow around her. I'm using an Inktense pencil.


Finally I add some stamping:


Here are some close-ups:


Thank you for stopping by today!
xx Susanne.


Supplies:
Viva Las VegaStamps!
Tired of Trying to Cram 1
Dancing Lady
There is a Universe
You are Beautiful
Howling Coyote Silhouette
Straggly Pine Trees 
Others:
Brushos
Archival Ink
Sizzix Tim Holtz Mixed Media Dies
Distress Sprayer
Gel Medium
Gesso
Tissue Paper

Sunday, May 21, 2017

Mail Art Monday with Fiona

Hello VLVS! peeps, Fiona here with you today to share a little piece of mail art I made using three of my favorite VLVS! stamps.


Just a quick little creation today.


A little bit of a spray. A Little bit of a sprinkle. A little blending. Stamp Stamp Stamp and she's done!

Viva Las Vegastamps used:

Just a quick one today, but I'll see you again soon x


Monday, July 25, 2016

Mail Art Monday - FlipBook - by Jenn Engle (and GIVEAWAY!!!)

Hey everyone! For today's Mail Art Monday I made a Flip Book. A Flip Book is basically a little handmade book stuffed with goodies that you mail out to your friends.

A lot of work went into this little book. So rather than tell you how I made it, you can watch how I made it. The process video will be up at the end of this post.


Stamps Used:


Now for the GIVEAWAY!
All you have to do is leave a comment on this post telling us what your favorite kind of mail art is and you'll be entered to win this Flip Book! (Be sure to check out the video to see the goodies that went in here!) 
Giveaway will close at Midnight EST August 1st. 
For an extra entry: "Like" us over at our Facebook page. Leave a comment below saying you did this for another entry. https://www.facebook.com/vlvstamps/


Thanks for looking!
~Jenn


Monday, June 20, 2016

Mail Art Monday with Fiona

Hello VLVS groupies! Fiona here with you for a "Mail Art Monday" YAY!!!


As a scrapbooker, I often send my work to an Australian magazine to be published and to do so I send my layouts in pizza boxes! This is my latest I created using the Viva Las Vegastamps!


I've been dying to use this gorgeous Dandelion stamp ever since it arrived in the mail! After blending some Distress ink colours over the box I stamped first with water to remove some of the colour and then with black ink.


The flock of geese in the top left hand corner balance the scene. 


You can see the water mark effect here next to the "You Are Beautiful" stamp.

Viva Las Vegastamps used:


Happy Monday and happy Mail art day xx

See you again soon