Saturday, April 20, 2013

The great ATC swap!

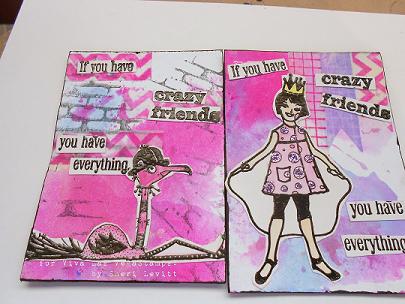
April 11th I went to an Art Retreat with some crafty friends I've met on line over the years from Ustream. Its was a blast!  One of the things we did was an ATC swap. It didn't take me long to make 25 ATC's. And no there not 25 people going, its just how many I made. I had the backgrounds done for a while and sitting in my stash, so all I had to do was cut them to ATC size and stamp and decorate away.


I used 3 different sentiments stamps and 4 Mary Vogal Lozinak images. The 4 images I used were Bird head on stick, Flamingositting bird, One eye monster, and jump rope girl. The 3 sentiments I used were If you have crazy friends you have everything, I'm not insane, and I'm not weird.The background are all different  But I am surprise on how many stamps I used for this project. lol I stamped them all on white cardstock in black Versafine ink pad and embossed with Ultra high gloss clear embossing powder. I colored them with watercolor by Artist loft. The Jump rope girl I added some stickles to the circles of her dress. I stuck them down with Miracle tape.The sentiments I cut in to pieces and glued them on the ATC's Glossy Accents.

One set of backgrounds I did was using water down craft paints and sprays on some glossy paper or Kromecote and then placing the plastic wrap over it. Let it dry. Once its dried you get some cool texture background.


The other background I did was a left over piece of white cardstock that I had dragged some sprays  through to get some cool effects. These I added the six hexagon background and brick background and made some washi tape with the washi tape backgrounds stamps using the Chevron, grid and reverse grid.

The 3rd set of background I did was bubble background using dish soap. You can also use kids bubbles. I poured some dish soap in a small dish and a straw I blew some bubbles and then sprayed some sprays like Lindy's stamp gang, or S.E.I. Tumble dyes, or Color wash. Then I took some glossy cardstock and Kromecote and dragged them trough the bubbles. After that To add more color to it I added some drips with the sprays.


The last background is an old school technique with wax paper resist technique on glossy paper or in this case Kromecote. Instead of crumpling the wax paper for texture I used a embossing folder by Sizzix with the wax paper. After I ran the folders through my big shot. I tool a piece of Kromecote and put the wax paper on top if it then placed a piece of copy paper on top of that. That's so the wax doesn't mess up your iron. I used my craft iron to melt the wax on to the Kromecote. Then I took my brayer and an ink pad and put some color on it to get the resit from the wax paper. 
This one I used one of the retro texture fades by Tim Holtz and Mowed Lawn Distress ink pad.

The ATC's from that paper

This one I used a diamond embossing folder and Black Soot distress ink pad and then for more fun I  dragged this piece through some bubbles.
The results of that.


 After I cut all the backgrounds to size I glued them on to light-wight cereal box chipboard. I edge the edges with black craft paint.

And what to put the ATC's in after I get them all....in a little book of course! 


The "pages" of the book are 12 x12 papers from Crowded Attic, Lost and Found and Destination by Tim Holtz. I scored  them at 1/2" 2 1/2",6",9 1/2 ans 11 1/2. Then turn it and scored at 3,6, and 9. then folded all the score lines. The book cover  is made out of chipboard that I covered in scrapbook paper.I used Miracle tape to attach the papers to the chipboard along with Aleen's tacky to insure it sticks. I used rubber bands (you can also use hair bands or those shaped band bracelets the kids wear)to attached the pages to the book at the first crease. This way you pull the page out.


The spine where you see the brightly color bands, I dyed some May Arts trim with Espresso Color wash. The one trim was a cream with tan check squares on it. It took the color awesome. I also dyed some of the Raffia by May Arts which turned out great. I also used some brown twain too. I tied them to the rubber bands.

The cover I cut out the one sheet of the Destination paper where it has the alphabet ala license plates. I spelled out Austin ATC. I attached those pieces with Miracle tape. I punched a hole on the front and back cover. The front I put a hitch post, the back I put an eyelet. I made my closure with a swivel clap with some charms in my stash. I put the clasp through the eyelet and one of the charms around the hitch post. On white cardstock I stamped the Texas Barbecue and Woot! with black Memento ink pad. I then distressed them with Vintage photo and Walnut stain distress ink pads. Attached them with Miracle tape.


Stamps used

Bird Head on stick
Flamingo
Sitting Bird
Jump rope girl
One eye monster
If you have crazy
I'm not insane
I'm not weird
Washi chevron background
Washi grid background
Washi reverse grind background
Six hexagon background
brick background
Woot!
Texas Barbecue

Items used
Miracle tape
Kromecote
May Arts
photo paper
various sprays
kids bubbles or dish washing soap
wax paper
plastic wrap
water down craft paints
glossy card stock
craft iron
embossing folders
watercolors
water brush
stickles
lightweight chipboard
Brayer
Mowed Lawn Black Soot, Walnut Stain, Vintage Photo distress ink pads
Black graft paint
Aileen's tacky
Tim Holtz Scrapbook paper
Tim Holtz Hitch post
Tim Holtz swivel claps
Charms
Scrapbook papers
rubber bands


Don't forget Viva Las VegaStamps! is having free shipping until April 25! Great way to stock up on Miracle tape and  to get the new rubber stamps that are now out! :) Code is "freeshipping"

Wednesday, April 17, 2013

Stamping with VLVS! Kromecote!

VLVS! Kromecote Cardstock is my paper favorite to stamp on. On a piece of VLVS! Kromcote Cardstock 4 1/2 x 5 1/2 I lightly sprayed with SmoochSpritz, then cut to size for each card.
"Don't Follow Your Dreams"
The VLVS! Follow Your Dreams (Plate 893) and VLVS! with Wings (Plate 893) were stamped with black ink on the VLVS! Kromecote Cardstock spritzed earlier. The images were heat embossed with VLVS! High Gloss Embossing Powder. The wings and dress of the girl have been tinted with Tim Holtz Distress Markers. Stamp the seeds only from the VLVS! Dandelion & Extra Seed-Susan M. Brown (Plate 918) using ColorBox Raspberry Ink. Attach a bit of May Arts Fiber to the bottom of the card. Layer on a red cardstock base.

Supplies for "Don't Follow Your Dreams"
VLVS! Dandelion & Extra Seed-Susan M. Brown (Plate 918)
VLVS! Follow Your Dreams (Plate 893)
VLVS! with Wings (Plate 893)
VLVS! Kromcote Cardstock 4 1/2 x 5 1/2
VLVS! High Gloss Embossing Powder
VLVS! Miracle Tape
SmoochSpritz Pink Sprinkles
ColorBox Raspberry Ink
Memento Black Tuxedo Ink
Red Cardstock
Tim Holtz Distress Markers
May Arts Ribbon

"Worn Clock Face" 
On the "Worn Clock Face" card the VLVS! Harlequin Diamond Background is offset to the left. This is one of my all time favorite stamps, it measures 4 1/2 x 5 3/4. Perfect for an A2 Card (quarter sheet of 8 1/2 x 11 sheet). The VLVS! Worn Clock Face (Plate 918 was stamped with black ink on the VLVS! Kromecote Cardstock spritzed earlier. The image was heat embossed with VLVS! High Gloss Embossing Powder. The center of the clock face was tinted with Tim Holtz Distress Markers. Add a bit of May Arts Ribbon with VLVS! Miracle Tape.

Supplies for "Worn Clock Face"
VLVS! Worn Clock Face (Plate 918)
VLVS! Harlequin Diamond Background 
VLVS! Kromcote Cardstock 4 1/2 x 5 1/2
VLVS! High Gloss Embossing Powder
VLVS! Miracle Tape
SmoochSpritz Pink Sprinkles
Memento Black Tuxedo Ink
Tim Holtz Distress Markers-Yellow
May Arts Ribbon
Red Cardstock

Note: All stamps used maybe purchased individually mounted or unmounted. They are also available on plates as notated above.

REMEMBER FREE SHIPPING UNTIL APRIL 25, 2013
Enter coupon code "FREESHIPPING"
in your cart when ordering!

Free Shipping is ON!!!!!!!


Beehive Storage

I can't believe I only have one more month as a VLVStamp Design Team member. This experience has been Bee-yond fabulous. The gals, especially the head honcho DeeDee, are all so talented and I have learned so much from them. I wanted to make something that I could keep in my craft studio - the Beehive - that would always remind me of VLVS.

As the EllenBee I have a growing collection of bumble bee ephemera. I had been storing it in a box but waned to display some it and thought that an altered clipboard would be the perfect item to alter.

I started the project by rusting the metal clip with an inexpensive rust kit I found at Michael's. After adding a small bee charm I painted the front and back with yellow bumble bee paint. Next I distressed it with TH Vintage Photo distress ink. I then took out my Honeycomb Pattern Stamp and went to town on the front. To protect the board I added a layer of ModPodge. Last was the bee ribbon I received from a friend that I attached with Miracle Tape.

I added the Bumblebee stamp on kraft paper and a simple tag with one of my favorite quotes To Bee Or Not To Bee. VLVStamps has a ton more Bee stamps and I plan on adding more to my growing collection!

Full Frontal
Backside

From A - Z you'll find whatever stamp you need at Viva Las Vegastamps!

Tuesday, April 16, 2013

Spotlight Shift!!

I thought it seemed like a good day to spotlight some of our fans and their projects!!


This first one is from Mary Vogel Lozinak, who is actually an artist of ours here @ VLVS! -- The stamp she uses on this is a favorite of many : Don't Let Anyone Ever - 3/4 x 2


The second is by one miss Irit Shalom - she finished with our Clock - 2 1/2 x 2 3/4


And last but never least is Michele Kosciolek who has been loving our Butterfly 3 1/4 x 3 1/4!

We really enjoy seeing work by fans using our stamps - so if you're playing around why don't you share something? You can always share it on our Facebook page!

Monday, April 15, 2013

Art journal fun

Hi everyone, Glenda here with a new prompt from the A Year in the Life of an Art Journal blog! The prompt today is:

PROMPT: What's your Story? (everyone has a story about a person, event, emotion, feeling, whatever, tell me yours)
SHOOTERS Shoot your mug with a stack of books.
BOOKERS: Focus on lots of journaling! Use stencils or masks. If you don't want your journaling to SHOW, journal THEN PAINT! Cover your journaling with your paints and embellishments!!

If you enjoy art journaling or even just taking pictures (you can be a "shooter"!) I hope you pop on over and play along with us!

I am a "booker" which means that I love to art journal and for the above prompt I had fun using a few different stamps such as the Birds on a wire stamp
and the Row of stars stamp

and the Washi chevron background stamp

that you can also find on Plate 917
and I made an art journal page using a ton of paint and lots of journaling
I hope you enjoyed my page and hope to see you pop on over and play along with us over at the A Year in the Life of an Art Journal!

Supplies used:

Staz on ink
Lots of various paints
Image from magazine
Sticker
Flower
Brad
Journaling pen

Saturday, April 13, 2013

Don't Forget Baseball Season-Pick Me Ups!

Hey there VLVS friends, 
It's Pinky today sharing a fun card project with you. 

You know baseball season is rampant in the Hobbs home and I 
think it's so important to let my boys know that even in mid sports season
win or lose they are completely awesome!

I knew it would give my boy a giggle and a lift for the day. 
See? Not all my snarky stamping is for evil! haha
 I used some very sporty Kraft papers to create this sports themed
card and I just know my little man is going to love that mom made him a card too!
  1. Trim out 9X6 Cardstock.
  2. Use bone folder to fold card in half at 4.5".
  3. Trim out dark blue cardstock base ay 4.5X6".
  4. Trim out patterned paper to 4"X5.5". 
  5. Adhere card front to each other using Miracle Tape. 
  6. Pop out Jillibean Soup Game Day Chili die-cut.
  7. Use Clearsnap Ink to stamp Viva Las VegaStamps My Daily Routine Stamp onto die cut.
  8. Trim out pennant shape.
  9. Adhere to card using pop dots. 
  10. Adhere extra die cuts. 
  11. Add stickers from paper pack. 
Give with a cookie and a smile! Watch your child's face light up.
Until next time, I hope you enjoyed this spirit lifting card!


Products Used:
Jillibean Soup Game Day Chili Collection
Clearsnap Ink
Cardstock

Friday, April 12, 2013

Steampunkery and Pigs Can FLY!!!


Welcome to Viva Las Vegastamps! - it's finally FRIDAY and I'm so happy - this week has been a whirlwind. There is a new Viva Las Vegastamps! SWAP this month and we are trading Button Fairies. So I thought I would give you all a little primer on how fun and easy - AND - TOTALLY ADDICTIVE they are to make. Once you start... you just can't stop! Not only did I make a button fairy today... but I proved PIGS CAN FLY... Steampunk one's that is!


I have to say that I had so much fun making this and I only used ONE stamp - Winged Pig Large #9476.


**TIP FOR THE DAY** Stamp an image on different types of paper and fussy cut them back together. For my Steampunk Pig Flyer - I stamped his wings onto scraps of distressed aluminum tape paper and the pig onto cardstock with overspray from  another project. I stamped the image three times so I could fussy cut and pop-up the snout and right ear when pieced back together.


You don't need a whole lot of supplies - just some beads, buttons and other findings, and some wire or ribbon to link them together. I hand colored my pig pieces using my Ranger Distress Markers with a waterbrush and cut out.


Starting from the bottom I fed a silver bead with wire folded in half and began to string the beads an buttons from smallest to largest; twisting the wire and feeding through button holes and shanks. Feel free to mix and match goodies from your stash.


I added a glass bead between each button to add a little sparkle. These are so much fun embellishing! To see my "White Rabbit Fairie" that I shared how I made on the Saturday Crafts Fair, please CLICK HERE.


I added a shield made of a resin cast shell and an assortment of layered gears and metal junk. The finishing touch is a zig zag clip affixed to a piece of twisted wire to be his beanie propeller - now he's officially a "STEAMPUNK FLYING PIG!!!" I hope you'll enter our SWAP - CLICK HERE for all the DETAILS.

•••••••••••

Supplies used: STAMPS - Winged Pig Large #9476. Other supplies: Assorted buttons, beads and gears from my crafty stash; a resin piece of shell created with Amazing Mold Putty and http://www.moldputty.com; Staz-On Black ink; Miracle Tape; 3-D foam mounting tape; Ranger Distress Markers; and water brush.
Thanks so much for dropping by. Have you seen what the Viva Las Vegastamps! Design Team has been creating or dropped by the Viva Las Vegastamps! store lately? There's so much amazing inky inspiration to see!  If you would like to see more of my creations please visit my blog, sbartist : painting in the dark HERE. I'll be back soon with another stamping adventure...and I'm starting off April on an adventure of my own - a trip to the WORLD FAMOUS Viva Las Vegastamps! Have an inky day - and a fabulous weekend! Sb

Wednesday, April 10, 2013

Steampunk Jungle Rhino

While building up your collection of fabulous Viva Las VegaStamp images, even 1 image has a variety of options to create with!  I fell in love with this rhino and had to have him!!!

VLVS images:

15988 - Steampunk Rhino
16023 - Steampunk, Solid Background
19022 - Explore

Miracle Tape

 Clearsnap Smooch Inks
Papers and Embellishments from Bo Bunny Press

On decorative background paper, add a large label card to add your focal point - the rhino.
Don't be afraid to mix themes - this is steampunk and jungle papers with embellishments mixed.

The rhino was stamped in a brown hue to match the large jungle label.  Color various areas with Smooch Inks.

Die cut gears added for contrast as well as steampunk vignette with gears and swirls.  Key emphemera added at the bottom left.  Rhinestones added to a couple die cut gears.

Add sayings - Explore and Steampunk, to finish the layout.

*A photo from a visit to the zoo can be added as a special touch to showcase the day out.

VLVS images are perfect for any decorative papers and/or media you want to use!!  Various inks, paints, papers lend themselves so well to the vast amount of images VLVS carries.

CreativeLea Yours - Lea


treasure box

Hi Hermine here again! I made this box because I love giving presents and like to "wrap" them in an awesome way. I used an exciting template from a box I received years ago and altered it (more about that further along in my article)


Take a sheet of cardstock and stamp the pigs in basket (9686) with Versafine ob you paper. Then I took an excisting template and altered the size of the bottom part to fit the size of my stamp. Trace that part of the template with pencil. Stamp the pigs again on the other side. Mask the image and stamp the tekst  Don't follow your dreams chase them (19003).


Then take a scrap piece of vellum and put over the image, this way you still can see the image.

 
Cut this shape out and trace around it. Flip over to the other side so it mirrors it, this way when you fold the two parts they line up perfectly.

 
Cut out the whole template, score the lines and erase the pencil lines.

 
Colour your background and images. Stamp the sunflowers (19119)

 
Then I realised that I made a misstake. Because I altered the size of the bottom part I realised that I also should have altered the size of the side flaps (why is it that you ALWAYS find out you made a misstake when your almost done DUH!). That was so frustrating, so I thought two things, one: I throw it away and start over again (which I think is such a waste of time, effort and materials) or two: try and find a solution. I opted for the second option and made a link between the 2 flaps by making a template, this time carefully measuring with a piece of scrap paper, then when I saw that it could work I traced around it on cardstock, cut out twice, colour them and stamp the bricked background (19077). I love the way that turned out, so we don't call it a misstake any longer, now we call it a happy accident hahaha.

 
And here we are, an awesome little gift box, you can put some chocolats, money etc. in it

Used  materials:
Pigs in basket (9686)
Don't follow your dreams chase them (19003) also on plate 893
Sunflowers (19119) also on plate 923
Bricked background (19077) also on plate 917
May Arts ribbon

Hope you like my tutorial, and please remember one important tip: if you ever decide to alter the size of one part of a template please remember to do so with the other parts, it makes life so much easier :o)

Warmly HERMINE