Showing posts with label ATC swap. Show all posts

Saturday, April 20, 2013

The great ATC swap!

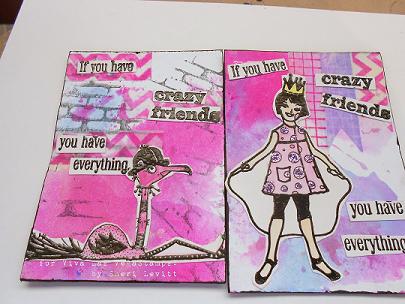
April 11th I went to an Art Retreat with some crafty friends I've met on line over the years from Ustream. Its was a blast!  One of the things we did was an ATC swap. It didn't take me long to make 25 ATC's. And no there not 25 people going, its just how many I made. I had the backgrounds done for a while and sitting in my stash, so all I had to do was cut them to ATC size and stamp and decorate away.


I used 3 different sentiments stamps and 4 Mary Vogal Lozinak images. The 4 images I used were Bird head on stick, Flamingo, sitting bird, One eye monster, and jump rope girl. The 3 sentiments I used were If you have crazy friends you have everything, I'm not insane, and I'm not weird.The background are all different  But I am surprise on how many stamps I used for this project. lol I stamped them all on white cardstock in black Versafine ink pad and embossed with Ultra high gloss clear embossing powder. I colored them with watercolor by Artist loft. The Jump rope girl I added some stickles to the circles of her dress. I stuck them down with Miracle tape.The sentiments I cut in to pieces and glued them on the ATC's Glossy Accents.

One set of backgrounds I did was using water down craft paints and sprays on some glossy paper or Kromecote and then placing the plastic wrap over it. Let it dry. Once its dried you get some cool texture background.


The other background I did was a left over piece of white cardstock that I had dragged some sprays  through to get some cool effects. These I added the six hexagon background and brick background and made some washi tape with the washi tape backgrounds stamps using the Chevron, grid and reverse grid.

The 3rd set of background I did was bubble background using dish soap. You can also use kids bubbles. I poured some dish soap in a small dish and a straw I blew some bubbles and then sprayed some sprays like Lindy's stamp gang, or S.E.I. Tumble dyes, or Color wash. Then I took some glossy cardstock and Kromecote and dragged them trough the bubbles. After that To add more color to it I added some drips with the sprays.


The last background is an old school technique with wax paper resist technique on glossy paper or in this case Kromecote. Instead of crumpling the wax paper for texture I used a embossing folder by Sizzix with the wax paper. After I ran the folders through my big shot. I tool a piece of Kromecote and put the wax paper on top if it then placed a piece of copy paper on top of that. That's so the wax doesn't mess up your iron. I used my craft iron to melt the wax on to the Kromecote. Then I took my brayer and an ink pad and put some color on it to get the resit from the wax paper. 
This one I used one of the retro texture fades by Tim Holtz and Mowed Lawn Distress ink pad.

The ATC's from that paper

This one I used a diamond embossing folder and Black Soot distress ink pad and then for more fun I  dragged this piece through some bubbles.
The results of that.


 After I cut all the backgrounds to size I glued them on to light-wight cereal box chipboard. I edge the edges with black craft paint.

And what to put the ATC's in after I get them all....in a little book of course! 


The "pages" of the book are 12 x12 papers from Crowded Attic, Lost and Found and Destination by Tim Holtz. I scored  them at 1/2" 2 1/2",6",9 1/2 ans 11 1/2. Then turn it and scored at 3,6, and 9. then folded all the score lines. The book cover  is made out of chipboard that I covered in scrapbook paper.I used Miracle tape to attach the papers to the chipboard along with Aleen's tacky to insure it sticks. I used rubber bands (you can also use hair bands or those shaped band bracelets the kids wear)to attached the pages to the book at the first crease. This way you pull the page out.


The spine where you see the brightly color bands, I dyed some May Arts trim with Espresso Color wash. The one trim was a cream with tan check squares on it. It took the color awesome. I also dyed some of the Raffia by May Arts which turned out great. I also used some brown twain too. I tied them to the rubber bands.

The cover I cut out the one sheet of the Destination paper where it has the alphabet ala license plates. I spelled out Austin ATC. I attached those pieces with Miracle tape. I punched a hole on the front and back cover. The front I put a hitch post, the back I put an eyelet. I made my closure with a swivel clap with some charms in my stash. I put the clasp through the eyelet and one of the charms around the hitch post. On white cardstock I stamped the Texas Barbecue and Woot! with black Memento ink pad. I then distressed them with Vintage photo and Walnut stain distress ink pads. Attached them with Miracle tape.


Stamps used

Bird Head on stick
Flamingo
Sitting Bird
Jump rope girl
One eye monster
If you have crazy
I'm not insane
I'm not weird
Washi chevron background
Washi grid background
Washi reverse grind background
Six hexagon background
brick background
Woot!
Texas Barbecue

Items used
Miracle tape
Kromecote
May Arts
photo paper
various sprays
kids bubbles or dish washing soap
wax paper
plastic wrap
water down craft paints
glossy card stock
craft iron
embossing folders
watercolors
water brush
stickles
lightweight chipboard
Brayer
Mowed Lawn Black Soot, Walnut Stain, Vintage Photo distress ink pads
Black graft paint
Aileen's tacky
Tim Holtz Scrapbook paper
Tim Holtz Hitch post
Tim Holtz swivel claps
Charms
Scrapbook papers
rubber bands


Don't forget Viva Las VegaStamps! is having free shipping until April 25! Great way to stock up on Miracle tape and  to get the new rubber stamps that are now out! :) Code is "freeshipping"

Wednesday, January 30, 2013

Making Backgrounds!

It is always fun to try new techniques using what is around the house, shop/garage or in our creative supply stash.  Today's post is about making backgrounds. 

Faux Wood Background
This is an ATC from a SWAP... The theme of the swap was "FROM THE SHOP." My shop items are masking tape and locking washers! over lapping layers of Masking Tape on the base card stock (2 1/2 x 3 1/2), swipe with Chocolate Brown. Stamp VLVS! Harlequin Diamond Background with Barn Red after stamping off. Note: stamping off is inking the stamp then stamping on another sheet of paper before on the actual project.  Next stamp the VLVS! Easy Dog Rider and Route 66 Road Sign with Black. Cover the entire card with VLVS! Ultra High Gloss Embossing Powder, heat the embossing powder until clear, this gives the card a nice finish. Add locking washers (available at the hardware store) for embellishment and a touch of color with COPICS.

Supplies:
VLVS! Stamp Harlequin Diamond Background
VLVS! Easy Dog Rider
VLVS! Route 66 Road Sign
VLVS! Ultra High Gloss Embossing Powder
Masking Tape (shop)
Card stock
Inks: Chocolate Brown, Barn Red and Black
Heat Emboss Gun
Locking Washers(shop)
COPICS

RESIST With
Stamp the VLVS! Nike Statue and VLVS! Two Columns in the back ground with white ink (one statue with violet ink), using masks to keep from stamping over previously stamped images. Heat emboss with VLVS! Ultra High Gloss Embossing Powder.  Spritz with mists, wipe the mist from the embossed images. Randomly stamp VLVS! Swirls to create borders with violet ink. Ink May Arts Lace with chocolate ink and adhere with VLVS! Miracle Tape. What a great background!!!
Supplies:
Journal Clairfontaine
Ink White - Violet - Chocolate
Mist - Winter Grass Stewart Superior
Mist - Sandalwood 
Add VLVS! Lady with Arms stamped on Kromecote Cardstock, fuzzy cut and add her in the foreground.  


Washi Tape Background
To see step by step instuctions on making your own Washi Tape check out Dee Dee's Washi Tape Tutorial posted earlier this week. It is well worth watching!!!
For this card place VLVS! Miracle Tape 1 inch on white tissue. Use an dauber or sponge to apply brown ink directly to the white tissue. 
Randomly stamp images of VLVS! stamps Draw,Pen Tips, Pointed Pen Tip, A Drawing Is and This is where I draw the line on the tissue. Note: the images are partially stamped on the tape. Now you have beautiful one of a kind Washi Tape.   
For this card the Washi Tape was cut to fit the card stock panel and used as a background. A few pen nibs were added in the lower left.  Stamp the VLVS! Feather Pen Collage on coordinating card stock and mount with foam tape.
Supplies:

White Tissue (dollar store)
Pen Nibs (thrift store)
Card stock
Ink Brown & Black

Curtains
Another background can be done using VLVS! Stage Curtains stamps to create a mini stage. This is a background I used last weekend when the VLVS! Design Team had their fantastic blog hop BLAST FROM THE PAST using VLVS! Oldie But Goodies Stamps! My stamp was the VLVS! MAN WITH HOOP! Here I created an altered tin with a stage.


Supplies:
VLVS! MAN WITH HOOP
VLVS! Chevron Banner
VLVS! Stage Curtains
VLVS! Ultra High Gloss Embossing Powder
May Arts Ribbon & Fibers
Altoid Tin
Transparency
Cream card stock
Pink Card stock
Black ink
Red ink
Stickles
Sakura Crystal Lacquer
Hearts Made from Creative Paperclay®
Be Mine - Sticker
Foam Tape
Small blocks


Now is the time to stock up on your Viva Las VegaStamps! 
They are now  47% OFF!!! 

Saturday, November 10, 2012

Follow the red brick road


Back in Sept. I was in a Tag/ATC swap on the VLVS! forums. the theme was open, we could do anything we wanted. We just had to make sure the atc's and Tags go with one and another.

One thing I wanted to do flopped. so went another route. I was inspired by this one picture I saw on pintest. It was from the movie Wizard of Oz where Dorthy landed in Oz and she was going to start her journey down the yellow brick road and the caption of the picture was "Where do the red bricks go to?" And that got me thinking "What if Dorthy went down the red brick road."

I don't have the #8 tag die, but last year when I was visiting a friend, she had the tag die and i die cut a few. I also took the negatives from the die cuts. I traced the negative on manila file folders. I cut them out and then Gessoed them. I then did a layer of water downed craft paint in Magenta. I then painted it Raspberry craft paint that is a glossy craft paint.  I used a brick stencil that another friend made me and sprayed some Hottie pottie Hot Pink Starbust spray by Lindy's stamp Gang. With the same brick stencil and with Molding paste(In this Tag/ATC project I used Golden soft molding paste that was in the starter pack of mediums and the Blick's brand when I ran out of the golden stuff in the little jar.) With A pallet knife I scraped some of the molding paste on the stencil in various places on the tag. used the heat gun to dry it. After it was dried I spritzed some Golden yellow Tumble Dye spray on the craft mat and painted (yes painted!) all the bricks.  I put some water down black and white craft paints on a paint pallet and with a brush made some drips and splats. The background looks likes this.


I backed the tags on lightweight chipboard and painted the edges with black craft paint.

On white cardstock I stamped the Fat Fish in High Heels, Many armed clock person, and Wheeled man in black Memento ink pad. I painted them with Distress ink pads in Picked Raspberry, Mowed Lawn, Salty Ocean, Wild Honey, and antique Linen. The Silver in the wheel is Pearlesnt watercolor. Fussy cut them out. The fish and the man I used foam tape, the clock guy I used Miracle Tape and Glossy Accents. 


The sentiment on the tag I typed it up in Word. I tried to pick a good font to fit the Oz theme.  I then took some pink ribbon I had gotten at a thrift store and cut small pieces and out then trough the top of the tags and stapled them.

Next are the ATC's

They are also are on Manila folders and Gessoed. I wanted to use the opposite colors on the ATC's that I used on the Tags. So instead of the Pink in the background color I wanted the Yellow. I sprayed the Golden Yellow Tumble dye spray on the atc. Didn't like it. So after it dried. I painted the atcs with yellow craft paint. I then took a tire tread stencil that the same friend who made the brick stencil made me. (thanks Jean!) and molding paste. scraped some of that with the pallet  knife on the atc. Once that was dried, I painted them (call me crazy!) with the water down  magenta craft paint. I then made drips and splatters with the water down black, white and the magenta craft paints. (to have a bottle of water down craft paint. When the bottle of color craft paint is almost empty, just take it and fill it with water. and shake it a bit.) I backed the atc's in lightweight chipboard and painted the edges with black craft paint.


On white cardstock I stamped the Braids Lady and Sitting Bird. Colored them with distress ink pads in Picked Raspberry, and Salty ocean. I used peach water color for the girl's face. I used Glossy accents to the girl (the glossy accents help stick the girl more to the parts of the atc that had the molding paste on it) and foam tap for the bird. Again i typed the sentiment on Word with another font that I thought was OZ like. Glued the words on to the ATC. 


We had to put a pocket or envelope on the back of the tag, I had some atc sleeves that i had gotten from other swaps I was in. I used Miracle tape on one side of the sleeve and taped them to the back of the tag and slipped the atc in there..


Stamps used

Items used
Manila folders
Gesso
Craft paints
stencils
Molding paste
pallet knife
tumble dye stray
Lindy's stamp gang Starburst spray
water down craft paints
foam tape
glossy accents
white cardstock
Wild Honey distress ink pad
water brush
peach watercolor
pearlesent watercolor
light weight chipboard
Aileen's tacky glue 

Sunday, June 03, 2012

Steampunk ATCs

Lyneen Jesse hosted a Steampunk ATC swap at the Viva Las Vegastamps! forum last month, and I couldn't resist.


I stamped this funky Steampunk Camel Item 18443 Plate 1390 .and decorated with Zentangle®-inspired patterns, then colored with Tim Holtz Distress markers.  A few beads and some little tubie-things I have--no idea what they are--and my card was done.

We were required to do eight of the same card.  It looked pretty cool with 8 little camels all in a row.  I hated to send them off!