Saturday, July 30, 2022

Many Thanks (Herzlichen Dank) ► Majo


Hi Peeps,

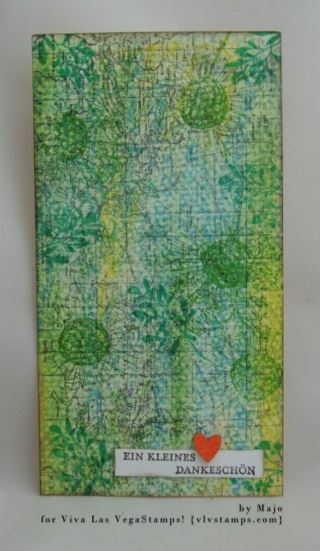
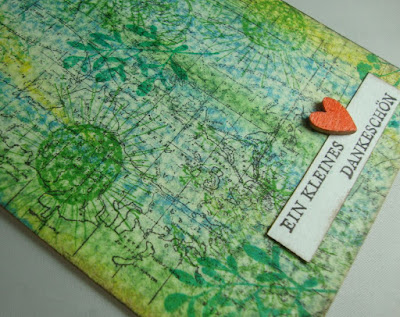
 I show you a gift bag I made for a friend. The sentiment is in German; she doesn’t know one word in English.


I colored the background with different distress inks and stamped the world map circles 
16096. I love the way this stamp always gives backgrounds some interesting texture without superimposing the whole picture.

 I added a few of my nature stamps:

14088

16685

14102

20146 

I computer generated the sentiment and added it to my panel. A little wooden heart finished of my bag.


Have a wonderful Sunday and find time to craft!

Luv ya ♥


Monday, July 25, 2022

THE SIDESHOW - by Fran Chalmers

Hello everyone!
Today I have made a card using the lovely Banksy bear on a unicycle! Here's how I made it....


 First of all I made a background by smooshing distress inks in Kitsch Flamingo, Mustard Seed and Picked Raspberry, drying between layers.


I then added background stamps in different colour inks (see below) to add a bit of texture.


I stamped the bear onto thick paper and coloured with copic pens.  I fussy cut it out and edged it with a black marker.


After placing the bear, I edged the mat with Spiced Marmalade distress ink, and coloured the bunting and the inside of the chevrons.  I stamped the sentiment in black straight onto the mat.


I glued the mat onto a white card to finish off.


Stamps Used:

Banksy Circus Bear 19977

Library Return Dates 20342 

Row of Scribble Circles/Eyes 20172

Row of chevrons 19829

The Sideshow 19061

Other Items Used:

Distress inks in Kitsch Flamingo, Mustard Seed, Picked Raspberry, Spiced Marmalade

Versafine Clair inks in Warm Breeze, Nocturn and Chianti

Copic Pens

Black pen


See you next time!


Friday, July 22, 2022

Vitruvian Man by Tracy Blackwolf

Hello everyone~ hope you're all keeping cool !

Here is my new blog post for this week.

So for this project I used the "smooshing " technique to create the colorful background.

I put a bit of the three colors I used on a sheet of glass, spread them with my finger and then spritzed them with some water to blend a bit.


Keep smooshing card or tag on ink until you like the result. Let dry and then drip water onto it to give a more distress look. I used oxide inks for this card.
When it was dry, I added a little yellow distress spray to give a sun break like look. I then stamped the Vitruvian man  on card stock and on a sheet of acetate, I painted the cardstock one and fussy cut him out. I cut out the entire image on the acetate.
Then I used several inks and stamps and randomly stamped the background on the tag.
I put two strips of 3d tape on the back of the man as I wanted him to stand off the tag,. I went into my Dresden trims wings stash and found the perfect wings for him. Those coper wings gave him a steampunk vibe so I stamped some cogs around the edges of the tag.
I also added some metallic wax around the edges of the tag to pull it all together. Last, I found some verbage stickers  to finish the tag.

And that's a wrap! I hope you enjoyed my art tag today! until next time~ stay arty!!


Stamps Used:
Vitruvian Man-Lg.     19763
Periodic table        19449
Atomic structure     19451
Human heart    20143
DNA strand     19437
Nesting gears 2      18077

Other supplies:
Distress oxide reinkers: Abandoned coral, Fired Brick, Black Soot
Distress ink spray: Squeezed  Lemonade
Redesign decor wax- Cosmic ray
Dresden trims- copper wings
acetate
#8 tags -TH
Versaclair inks- Black, Pinecone, morning mist



Saturday, July 16, 2022

Creature by Arwen

 Hi Lovelies

Welcome back here on the VLVS Blog.

This time, I wanna share my newest art journal page.


And that's the way, how I made it:


1.) I used watercolor paper from Canson and colored it with the "Tropicals" watercolors from Prima.


2.) After coloring the whole sheet, I used a tiny sponge, Distress Oxides and a no named stencil.

Background color is "Hibiscus" (type of orange)


3.) To use the stencil, I choose these two Distress Oxide colors - Seedless preserves and Picked raspberry.


4.) Adding some stamps on my background with ColorBox Chalks and Distress Oxide.


5.) To create my new creature, I used masks and my stamping plattform.

Now it's time to cut it out and give it some color :)

Result - a new aj page at the top of this posting .


All stamps, I used:

- Whimsical demon

- Bat wings

- Spinning circle

- Striped Leggings

- Art is anything

- Writing and scribbles collage

- Writing Triangles

- Punchinella


other stuff:

- Watercolor paper

- Staz on

- Distress Oxides

- ZIG clean color

- Distress Reinker

- ColorBox Chalk


See ya soon ❤


Monday, July 11, 2022

I'M WEIRD BY FRAN CHALMERS

Hi everyone!

Welcome to the blog.  Today I have made a postcard with one of the great clown stamps that VLVS do!


First of all I stamped my main image onto thick paper, coloured with copics and fussy cut out.


Then onto my background.  I blended some Elements Inks onto a piece of card.  The colours were Lime Punch, Pine and Blue Lagoon.


For some interest and texture, I flicked water onto the card and dabbed dry, then I put some thin gesso through a harlequin stencil.  I then stamped some of the texture background stamps randomly in black ink.


I stamped onto some tartan paper I had so that the clown had something to "sit" on, then fussy cut it out.


I finished it off by adding my sentiment, and putting some white gel pen on the gesso to make it more 3D looking.


Hope you like it! See you next time :)

Stamps Used:

Clown Face 6727

Carved Xs 20162

Mesh texture 1455

Scallops from Plate 1471

I'm Weird 18561

Other Items Used:

Elements Inks

Versafine Clair Ink - Nocturn

Copic pens

Thin gesso

White gel pen

Tartan paper


Saturday, July 09, 2022

Mouth of a shark by Arwen

 Hi Lovelies ❤

Today, I wanna share my art journal page with you.


Here are some close-ups:


The stamps, I used:

- Shark Head/large

- Cephalopod

- Soul of a mermaid...

- Scrabble Alphabet small


Other stuff:

- Staz on

- Watercolor paper

- Distress Reinker

- Gelli Plate

- Die cuts

- Acrylcolor

- Dylusions Shimmer spray 


Hope you like my project :)

See ya next time ❤


Tuesday, July 05, 2022

Creepy By Tracy Blackwolf

 Hello friends! 

Today I wanted to do a creepy art tag, so here we go....

So for this piece, I wanted the clown to be super bright and the rest to be gloomy. So I painted him in with 

Marker Forte re inkers. I like to squeeze some out onto my acrylic stamp block and use a bit water and a brush. After he was painted and dry, I fussy cut him out and set him aside.

I took a window baseboard and a mica tile and some clear holographic flakes to make my broken window. first I glued the mylar flakes to the inside edges of the window, let dry, and then used double stick tape for the mica tile. After it was taped down, I used a craft knife to cut a jagged hole in the "glass". Then more tape to stick the clown on, carefully pulling his hat flower through the window.

Yes, I did not like the first impression I got so I flipped the card over. At this point I added strips of foam tape to the window frame to give dimension from the tag. Next was to make the tag..
First I spritzed the tag with Speckeled egg spray, then I used a brush to pick up some re
inker of Weathered wood and dripped it from the top of tag. Next I did the same with black soot. I sprayed with a little water to make it run a bit and left it standing up.
I dried it with my heat tool and stuck the window with clown onto the tag. Found some creepy verbage stickers and that was it!
Hope you enjoyed~ until next time, Stay crafty!

Stamps Used:

Clown      7658

Other supplies Used:

Distress spray stain: Black soot, Speckeled egg
Distress re inker: Weathered wood
Maker Forte re inkers: Purple rain, Limewired, Rah Rah Skirt, California Love, Outrageous
Glitter hippo: Clear holographic mylar flakes
TH Frames Baseboards
TH Halloween verbage stickers
LG. Mica tiles for window glass