Thursday, October 31, 2019

Be very afraid ► Majo

Hello my friends!

Yes, I'm right on the spot with my Halloween card. I have had the beautiful winter wood scene for some time and it fit my card and the theme just perfectly.


I stamped my image on watercolor paper and applied distress ink in two different colors. I watered it down a bit to make it look more interesting and added the stars with a stencil.

After stamping the pumpkin I fuzzy cut and colored it. I used Faber-Castell PITT artist pens. I stamped my sentiment on scrap paper and adhered it with pop dots just as I did with the pumkpin on my card.

 A closer look?


I have used the following stamps on my card:


 I have used Distress ink in Peeled Paint and Shaded Lilac as well as Archival Ink Coffee and Black.

Thanks so much for stopping by, have a great week and don't forget that we will have a new challenge over at our Facebook group starting tomorrow.


https://www.facebook.com/groups/235408416563560/

Tuesday, October 29, 2019

Halloween Sale!

Ends Monday the 4th : HALLOWEEN SALE

Save 10% & get FREE SHIPPING : use coupon code SPOOKY


Boop! I got your nose --- by Elisa Ablett


Hey Gorgeous Stamps Groupies,

It is so good to be back creating after a short break. 
Life sometimes goes sideways and you gotta learn when to tuck and roll with it 😂💪

So to get back in the creative mood, I organised my stamps and I pulled out a few to make something for Halloween and then..... this Art Journal page fell together and it has to be one of my favourites.

Let's take a closer look !


So one of my favourite mediums to work with happens to be watercolour inks and paired with photo paper for the substrate, match made in heaven. When you smoosh, flick, drop, splatter or however you want to add the ink to your paper, it soaks right in and becomes ... permanent, vibrant colour! 

Try it today, i bet you won't be disappointed. Use stencils and waterbased ink sprays as well. All work wonders with photo paper. 

Stamp, heat emboss and fussy cut your skeleton out and put to the side. Then stamp the 'Dancing Lady' with waterproof ink, let dry and then colour using watercolours or if you prefer colour markers.

For the background, I set the 'spooky' scene by adding a landscape for the skeleton to stand on and also a crackling effect in the sky. Use Archival or Versafine black ink to stamp on the photo paper.

Add some stitching around the edges and staples for texture and effect up one side and then glue to your background cardstock and paper. 

Add your handstamped or computer generated 'quote' to finish up.

Stamps Used: - 


Other Products used: -

Photo Paper
Watercolour inks
Watercolour palette - Prima Odyssey
Sewing Machine
Cardstock - Black
WMRK Patterned Paper
Staples

Thank you for stopping by the blog today!
Don't forget to head over to the Facebook group - Viva Las VegaStamps! Groupies and add your OCTOBER entry.
We LOVE seeing what you create.
Make sure you leave some love on the Design Team Creations, we love hearing from you all x

Hugs x

Elisa 

Sunday, October 27, 2019

Not every piece of street art is Banksy

Hello everyone,

welcome to the VivaLasVegaStamps! blog where today I have a tag to share:


here's how I made this:


I started with cutting a tag out of Mixed Media Paper and colouring it with Lindys Stamp gang sprays. I used Star Burst sprays which are sparkly.


Next I stamped randomly over the tag with different VLVS! Stamps (list below) and I also used an Um Wow studio stencil called Dahlia with white paint. Because the sprays are watersoluble they react with the white paint.


Next I stamped this lady on the tag and on some more MM paper; I coloured her with Zig Clean Color real brush markers and cut her out. 


I then glued the cut out one onto the one on the tag; this was all the small details that are impossible to cut out, are there too. 


Next I stamped the sentiment, cut it into strips and adhered it to the tag. I doodled around the strips and also along the edges of the tag with a black pen.


Lastly I added a piece of ribbon. 

I have used the following stamps:

Other materials:
Mixed Media Paper; I used Daler Rowney 169 lb. or 250 gsm
UmWow Studio Dahlia stencil
Amsterdam Acrylic - Titanium White
Lindy's stamp gang Star Burst sprays: Marigold Yellow Orange and Yellow Rose of Texas
a piece of ribbon
Black pen
VersaFine Ink Onyx Black 
Distress Oxide - Carved Pumpkin 
StaZon - Dove Grey

Thank you for stopping by today ! 


Friday, October 25, 2019

BEWARE!

Happy Friday! 
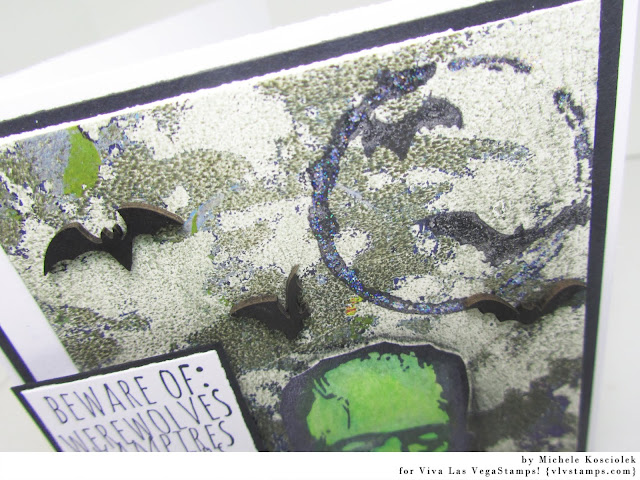
Michele here and with Halloween right around the corner I HAD to do a Frankie card!!

Stamps used:  Frankenstein's Bolts, Beware of, Bats Over Moon

I started with a spooky gelli print I did with Dina Wakley paints.


Stamped the moon and added a tiny bit of sparkle with some Stickles.


Frankie was next, cut out and colored with my Prisma Colored Pencils and blended with Gamsol.

Did you notice the scary chipy bats from Um Wow Studios??  Inked up black with archival ink!!

HAPPY HALLOWEEN ALL!!
Until next time...get inky!!


Wednesday, October 23, 2019

Little Boy Lost

Just like that recurring Halloween nightmare...
I am BACK..
with another Halloween inspired set of ATCs.

so my little Winged Boy actually did get a little lost in there but I think it works 
really well with the Halloween theme....
Scroll through the close ups and watch me create this little series... 


 Viva Las VegaStamps used:

Winged Boy (sku: 19062)

Full Moon (sku: 18911)

Flock of Bats (sku: 18909)

Mesh texture (sku: 15969)

Tape X (sku: 15972)

Other Products:
Watercolour paper
Ranger/Tim Holtz Distress Oxide Ink: Fired Brick, Scattered Straw and Candied Apple
Stazon: Jet Black
Shellac
Recycled Baby Wipe
Liquitex Gel Medium
Stitching
Tim Holtz: Chip words, Small Talk
Book Text.

Thank you all for checking out the video.
Don't forget to head over to the facebook groupies and add your OCTOBER entry.
We LOVE seeing what you create.
Leave some love on the Fabulous Design Team creations.

Live With Respect..
Leanne xoxo


Hello Sweet Evil | Sue Plumb


Hi everyone!
Sue Plumb here to share my latest design team project with you. Today I am sharing a mixed media scrapbook layout I created with some of the creepy stamps from the most recent release and a photo of my sister and I dressed up for a "bad taste" theme night. 


I began my layout with a sheet of white heavyweight cardstock, and created a watercolour style background using Distress Oxides. I did this by swiping the ink pads on my craft mat then spritzing with water, before laying the cardstock over the top to absorb the ink. I did this first with 'Iced Spruce' then dried it off and repeated the process with 'Carved Pumpkin'.


Once I had my background colour in place, it was time to add some stamping! I started with the Palmistry Palm, which I stamped over the top of the Distress Oxides.


I then stamped the Pirassoipi Bicorn and the Poison Caution stamps onto my background as well, using black StazOn ink again.


Once I had the stamping done, it was time to add my focal image, which was the photo of my sister and I that I had cut out. I mounted the image onto some scrap cardboard to help pop it up from the page.

To embellish my page, I stamped out the Cross Statue stamp three times onto some black cardstock using embossing ink, then heat embossed the images using gold embossing powder.


I then fussy cut around the crosses and added them to my page around the base of my photo.


Next, it was time for my title. I love a mixed font title, so I used a Kinder Kreations chipboard word hello, which I also embossed with gold embossing powder; then the wood veneer word sweet from Corbett Creations; and then some Cocoa Vanilla Studio alpha stickers.


To add a little extra detail to finish off my page, I used the Sky of Stars Background stamp to add a few little stamped stars, then added a some wood veneer stars that I had coloured black with a Sharpie. I also added some small gold mist splatters.


And with that, my page was complete! Thanks so much for stopping by today so I could share this with you. I hope I have inspired you to get inky too!


VLVS stamps used: 

Other materials:
- Bazzill cardstock
- Ranger Distress Oxides
- Tsukineko StazOn ink
- Colour Blast 'Bling' Embossing Powder
- Kinder Kreations chipboard word
- Corbett Creations wood veneer word and stars
- Cocoa Vanilla Studio alphabet stickers
- Heidi Swapp gold Color Shine

Sunday, October 20, 2019

Valley of the Blind - Art Journal spread by Cheetarah


Hi VLVS! fans, hope you all are doing great! It's Cheetarah here and I have a art journal spread to share with you made in my pocket watercolor journal. The stamps I used are listed at the end of the post. 


In my Hanemuhle pocket watercolor journal I stamped the whimsical Cyclops and Banksy line of punks with memento Tuxedo black on the pages. It didn't matter that the imprint wasn't as solid black because I am going to use watercolors over it. 

I really love the design of this cyclops, the eye is so wonderfully pronounced. Started with the face and just slowly built up layers as you do with watercolors. 

When I was satisfied with the look of the face I made a mask by stamping the image on post it paper and stuck it to the colored image before I went to do the background. 

Made sun rays by using a stencil and yellow, orange and gold watercolors. I extended the rays to the other page and darkened the 'punks' by using an indigo color mixed with a little bit of magenta to make it a little purple. 


To finish the page I stamped big and small numbers plus some dandelion seeds in orange to pull the pages together. The wrote the quote "In the valley of the blind, the One-Eyed person is King" with a Tombow fudenosuke lettering pen. 

Stamps used: 

Thank you for stopping by and have a wonderful day!

Wednesday, October 16, 2019

Fuck Head ► Majo


Hello everyone,
For today's project I have made an art journal spread using some of the latest release stamps. 

I love the new scribble girls by Tina Walker and I just had to use them on my page.


I stamped my images and used masking fluid to protect them from further coloring.

I added the ray silhouette and applied distress ink around the edges of my spread. After stamping the waybill I added more stamping for texture. I used the wildflowers and doodle dots staying in the same color range I used before.

After I rubbed off the masking fluid I colored the beautiful girls and stamped my sentiments on scrap paper.

Some close ups:


I have used the following stamps:
Women and sentiment from Plate 1517
3101 - Having a bad hair day
19416 - Waybill
19896 - Ray Silhouette
19666 - Wildflower Silhouette
19827 - Doodle dots from plate 1471

Hop on over to the shop to take a look at all our new releases:


Our challenge is still underway until October,31st, hop on over and join our fun:


Have a wonderful week and happy crafting ♥