

Thursday, October 13, 2011
Save 20% when you Pre-Order the new VLVS! plates
Check out http://www.vlvstamps.com/pre-order-plates-o-rubber.html for eight new plates of great images and sayings... we're getting close to 18,000 stamps! Also, we've been busy uploading new items to the Bargain Basement and you can find great deals there... and we now have consignment stamps from other companies... it's all happening at www.vlvstamps.com! and don't forget to check our Blog at http://vivalas.blogspot.com for great new projects from our Design Team!


Wednesday, October 12, 2011
Altered Globe
Hey all!! DeeDee here!! So excited to be back for a 2nd term with the FABULOUS Viva Las Vegastamps! and their GORGEOUS red rubber assortment!
Today I have an altered globe to show you featuring TONS of my favorite VLVS! Stamps.. and if you come back to visit me again in 2 weeks I'll have a short video to show you on using cling rubber to mount your favorite stamps on :)
Onto the project!
Here is the piece as a whole:
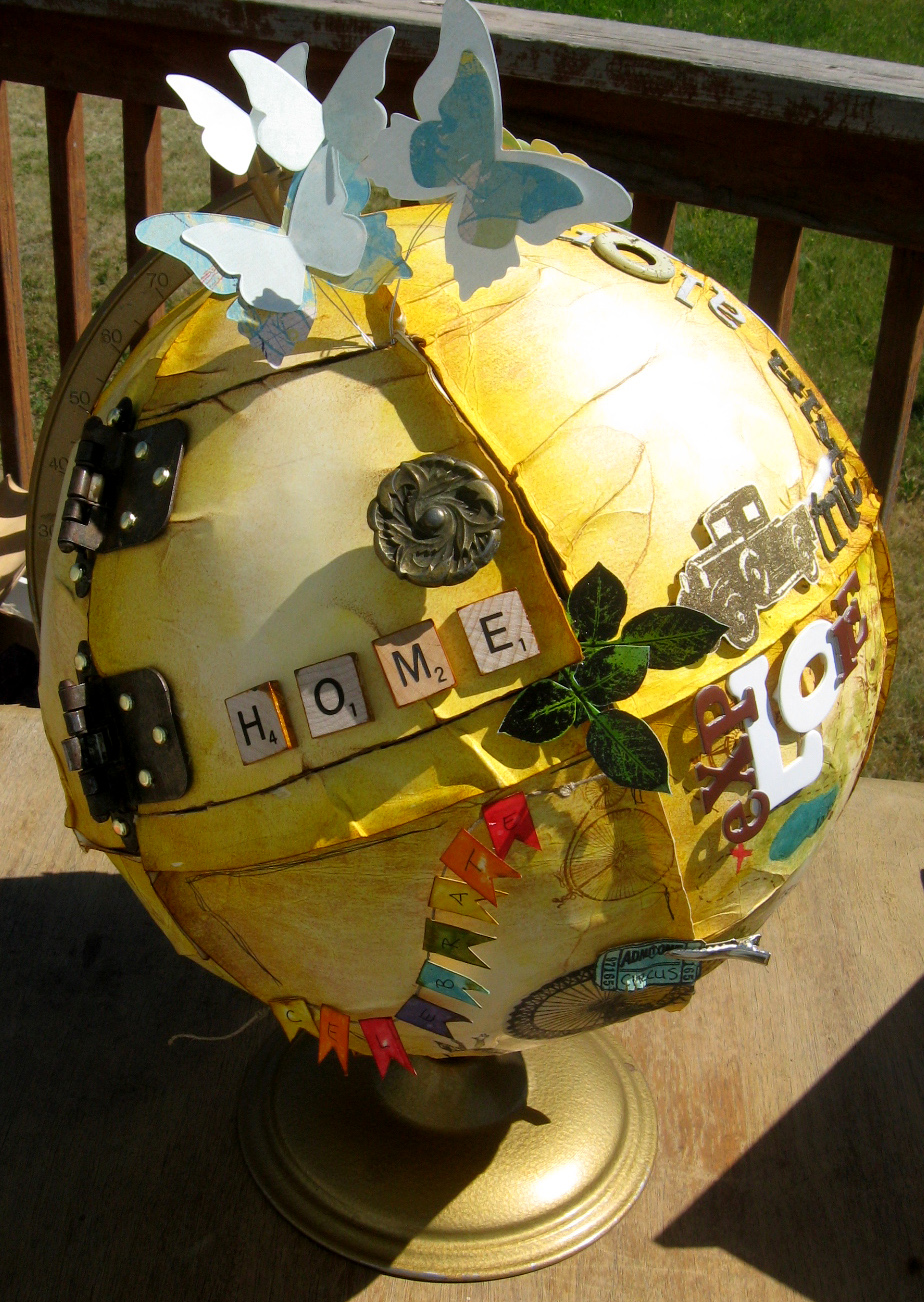
and here are my favorite three sections of the globe.. all featuring the most amazing VLVS! Stamps!

The celebrate section uses the Jester with Arms UP stamp, the Vintage Bicycle stamp and the Ferris Wheel stamp

The fly section focuses on the balloon stamp which was embossed with smooth black embossing powder and colored with a blue prisma color marker

and right next to the fly section is the brave the storm section using the Vintage Umbrella Man stamp which I first stamped on tissue paper and then glued down with watered down elmer's glue.. to REVERSE THE IMAGE! Such a super easy peasy and wonderful technique!
The base of the globe was made out of manila folders that were inked with mustard seed and vintage photo distress ink.. from there I just did tons of stamping, doodling and inking to create each section :)
Can't wait to see you next time! -DeeDee
Sunday, October 09, 2011
Ouija Board Halloween Card

Ouija Board Finished Card (5" x 7")
Welcome! I’m happy to be posting the first project of my second term on the Viva Las Vegastamps! Design Team.

Glitter Sepia Trees on Linen from The Robin's Nest
This month, the folks at The Robin’s Nest provided us with a selection of their papers to use in our projects. As I flipped through the pile, I saw my favorite – Glitter Sepia Trees on Linen. I love the color, tones, shadows and glitter. I knew I had to use it on my project.
I always think of spooky things being conjured up when someone uses a Ouija board and Viva Las Vegastamps! has the perfect stamp of a Ouija board! It measures 3.25” tall x 4.25” wide. Combine that with ghosts from The Robin’s Nest’s Glitter Ghost Camo cardstock and you have a successful séance.

Glitter Ghost Camo cardstock from The Robin's Nest
I wanted the sentiment to look like the Ouija board and found out that the most common font used on Ouija boards is Captain Howdy. You can download it for free from Urban Fonts. In case it sounds familiar, “Captain Howdy” was the name of the spirit the little girl talked to on her Ouija board in The Exorcist, so it’s the perfect font to use for Halloween.
With the paper, stamp and font set, I was ready to create my ghoulish 5” x 7” card. Here are the steps I followed.
- Print “Happy Halloween” in Captain Howdy font along a curve on acetate. Cut out.
- Cut a background mat from Glitter Sepia Trees on Linen (4.75” x 6.75”). Ink the edges.
- Cut out some ghosts from the Glitter Ghost Camo cardstock.
- Stamp the Ouija board on Sizzix Little Sizzles™ Hombre Texture Pad paper. The brown looks just like the aged wood you see in vintage Ouija boards. Cut out. Ink the edges.
- Stamp the Ouija board again on Sizzix Little Sizzles™ Hombre Texture Pad paper. Cut out the planchette (small heart-shaped piece of wood). Punch a hole at the end and attach a small piece of acetate to the back to cover the hole. This will make it look like the real playing piece, which has a small glass window that reveals the letter under it on the Ouija board. Ink the edges.
- Assemble the card.
- Adhere the planchette to the Ouija board with a pop dot.
Adhere the background paper to the card base.
Adhere some ghosts to the background paper (so they are coming out from behind the Ouija board).
Adhere the Ouija board with pop dots.
Adhere some ghosts so they are on top of the Ouija board. Use pop dots to support the parts that aren’t attached to the Ouija board.
Check out my other projects on my Create & Craft blog and Happy Halloween!
Joe Morgan
Saturday, October 08, 2011
Did you play our Monthly Challenge Last Month????
You can win a $25 Shopping Spree for our On-Line Store
Here is Last Month's Winner!

Winner was
Cheryl Lindsay!
with her Amazing Steampunk Card!
This Month'a Theme is "Halloween" so go order your Favorite "Halloween" Stamps from our Store and become the next winner... You can have your project featured here on our blog and you get to go shopping... Fun - Fun - Fun!
Thursday, October 06, 2011
Witchy Kitty Giftie
 It's exciting to be a part of the VLVS DT! With Halloween in just a couple of weeks, I thought why not use my Pound O' Rubber for a giftie project. VLVS has such a HUGE variety of stamp images, and chose to create a useful, fun, Trick or Treat container. What is funny is that I chose the kitty design first, made the project in the french fry box, then found the fry saying! I love being a little strange at times, and this saying worked perfectly!!!
VLVS Stamps & Products:
Halloween Kitty: 2035
Fries Quote: 332
Miracle Tape

Other materials:
Orange, purple, green, light gray, and light green cardstock
Black & Purple Permanent Ink
Decorative and regular scissors
Hand or Electric (Software) Cutting Machine
Green Glitter
Bone Folder or Straight Edge for Scoring
Gelly Roll Pens
Note: A fast food french fry container can be used as a template and traced if you do not use any cutting machines.
 |
| Pound O' Rubber |
Trace or die cut french fry container shape. Using an electric die cutter and software, you can create any size container you want. Use the bone folder to score in the appropriate areas to create the creases to fold the container. Use Miracle Tape on two flaps and adhere box together (see image below) .
 Miracle Tape is Fabulous!!!! Had to mention this because I've been frustrated with other liner tapes in the past. Look at the blue handle for ease of application and cutting. You pull back, and viola', the tape is cut. The best part is the hold and flexibility. I can remove the liner with the flick of my nail and it comes off easily and the tape is stuck to my project! I can line up my sides without the tape accidently sticking before I want it to, there's give so there's no hassle.
Once the fry container is finished, stamp the kitty stamp on light gray cardstock. Color with Gelly Roll pens and cut out. Color the background so when you cut, you have a bright background for contrast. Stamp the fry words on the green cardstock and cut with decorative scissors. For the scallop, you may have some in your stash of collage/scrapping materials or you can use your cutting machine to make one. Use the Miracle Tape to assemble the elements as seen in the photo above.


Ok, candy isn't for me on Halloween, I could lose some weight, ha ha ha. So I'd rather rack up the pounds in rubber - this is the giftie I want!

I look forward to sharing more ideas and projects with you, hope you have enjoyed this one. Be sure to check my blog, and always see what goodies VLVS has on its website.
Tuesday, October 04, 2011
More Halloween at Viva Las Vegastamps!
Hello! Lyneen here, I am really excited to be a member of the amazing Viva Las Vegastamps design team. Today on my debut post I am sharing two projects, my first, is a Halloween Treat Cone using the Viva Las Vegastamps Cat & Bat Jack o’ Lantern stamp!

Cut cone from Robins Nest - Halloween Glitter Stripe paper, (I used a pattern borrowed from Gingersnap Creations.) Score on fold lines, fold cone, don’t adhere seam at this time. Punch holes with Crop-o-dile on sides and attach eyelets for ribbon. Cut black crepe paper four times the length of the top of the cone. Using needle and thread gently do a loose stitch, then gather. With Viva Las Vegastamps Miracle Tape along the top inside edge of the cone attach crepe paper. Around the top outside edge of cone embellish with black Stickles. Set aside to dry.

Stamp Viva Las Vegastamps Cat & Bat Jack o’ Lantern on white cardstock, color pumpkin with COPICS, add black Stikles to the cats and bat on the face of the pumpkin and set aside to dry. Punch scallop circle from black cardstock and edge with black Stikles, set aside. When dry, using Viva Las Vegastamps Miracle Tape, adhere Robin’s Nest Orange Dew Drops to the pumpkin cat eyes. Attach the pumpkin to black scallop with foam tape and attach scallop to the cone using foam tape. With Viva Las Vegastamps Miracle Tape on cone seam adhere the two sides. Add ribbons for handle. Your cone is now ready to fill with Halloween treats!!!
Supplies for Cone:
Black Cardstock
White Cardstock
Stickles -Black
Memento Black Ink
Ribbon
Crepe Paper - Black
COPICS - Orange and brown tones
Eyelets
Needle & Black Thread
Foam Tape
Cutter
Scallop Punch
ScorePal
Cropodile
Scissors
For the card I used the Viva Las Vegastamps Haunted House and Viva Las Vegastamps Skeleton in Long Coat.

First, create a small panel, stamp the Viva Las Vegastamps Haunted House on a transparency and heat emboss with Viva Las Vegastamps Ultra High Gloss Clear Embossing Powder, color the moon with yellow Copic on transparency. Stamp the Viva Las Vegastamps Skeleton in Long Coat on orange paper.

Using Viva Las Vegastamps Miracle Tape layer transparency on orange paper, then layer on black cardstock. Cut Robin's Nest - Glitter Ghost Camo cardstock layer on black card stock and adhere to card using Viva Las Vegastamps Miracle Tape. Attach Viva Las Vegastamps Haunted House with foam tape. Attach Happy Halloween ribbon with Viva Las Vegastamps Miracle Tape.
Supplies for Card:
Orange Scrap for Haunted House background
Card base
Black cardstock
Transparency
Memento Black Ink
Yellow COPIC
Ribbon
Miracle Tape 1/2 inch
Foam Tape
Cutter
Heat gun
Scissors
Visit the VLVS Store HERE
Get inspiration on the VLVS Blog
every Monday, Wednesday and Friday
New posts by the Design Team!
Join the monthly challenge...
New posts by the Design Team!
Join the monthly challenge...
for a chance to win a $25 Gift Certificate
Find out more about the
Just post the Viva Las Vegastamps Blinkie on your Blog or Website and get a FREE Grab Bag of Unmounted Rubber... details on the VLVS blog sidebar!
Visit my blog Dreaming of Castles HERE!
Have fun with your Halloween projects,
until next time have a SPOOKY OCTOBER!!!
Sunday, October 02, 2011
Halloween Lantern
I’m so excited to be sharing my first project with you, as a new member of the Viva Las Vegastamps! Design Team (DT)! It was so hard to pick just one Halloween image from the huge variety of stamps Viva Las Vegastamps! has in their 15,000+ collection that I needed to come up with some way to use many stamps. I love three dimensional pieces made from paper and Halloween makes me think of nighttime, so a lantern came to mind.
 |  |  |  |
This is a really simple project to make. I’m providing you with a zip file of the pattern (as a PDF you can print and cut out, as an SVG file you can import into cutting software and as a Sure Cuts A Lot SCAL V2 project file). CLICK HERE to download the Halloween lantern pattern files.
It started with a half-gallon cardboard milk carton. Wash it out well and cut off the top. Leave a small tab at the top of each side so you have a place to adhere the roof.
Cut out four roof panels, four frames and the top piece from cardboard. I used cereal boxes. Use the inside piece of a frame as a template to cut a window on each side of the cereal box about 1” from the bottom using a craft knife.
Once you have all the pieces cut out, cover them with aluminum tape, dry emboss the roof panels (to give them some texture), and coat the pieces with black alcohol ink. Once the ink is dry (about 10 minutes), distress the surfaces with a steel wool pad. This will make the embossed pattern really pop and gives the lantern an old steel-like finish.
Punch a small hole in the center of the top piece so you can attach a wire to use as a hanger.
 Got milk? Or juice...or any square carton. |  Pieces covered in metal tape. |  Milk carton cut down. |
Cut out four vellum panels (using a frame as a template) and stamp your images with dye ink. I used these 8 stamps from Viva Las Vegastamps!:
- Grim Reaper 2 3/4 x 3 3/4
- Skeleton RIP 2 3/4 x 3 1/2
- Bat 3/4 x 1
- Spider And Web In Corner 2 1/4 x 2
- Corner Cobweb 1 1/2 x 1 1/4
- Skeleton Dancing 2 x 3 1/2
- Spider Looking For Little Miss Muffet 1 1/4 x 1 1/2
- Skeleton With Cigarette & Drink 2 3/4 x 3 3/4
Adhere the vellum panels to the frames with Miracle Tape and you’re ready to assemble your lantern.
First create the roof by folding the tabs of each roof panel to the back and then adhering them together using Miracle Tape. I stapled each tab too for extra holding power. Then attach the roof piece. Create a wire hanger and put it through the hole. I put a bead on top from an old necklace I picked up at a flea market.
 Roof piece dry embossed and top piece with hole punched. |  Underside of assembled roof. |  Pieces dressed to look like old steel. |
Adhere the roof to the milk carton by using Miracle Tape on the tabs you made along the top of the cartoon.
Adhere three of the frames to the milk cartoon using Miracle Tape. Attach the fourth panel with magnetics or Velcro dots, so you can easily remove it to maintain the battery operated votive candle.
For added fun, dangle a spider from a thread under the roof. Just punch two spiders and glue them back to back with a piece of thread sandwiched between them. Coat the spider withCrystal Lacquer for added strength (and some shine). Attach a red rhinestone. Use a needle to punch a hold under the roof and tie up the thread.
Think how fun several of these would look around your house (they stand really well) or hanging in your front yard!
 |  |  |  |
I also want to invite you to participate in the Viva Las Vegastamps! Theme Challenge for October. Submit “Halloween” creations you made using Viva Las Vegastamps! for a chance to win a $25 gift certificate at the Viva Las Vegastamps! online store. CLICK HERE for submission instructions.
Visit my blog at Create & Craft to see my other projects. Have fun!Joe
Subscribe to:
Posts (Atom)