Tuesday, August 29, 2017

Something wicked

Hello everyone,

welcome to my last post for August ! Can't believe it is almost September ...

Anyway for today I have a postcard to share and this is it:


and here's how I made it :


I made the background on water colour paper. I put the Oxides on my craft sheet, sprayed water over it and then dunked my card in it repeatedly, drying in between layers. 


Next I tool a pallet knife and some white acrylic paint and scraped some over the card. 


I liked the result. Next I added stamping; I used the same Distress Oxides and grey and black Archival inks. 


This was the result.. 


Next I stamped my images onto some pattern paper which hasn't got any pattern on it, lol... but the colour of this paper matched the paint I used... 


After I cut everything out I adhered it to my card and doodled around the edge and around the words.


Here's a detail... 


and another.. 

I have used the following stamps:

Thank you so much for stopping by today ! 


Monday, August 28, 2017

Mail Art Monday with Shanna


Yes its time for some Mail Art Monday! I feel like it has been forever since I shared my last piece of mail art with you all. 

So here she is! I am telling you the new stamps are so fun! I mean y'all just don't understand how easy it is to pick them up and go crazy (because I sure did but don't tell anyone)!


So I had a chance to make a video for you in case your wondering how I created this envelope. It was super simple and easy! 


Here are some close ups of the stamps I used!


Stamps Used:

Other Items:
ColorBox Pigment Ink - Frost White
StazOn Black Ink
Dina Wakley Paints 
Gelli Plate
Black Paint Marker


Thank you all for stopping by today! 


Thursday, August 24, 2017

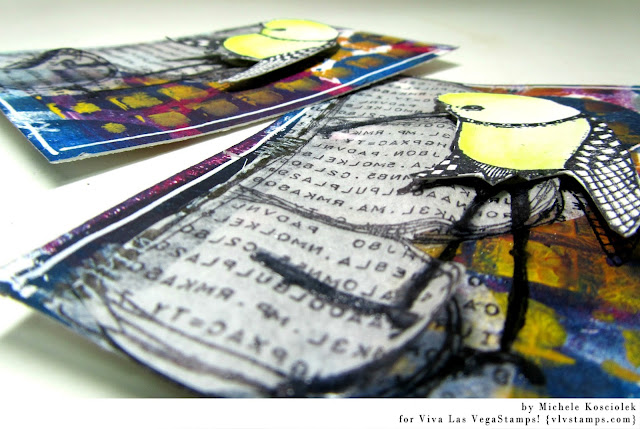
Whimsical Bird ATC

We have our August inspiration challenge

 AND our August swap still going on.  The August swap is for ATC's and the theme is: colors of the sunset.

If you have been watching the challenges and swaps lately you might have npticed that we have been picking themes for the swaps that go with our inspiration challenges.  That way you get more bang for your buck!  You get to swap art and link up for a chance to win!

So now that you have the insider information...on to the project I am sharing today...  I created ATC's for our swap inspired by the colores from the inspiration challenge that just HAPPENED to be colors of the sunset or at least my interpretation.


I started with a piece of watercolor paper, my gelli plate and Dina Wakley acrylic paints.  Oh and stencils too, one from Um Wow Studio.


I cut my two ATC bases from one of my prints.

I built up my layers by first stamping on a piece of tissue paper, fussy cutting and adhereing to my background.  Then I did another of the same layer and adhered only on one edge.


This is the Typeset Scallop stamp, one of my favorites from the latest release.


I love the texture.

The Whimsical Long Beaked Bird is stamped on all of the layers and then the body is stamped fussy cut, colored and popped up.


This bird is SO cute!

Here is a close up of the background...glorious colors!!!


Thanks for stopping by and I hope you are inspired to join us in either our swap or our challenge.  You can find the swap deatils in the events page of The Viva LasVegaStamps Groupies Facebook Page and the challenge info our our blog.

Until next time...get inky!

Tuesday, August 22, 2017

Finding My Way - Tag by Susanne

Hi everyone!

It's Susanne writing today and I want to share a mixed media tag with the lovely "Girl In Princess Costume" with you.
 
If you are gelli printing addicted, like me, you might have the same "problem": Tons of gelli printed backgrounds. This is one way you can use them:

Cut a tag from the background of your choice and stamp the main image:


Stamp the same image on white cardstock, too. Cut it out.


I did the same with all images that are on my tag. (Except from the sentiment and the tree on the background)


Colour the images with a medium of your choice (I used Distress Inks) and adhere them to the tag. I used a Nuvo Glitter Gloss pen to add some shimmer to the crown.


Here are some close ups:


Normally I use tags in my Art Journal, as a bookmark or to decorate gifts.
I hope you like this one. Thanks for stopping by today!
xx Susanne.


Supplies:
Viva Las VegaStamps!:
Girl in Princess Costume
Whimsical Worm
Compass
Finding my Way
Leaves Blowing from Tree
Others:
Gelli Print
Staz On ink
Distress Inks
Nuvo Glitter Gloss pen
Tim Holtz Stamping Platform

Thursday, August 17, 2017

Video Tutorial by Fiona

Hello VLVS! fans, Fiona here with you today to show you how I created some collage paper by stamping directly onto the gel surface with the stamps.

I then used the collage sheets to make a little mini album.


I embellished the cover with some more stamping.

 And added some little Um WOW Studio chipboard dudes on as well.


I think i might add some pages into this little one and turn it into an art journal or a little sketch journal.


Here is the video showing how I created the collage paper.


And here is the list of Viva Las Vegastamps! I used


Tuesday, August 15, 2017

Her Sparkly Star Shaped Self - August Challenge Inspiration

Hi all, it's Cheetarah here and I've made a little something for you to inspire you for our August Challenge. I have made an index sized art card inspired by the colors and imagery from our mood board below

Isn't it gorgeous and don't you just long for a summer sunset at the beach? 
It has inspired me to make the following

I am just absolutely in love with that Fancy Mermaid, the large moon and all the mixed media journaling stamps from the latest release. I've mixed a few oldies too, like the sentiment which is is a part of Tired of trying to cram stamp, which I LOVE! A full list of stamps and materials used is below. 


I also have a filmed the process which you can watch here:

Hope you enjoyed that and inspired you to play along with our monthly challenge :)

List of stamps used:

Other materials:
Gelli printed papers of which you can see the process HERE 
alcohol markers 
Staz-On inks store grey, midnight blue, azure
distress crayons 
liquitex titanium white INKS

Thanks so much for stopping by and have a wonderful day!

Monday, August 14, 2017

Mail Art Monday with Jenn Engle


Hey friends! Today I have an envelope to share with you.


Stamps Used:


I started out by putting a layer of gesso on my envelope. I taped off the center of Bug Specimens because I just wanted the frame. I could then heat emboss with black embossing powder to get a blank space for the address. Then, I heat embossed Wildflowers Silhouette with white embossing powder. I did this so it would act as a resist for the next step. 


I added some Distress Oxide Ink to my background to make it look like the sky. Where I had embossed the flowers, there was no ink and you can see the flowers perfectly now!


While my background dried, I took a piece of cardstock and several colors of Distress Ink and used a paintbrush to splatter all over the paper. I used Distress Inks, but any kind of watercolors or even acrylic paint would work. It just needs to be thin enough to be able to splatter with a paintbrush. Once I was happy with all the colors, I stamped Butterfly Specimens and fussy cut several of the butterflies. 


I glued the butterflies down with several strings of yellow thread behind them to make them stand out. I also only put glue on their bodies so their wings could stand up. If I was going to send this thru the mail on its own, I would skip the thread and adhere the butterflies completely. 

Finally, I splattered some watered down Dina Wakley Acrylic in Lemon around the envelope and that was it! To see exactly how I made this, you can check out the process video!


Other Products Used:
Distress Oxide Ink
Distress Ink
Black and White Embossing Powder
VersaMark Clear Ink Pad
Yellow Acrylic Paint

Thanks for looking!
~Jenn