When I saw this stamp, the Lady painting at easel,
my mind was full of possibilities for putting quotes onto the canvas, or even a drawing. I decided to use a quote and here it is:
Here are the supplies I used:
Lady painting at easel
Miracle tape
Cardstock
Watercolor pencils
Glimmer mists
How about you, what do you imagine on her canvas?
Tuesday, June 25, 2013
Monday, June 24, 2013
Button Button.. Who's got the button? {A Button Fairy Swap}
Hiya folks!!
Today I'm sharing an overabundance of beautiful art! Here are the results of our VLVS! Button Fairy Swap! We had an astounding number of participants and each day a new fairy arrived on my desk I was in total awe!!
Let's go to it shall we? Here they are in alphabetical order:
Today I'm sharing an overabundance of beautiful art! Here are the results of our VLVS! Button Fairy Swap! We had an astounding number of participants and each day a new fairy arrived on my desk I was in total awe!!
Let's go to it shall we? Here they are in alphabetical order:
This blue boy is by Anne Squire -- this stamp is long retired but still a favorite among those who snatched him during his sale days!!
Autumn Renault sent in this beauty! The wings on it are all metallic and glossy - super cool! She kept the Bandana Dog as the focal point for her fairy.
Barb Rankin chose a glorious steampunky style using our Vintage Fan Lady on a Balloon stamp. The feel is vintage, nostalgic, and super pleasing.
Cheryl Lindsey wows us with this monochromatic gal.
Chris McAdams used our Brick Background stamp to create the luxurious texture of her fairy's wings.
I decided to use our newest Octopus/Cephalopod stamp as the being portion of my fairy.
Gerrie Johnnic's fairy is sure to delight and create whimsy with the Skinny Girl.
Jennifer Walker used our Crackle Background to add some enchant to her wings.
Lyneen Jesse has a love for steampunk and her use of our Steampunk Couple shows it! Metallic-y goodness all around.
Mary Vogel Lozinak is always a hit and her Clown Face button fairy is hilarious!
Michele Kosciolek used our Corset stamp and molded her own fairy heads!!
Sandra Strait is astounding as usual with this Steampunk Dog Face canvas piece!
and Shawn Hayden used our Weeping Angel Child stamp(That split tail is AMAZING!) to finish us off! Fitting as that's the end of our button fairy swap.
But never fear!! We have ANOTHER swap going on ALREADY!! We'll be altering MATCHBOXES! So join us in our facebook group, read up on the info and let us know if you'd like to participate!
Labels:
button fairy,
canvas,
clown,
corset,
dog,
Mary Vogel Lozinak,
octopus,
Steampunk,
Swap,
Viva Las Vegastamps,
VLVS,
weeping angel,
Wings,
woman,
women
Sunday, June 23, 2013
Panties In A Bunch- Canvas by Pinky
Hey there VLVS friends,
It's just me Pinky- here today with another heartfelt touching projects-
JUST KIDDING...it's another sassy project of course!
I love making canvases and to be honest I start out with perfectly
good intentions of making them beautiful and heartfelt but in reality
I always end up putting something sassy on them...I mean it is from my
mind and I do have so many great saying from VLVS.
Today I am using Plate 1397 Images plus alot of GLITTER PAINT
To create this fun- girly canvas just for my friend.
It reminds you to have a huge heart, be a wonderful person
but also have a great sense of humor about life.
And how could I go wrong coating it in GLITTER paint, I mean
that's pretty much the best thing next to a new Viva Las VegaStamps stamp!
Enjoy your day- Thank YOU for stopping by and sharing in the fun!
Until next time- Keep on creating!!!
Products Used:
Viva Las VegaStamps Plate 1397 Item 18872 Angry Lady & Item 18875 Women Who Don't
8X10 Canvas,
Clear Scraps Frame & Banner Pieces,
Brick Mascil,
Glitz Design Sentiment Card,
Extreme Glitter Folk Art Paint,
Prima Pearls,
Clear Accents Gemstones,
Clearsnap Smooch Spritz & Metallic Inks,
Glassine Papers.
Labels:
altered art,
angry woman,
be brave,
canvas,
friends,
funny,
Glitter,
glitter paint,
humorous crafts,
Pinky Hobbs,
plate 1397,
Sassy projects,
Sassy Stamping,
women canvas
Saturday, June 22, 2013
Big Pants!
My last post for this term. It has been the most fun, wild ride with VLVS!!! I adore VLVS and will be a part of it no matter if I'm back on the DT or not!
This art is dedicated to Wayne Gartley who opened Viva Las Vegastamps in 1991. Jeff his nephew and our DT Leader DeeDee, now are at the helm running the show! Wayne is still around adding input and causing mischief ha ha!!
It was Wayne who helped me with the image above, the Man Losing Weight. I had asked about a certain person I wanted in rubber, and he directed me to this guy. This image made me laugh and filled the bill (ha ha) wonderfully.
After finding the image, I ran across several word stamps that added to a risque' - tongue n' cheek art. Wayne has a wicked sense of humor.
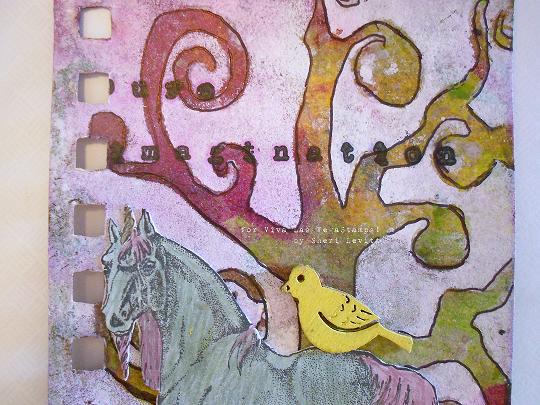
Dream Big, is more inspirational as word art, however, I chose to make a puny statement. The man is wishing for something he doesn't have. The other word art, It's Bigger on the Inside, is off kilter, and adds to the off color sentiment. I also wanted to add "You'te Going to Put That, Where?" but will have to save it for another piece of artwork. I continually use the Washi Tape Backgrounds (Hexagon this time and grid) to add stamped effects on my backgrounds!
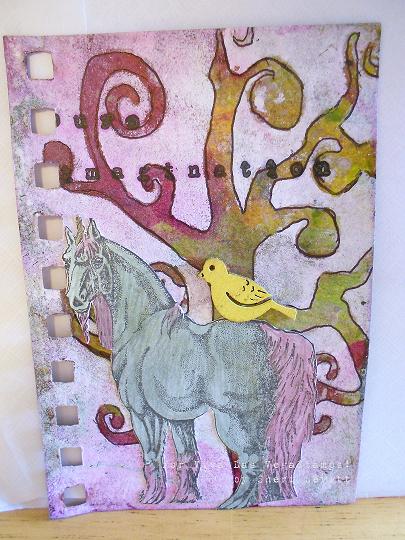
Splatter, stencil, layering, and embellishments create this piece. UmWow Studio Chipboard adds the perfect embelllishing touch!!
There are more sayings that can be added, this image of the man is priceless! I plan to use him many times!
Thanks Wayne!!!
Note: As of 6-18-2013, I made it to another term!!! I am so Happy!!!
Cre8tiveLea Yours - Lea
Labels:
Bigger on the Inside,
Collage,
Dream Big,
layout,
Man Losing Weight,
mixed media,
UmWowStudio
Friday, June 21, 2013
put on your apron and make art....
or take your apron and do some art on it hahaha. Hermine here and I can tell you how much funj it was to make this project. Alwats forgetting to put on my apron when making art, so there are many stains and spots of ink and paint on my cloth. Now this tailor's dummy is in my artroom and hopefully it reminds me to put my apron on.
Step 1: mask around the pocket with painter tape and put some gesso on the pocket. When dry put different colours of acryllic paint on it.
step 2: remove the tape and use the same colours to put several of colours of acryllic paint randomly over the upper part of the apron. Put some paint on your hand and make a print on the apron on the left hand side and again but only a few fingers just above the pocket on the right hand side.
step 3: use Stazon jet Black to stamp with. Stamp the Bird with hat 18890 on top of one of the finger tips. And stamp the sitting bird 18889 and the Pointed Pen tip 18793. Colour in with waterproof markers.
step 4: Take some M'xed Media Inx jasmin and stamp Birds in Treehole 19065 partial on the upper edge of the pocket, and take the number 24 of the december daily plate 1430 and stamp on it with M'xed media Inx red.
step 5: Trace around the hand and fingertips with a black waterproof marker. Take some red paint, make some drips at the en of the pointed tips and splash some over the apron.
Won't I look smart in it and doing some fun stuff and making art :o)
Used stamps and other materials:
Bird with Hat 18890
sitting bird 18889
Pointed Pen tip 18793
Birds in treehole 19065
December daily plate 1430
Stazon Jet Black
M'xed Media Inx
cotton apron
acryllic paints
markers
Labels:
Design Team,
DT,
Hermine Koster,
rubber stamps,
Stazon black ink,
Viva Las VegasStamps,
VLVS
Thursday, June 20, 2013
The Dog Days of Summer
Happy Solstice, Stampers! This is my final post for VLVS and I must say it has been quite a creative ride. Thank you to DeeDee for the opportunity to share some art - and her DT members for creating such a wonderful community of fun artists.
For today, I share with you my Dog Days of Summer ATC. For this I used: Golden Retriever Dog Secret and Be Adorable
I used Distress Stains on card stock and double stamped Be Adorable on this background. On Kromecote I stamped Golden Retriever Dog Secret. This I colored in using Copics. One trimmed, I added this to the background along with sequins, glitter glue and a crown.
Happy Summer!
Labels:
atc,
Be Adorable,
Golden Retriever Secret,
Summer Solstice,
VLVS,
VLVS DT
Location:
Sitka, AK, USA
Wednesday, June 19, 2013
One last wish from Me to You
Hello everyone! leslierahye here for my last post with Viva Las VegaStamps! I've been with the team for two terms and wanted to take this opportunity to allow new blood to join the team and to explore some new projects for myself--there are only so many hours in the day! I love Viva Las VegaStamps! and will continue to enjoy their unique and varied brand of rubber! For my final project I wanted to create for you an ATC that not only followed my "one little word" personal journey this year, but also focused on one of my most favorite "blooms."
Dandelions have always been in my top 5 favorite flowers and this year I have found some MAMMOTH ones nearby. I took the opportunity to photograph them last month and got this fabulous shot of the seed head close up! That becomes one of the layers of my trading card.
Memento Ink
Brilliance Ink
rope trim/bakers twine
Specimen Bottle
Foam Tape
bling
bling
photograph
fresh wishes
![]() |
| begin by procuring some fresh wishes. Tie rope twin to neck of bottle. |
![]() |
| trim out photograph for focal piece. Stamp with dandelion stamp & Make a Wish Edge the photograph |
![]() |
| Add focal piece to an ATC sized cardboard that has been stenciled. Attach with foam tape. Poke holes through ATC to attach specimen bottle full of wishes to ATC with Baker's Twine. |
![]() |
| Dot your "i" with a piece of bling! |
Thank you for joining me over the last year or so! I've enjoyed creating stamped projects with you! I hope you continue to find inspiration with my returning teammates and the new artists joining the team. They have awesome ideas to share with you! Finally I leave you with one final wish...I wish you take time to create for yourself...it simply makes the world a more interesting place!Thank you Viva Las VegaStamps for this fantastic journey! à bientôt! ~leslierahye
Labels:
artist trading cards,
atc,
DT-leslierahye,
Leslierahye,
rubber stamping
Tuesday, June 18, 2013
Accordion Fold Card
For my last project I'll be sharing a card using the brick, windmill and saying images from VLVS. I hope you enjoy this tutorial making my accordion fold card.
Accordion Fold Card
Supplies
http://www.vlvstamps.com/windmill-scene-3-1-2-x-4-1-2.html
http://www.vlvstamps.com/brick-background-2-1-4-x-5.html
http://www.vlvstamps.com/destination-unknown-1-x-2.html
1/2" Miracle Tape
Miracle Sheets
Kromecote Glossy Card Stock
Other supplies listed below
Cut 6 1/4 x 5 1/2" designer paper. Use Martha Stewart scoring tool; score and fold 1/2" twice on each end of rectangles.
Cut window opening with the large magnetic rectangle die using base tray and die cutting tool.
Set accordion fold card front aside.
Cut 8 1/2" x 5 1/2" card stock, fold, apply Miracle Sheets to card front, leave protective film on for now. Set aside.
Cut 4 1/4" x 5 1/2" white card stock, stamp windmill scene with sepia ink.
Stamp only Windmill on eclipse tape, cut out, place mask over windmill on card stock, spray blue and green Dylusions ink over card, heat set, remove mask.
Cut 4 1/4" x 5 1/2" white card stock, stamp windmill scene with sepia ink.
Stamp only Windmill on eclipse tape, cut out, place mask over windmill on card stock, spray blue and green Dylusions ink over card, heat set, remove mask.
Cut trimmed piece of designer paper to fit width of card front, stamp brick background with sepia ink, apply Miracle Tape, peel off adhesive and then adhere up to windmill.
On scrap piece of Kromecote glossy card stock stamp windmill scene with sepia ink, cut out windmill, adhere using Helmar acid free glue.
Stamp brick background on accordion fold card front, use stamp-a-ma-jig to center the saying Destination Unknown stamp over brick background.
Add 1/2" strip of Miracle tape to both of the outside strips of accordion fold card, peel off adhesive, apply to background, and then line up with folded card front, remove Miracle sheet on card front and apply to accordion fold to finish.
Other supplies
Helmar acid free glue
Ranger Dylusions spray ink
MS Scoring board with tool
Designer Paper
Sizzix Movers and Shapers magnetic rectangle die
Sizzix Vagabond
Sizzix Base tray
Eclipse masking tape
Stamp-a-ma-jig
White card stock
Archival Sepia ink
Genesis Safety trimmer
Click on my blog link to view project, cards and tags I made using during the past nine months as Design Team Member for Viva Las VegaStamps!
http://wwwstampedimpressions.blogspot.com/2013/05/favorite-projects-i-did-as-vlvs-dt-2012.html
You can view more artwork on my personal blog:
Stamped Impressions
Labels:
Archival black and sepia ink pads,
designer paper,
DT - Judy Cantrell,
dylusions spray inks,
eclipse tape,
Kromecote card stock,
Miracle Tape or Sheets,
paper,
TH magnetic rectangle die,
trimmer,
VLVS Images
Monday, June 17, 2013
Pure Imagination
I had 3 or 4 pages left in my small Staphmore Visual journal, so I took them out and did some backgrounds with the Melted Crayon technique. Just to have some backgrounds. This is one of the pages I did the background.
The crayons I used were magenta, a yellow and a green yellow. I took used some white craft paint over a tree mask. When it dried you can see some of the magenta crayon coming through the paint. Really cool! When it dried I took a black Bic pen and outlined the tree. I stamped the Unicorn on white cardstock with the black Menento ink pad. Colored him in with the metallic color pencils by Faber-Castell. I attached him on the page with Miracle tape. The unicorn needed a friend so I took one of the wood embellishments pieces by Prima, colored both sides with yellow craft paint(I didn't know which way the birdie wanted to face). Glued him using Aileen's tacky. I used the "Pure imagination"stamp for the page. When I got this stamp I cut the words apart, it is easier for me to use it this way. Yes I know the 'P' in Pure is cut off. I was kinda ticked when I pulled the stamp up. But I'm going to let it go and say its part of the process of art journaling.
Stamps used
Items used
Staphmore visual journal Mixed media paper
Crayola crayons
Craft iron
White craft paint
Tree mask
Bic pen
Black Menento ink pad
Metallic color pencils
Prima wood embellishment
This is my last Viva Las VegaStamps Design Team project for this term. It's a blast working for this company, and working with some amazing talented artists on this team. Its been a dream come true. I tried out for this team three times before I made it on the 3rd try. That is how much I love this company. I want to thank DeeDee for all her hard work she does for us, and letting me be on this awesome team. I will be trying out again for the next term. :)
Labels:
art journal,
art journal page,
melted crayon,
sheri,
Viva Las Vegastamps
Saturday, June 15, 2013
Travel advised!
Hi there, Glenda here with an art journal page about what I would do if money were no object and I could do anything I wanted, and that would be travel! Of course it would be stressful because I have a fear of flying but hey, nothing a little medication couldn't take care of right?? haha
The new prompt over at the A Year in the Life of an Art Journal is this:
PROMPT: If you could spend your day doing anything you wanted and money was no object what would you do?
SHOOTERS: Shoot your mug in a setting that signifies what you would do.
BOOKERS: You know those alpha and numerical sticker sheets we all have, that are sitting around with missing numbers and letters doing nothing? Yep. Let's use them up.
I had fun using a bunch of foam numbers as well as the fabulous Lady riding vacuum
and the gorgeous Large bird flying left
and the whimsical Row of stars
and I made this art journal page
I have been enjoying my new Dylusions art journal and I love the size and pages!!! Check it out:

Weeee!! Now I can do double page journal pages as there isn't a ring in the middle like the one I've been using. Plus I love the size of the pages which are 11 3/8 " x 8 1/4 ". My previous journal was a whopping 12 x 12 so this is going to be a real nice change!! There are 64 pages in my new journal so this will be awesome!!
Here are the supplies I used for this journal spread:
Lady riding vacuum
Large bird flying left
Row of stars
Miracle tape
Stencils
Paint
Glimmermists & Dylusions ink sprays
Foam numbers
Versafine and Staz on ink
Watercolor pencils
Journal spot
Rub ons
Washi tape
Die cut letters
Acrylic word
It's nice to dream isn't??
Subscribe to:
Comments (Atom)


