Showing posts with label Seek Paradise. Show all posts

Monday, June 24, 2019

Happy Days | Sue Plumb


Hi everyone!
It's Sue Plumb here to share my latest design team project with you. Today I have a mixed media scrapbook layout I created using a variety of Viva Las VegaStamps floral stamps. This page was created to document a photo from dress up night at my scrapbook retreat last year, which had the theme "Trouble in Paradise".


For my layout I began with a sheet of Bazzill Marshmallow cardstock and Ranger 'Mermaid Lagoon' Distress Oxide to create a simple watercolour style background. I swiped the ink pad onto my messy mat, added a couple of spritzes of water, then laid the cardstock over the top to soak up the colour and set it aside to dry.


With my background drying, I then set about creating the embellishments for my page. I gathered a variety of floral stamps that I thought would work well for my tropical themed page - Hibiscus Flower; Fancy Flowers; Beautiful Lily; Lilies; and finally Hawaiian Ginger for those fabulous tropical style leaves. I stamped them out onto some smooth white cardstock.


I then used my Faber-Castell watercolour pencils to colour each of the images, sticking with shades I thought would work well with my photo and give my page that "tropical vibe". I then used a water brush to blend the pencil lines, before cutting each of them out.


To construct my page, I started with the photo, adding some scrap cardboard underneath it to pop it up from the page. I then added a Cocoa Vanilla Studio floral cut file that I had cut from some white cardstock along the bottom edge of the photo.


I then arranged my stamped floral images across the page, following along the line created by the cut file. I tucked some underneath, and added others over the top using foam tape, to give the page extra dimension.


To finish off my page I stamped the Seek Paradise sentiment several times using black ink, and used some die cut words from Cocoa Vanilla Studio for my page title. I also added my handwritten journalling with a felt pen.


Thanks for stopping by so I could share this with you. I hope I have inspired you to get inky too!


Stamps used: 
- Lilies

Other materials:
- Bazzill cardstock
- Tsukineko StazOn black ink
- Ranger 'Mermaid Lagoon' Distress Oxide
- Faber-Castell watercolour pencils
- Cocoa Vanilla Studio 'Colour Me Happy' cut file
- Cocoa Vanilla Studio die cut title words
- foam mounting tape
- felt pen

Wednesday, April 05, 2017

Seek Paradise

Hello hello hello! How are you all today. Shanna here excited to be back on the blog today! Today I am sharing my first encaustic art piece with you all.


Let's be honest my images didn't blend well and probably would have been better if I added them before I started the wax layers but I am still excited and happy with it. I really loved the piece before I started adding wax so more of these will be coming.

My inspiration came from the Our Mixed Media Moods challenge DeeDee and Jenn have for this month.
 

If your interested in seeing how I created this please check out the video.


Here is are some close ups.  Hope you enjoy.


Viva Las VegaStamps Used:


Other Products Used:
Encaustic Clear Wax
Gesso
Fluid Acrylic Paint
Heavy Body Paint
Glazing Fluid


SaveSave
SaveSave

Thursday, August 04, 2016

Day Dreams of Paradise!

Hello Friends! 

Tera here...
Today I am here to share a pair of really fun ATC's

 (Artist Trading Cards) with you! 

For those of you whom know me personally, you know I am a dreamer...

I love the ocean, and my head is always in the clouds dreaming up ideas...
So this new stamp from VLVS spoke to my heart from the moment that I saw it!!! 


To create these ATC's I used the wrinkle free distress technique carefully building up each layer of color... I stamped my images in black archival ink and used a black ink pen to draw my boarder.  I also added a few flicks of some glimmer mist to give it that extra dreamy feel!


I can tell this little girl is a dreamer too!! 


Stamps Used:    

Seek Paradise 3/4 x 2 1/4


Thank you for stopping in to dream with me today!
I hope you find yourself dreaming of your paradise too! 


Friday, January 09, 2015

January Guest Designer : Georgia Heald

Today I'd like to introduce you to our January Guest Designer Georgia Heald. She is one super talented girl and I'm so excited to have her on our blog. She's joining us with a card and a tag, both so beautiful.


Hi, I'm Georgia, I'm 38, from Tasmania Australia where I live with my husband, teenage son and furry cat baby. I would describe my style as modern grunge with a real love for art mediums and stamping. I create mostly 12 x 12 layouts, cards and journals with the occasional off the page project and canvas. I currently design for Prima Marketing & The Scrapbook Diaries. I am absolutely thrilled to have been invited to be guest designer this month at VLVS!

My blog: www.startingtoscrap.blogspot.com.au


Seek Paradise Card


This little guy is so adorable, as soon as I saw him I could see him sailing across the ocean in search of something. So I decided to create just that. I have cut a piece of Ranger Claudine Hellmuth Studio sticky back canvas to fit my card, stuck on a craft mat and prepped with Gesso.


Once dry, I have painted my background using Studio Calico Color Theory acrylic paints and adhered to my card. I have then stamped my Boy In The Tub Boat stamp on a piece of Ranger Inkssentials matte coated cardstock and cut him out. I have kept him in black and white as I really wanted him to pop out from the background. And finally finished with the Seek Paradise stamp also on the matt cardstock to finish.


Product List
Boy In The Tub Boat Stamp
Seek Paradise Stamp
Studio Calico Color Theory Acrylic Paints, Ranger Sticky Back Canvas, Ranger Matte Coated Cardstock, Ranger Archival Ink in Black

Why Hello Tag


How sweet is this little girl! I really wanted to keep her the focus of my project so decided to do a small gift tag with her. I have created my background using watercolors, modeling paste and a stencil. I have then stamped my Girl In A Princess Costume onto some Ranger matte cardstock with archival ink. I have then cut her out and sprayed with some Micador Fixtative which makes the ink run just slightly giving her some grey shading. I have then used some watercolor paints to color several small pieces of tissue paper and once dry, stamped her onto each and cut out the layers of her dress to add to my image. I have added a few little embellishments and then using another piece of tissue paper, stamped my Why Hello title. I have then added this using a gel medium to my tag. Using tissue for your stamps is awesome when you have a textured background and may not be able to get a complete stamped image.


Product List
Girl In A Princess Costume Stamp
Why Hello Stamp
Micador Watercolor Paints, Micador Fixative Workable Mat Spray, Ranger Inkessentials Matte Coated Cardstock, Studio Calico Wood Veneer Stars, Prima Marketing Art Basics Heavy Gesso, Prima Marketing Art Basics Modeling Paste, Prima Marketing Art Basics Gel Medium Matte, The Crafter's Workshop Stencil, Prima Marketing Ingvild Bolme Junkyard Findings Wings Trinket, Chain & Jump Ring, Ranger Archival Ink in Black

Wednesday, November 05, 2014

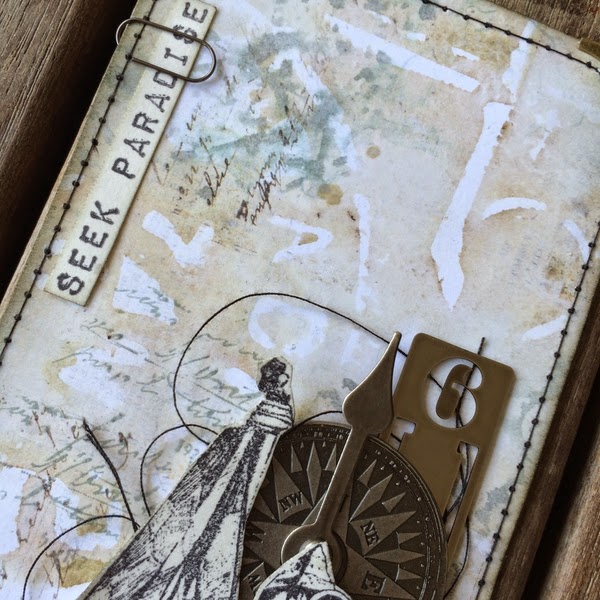
Seek Paradise

Hi Guys Karen with you again today.. I'm so happy to be back after a little break to share with you again.
 
I fell in love with the gorgeous little Boy in Tub Boat on plate 1449,


 so I thought it would be perfect to use for my project today.
 
I started off by doing some mono printing on to my tag as my first background layer using some of  The Crafters Workshop Stencils and some distress ink.
 
The Crafters Workshop stencils I used were
 
 TCW455 Love post
and
TCW460 Ring Doily
 
I love how this background looks!


I then added in some machine stitching around the edges, and a little bit of random stamping using  one of my go to background stamps


 I don't think I could ever get sick of using this stamp!
 
I then stamped the
 
 
and
 
 
Seek Paradise 3/4 x 2 1/4
 
 on to some cardstock and cut them out, added in a tiny bit of distress ink around the edges and mounted them onto my tag along with some of my favourite idea-ology embellishments and I was done, Nice and simple, but I love how it turned out!


Thanks so much for stoping by today, Until; next time.. Happy Stamping!
 
Karen xx