
Hi...
Tina here today with another VLVS project and I can't wait to share it with you.
Today, I'd like to share with you a new project, a Stamped Clay Wall Hanging piece. I am always wanting to try new stamping ideas, so why not stamp in clay? Last September, I attended Art Is You and took a clay class by the talented Laurie Mika. It was the first time I had stamped into clay and I was instantly intrigued. I have dabbled a bit since the retreat, but I thought I'd get out my clay and get creating!

For this project, basic Craft store Primo Sculptey will work just fine.

Before I began, I layed out a rough idea of what I wanted to do, using the stamps as a guide.

I conditioned the clay and rolled it out, then stamped my images directly into the clay. Working with unmounted rubber works great for this step.


Stamps used:
Directional Circle (cut in half)
Stained Glass Mosiac
Tangle
Before you bake (per manufacturers instructions), paint and embellish your clay pieces, using gently pressure so you don't smudge the stamped design. You can embed gems and metal pieces directly into the clay before baking. (special note: Some pieces may 'melt' in the clay oven, so be cautious on what is used).


Once the piece is baked and is hardened, adhere any remaining embellishments onto the clay surface using your adhesive of choice. (mine is Weldbond)
Preplanning clay pieces is crucial. I knew I wanted a 'hanging brad' piece at the bottom of my sculture, so I made sure to embed the brad into the clay before baking. This ensured that the piece would be in place and there would be no need for glue.
You can also touch-up any sections with paints, etc. if desired. You can attached a hanging wire to the back prior to baking or add an adhesive type hanger after baking. (the latter option may not work depending on the weight of your project.)

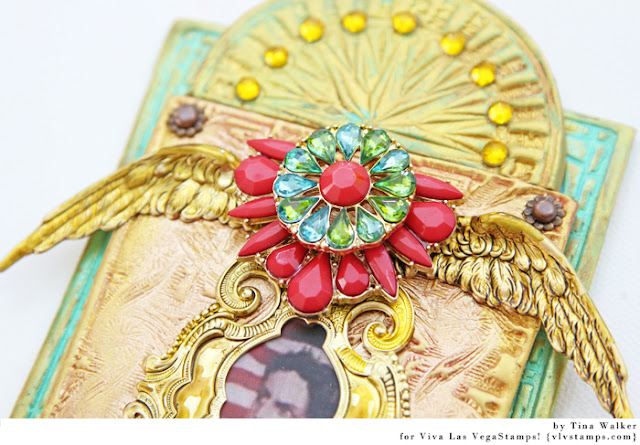


And done. VLVS stamps work great to create beautiful backgrounds and focal pieces on your stamped project.
Have you ever stamped into clay? I'd love to see your VLVS Stamped clay projects!
Thanks for stopping by! Have a great day.

Tina here today with another VLVS project and I can't wait to share it with you.
Today, I'd like to share with you a new project, a Stamped Clay Wall Hanging piece. I am always wanting to try new stamping ideas, so why not stamp in clay? Last September, I attended Art Is You and took a clay class by the talented Laurie Mika. It was the first time I had stamped into clay and I was instantly intrigued. I have dabbled a bit since the retreat, but I thought I'd get out my clay and get creating!

For this project, basic Craft store Primo Sculptey will work just fine.

Before I began, I layed out a rough idea of what I wanted to do, using the stamps as a guide.

I conditioned the clay and rolled it out, then stamped my images directly into the clay. Working with unmounted rubber works great for this step.


Stamps used:
Directional Circle (cut in half)
Stained Glass Mosiac
Tangle
Before you bake (per manufacturers instructions), paint and embellish your clay pieces, using gently pressure so you don't smudge the stamped design. You can embed gems and metal pieces directly into the clay before baking. (special note: Some pieces may 'melt' in the clay oven, so be cautious on what is used).


Once the piece is baked and is hardened, adhere any remaining embellishments onto the clay surface using your adhesive of choice. (mine is Weldbond)
Preplanning clay pieces is crucial. I knew I wanted a 'hanging brad' piece at the bottom of my sculture, so I made sure to embed the brad into the clay before baking. This ensured that the piece would be in place and there would be no need for glue.
You can also touch-up any sections with paints, etc. if desired. You can attached a hanging wire to the back prior to baking or add an adhesive type hanger after baking. (the latter option may not work depending on the weight of your project.)


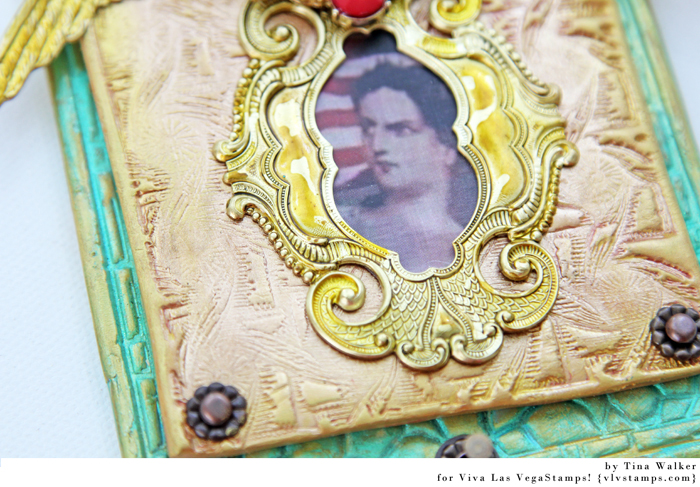

And done. VLVS stamps work great to create beautiful backgrounds and focal pieces on your stamped project.
Have you ever stamped into clay? I'd love to see your VLVS Stamped clay projects!
Thanks for stopping by! Have a great day.


