Showing posts with label box. Show all posts

Thursday, October 17, 2024

Gift box by ~*Arwen*~

 Hi peeps :)

Welcome back on this Blog.

Today I'm here with a tiny box, which I needed for a little present.


And that's how I made it:

1.) I need two pieces of cardstock in the following sizes.


2.) I cut and fold the larger piece using the sizes entered.


3.) I do the same thing with the small piece.


4.) Folded and glued, I now have a small box with a lid.


5.) Now I want to decorate my box even more, so I cut appropriately sized pieces of watercolor paper.


6.) First I prime all parts with a rich yellow.


7.) I shade the edges of each piece with a dark pink.


8.) To stamp the pieces, I choose a chalk ink pad.


9.) I stamp a saying on the largest piece of paper using VersaFine Clair. It also serves as the lid of the box.


10.) Before I stick everything on, I add a few spritzes of Dylusions Shimmer Spray.


All stamps, I used:

- You are beautiful

- Swirl

Other supplies:

- Cardstock

- Watercolorpaper

- Scor Pal

- handmade watercolors

- ColorBox Chalk

- VersaFine Clair

- Ribbon


See ya soon *mwah*


Friday, November 10, 2023

Watercolor gift box by ~*Arwen*~

 Hi Lovelies ❤


Welcome back on this Blog!

I want to give a friend my handmade watercolors. So I thought about how I would pack them. I chose a box with a lid.


Close-ups:


Stamps, I used:

- Butterfly Gossamer/small


other supplies:

- black cardstock

- ScorPal

- Ribbon

- handmade watercolors

- Posca white pen


See ya soon *mwah* 


Tuesday, March 21, 2023

Some kind of matchbox by Arwen

 Hi Lovelies

Back on the Blog with a new project :)


And that's the way, I made it:

1.) You need 2 leaves of sound box. The dimensions are in the picture.
Then both sides are folded.
The large piece (19cm wide, 21cm high) is folded at 1.5 cm - 6.5 cm - 12.5 cm - 17.5cm
Turn 180 ° and fold at: 1.5 cm - 6.5 cm - 14.5 cm - 19.5cm
The smaller piece is folded at 5cm and 10cm, then turn 180 ° and fold at 2cm and 7cm.


2.) With the big piece you have to cut a lot away so that the dimensions remain from the picture. Part 2 is only folded.


3.) After cutting out, all fold lines are kept in one direction. You do the same with the smaller piece of cardboard.


4.) All 4 tabs of the box are now stuck. After drying, glue the outer tabs inwards. Part 1 is ready.


5.) So that the drawer is properly adjusted, the smaller piece folded wraps around the box and marks the circumference with a pen. The box is glued together on this marking.


6.) Now you can push the box into the finished tunnel. The blank is now ready and can be designed


7.) To design the box, I cut out coverings from watercolor paper and colored it with watercolor color.


8.) With a chalk pillow, I stamp my selected motif on all pieces. A little shimmer spray sprinkle, a saying and the box is ready.


All stamps, I used:

- Checkerboard Heart large

- Swirl

- with love


other stuff:

- cardboard

- Prima Watercolor

- Chalk ColorBox

- Staz on

- ScorePal

- Dylusions Shimmer spray

- watercolor paper


See ya soon *mwah*


Friday, January 13, 2023

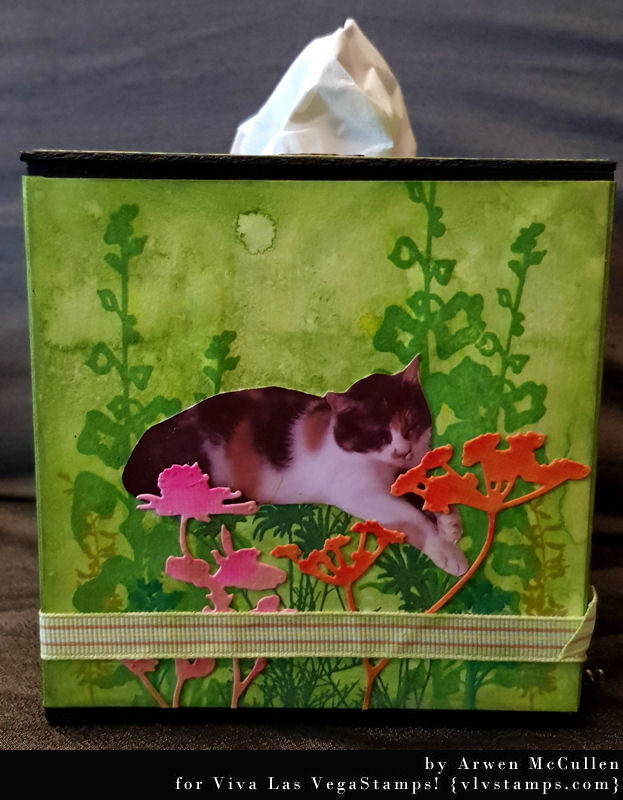
Tissue box with pets - by Arwen

 Hi Lovelies 

First of all:

HAPPY NEW YEAR ❤❤❤

My first Blog project for 2023 is this tissue box.

My sister needs a Birthday gift for a friend. She said, she has pets and loves nature.

So I created her this box with pictures of her own pets :)

I hope, she will like it.


And some detail pics:


All stamps, I used:

- Flowers on stems

- Wildflowers Silhouette

- Wildflowers Silhouette

- Long stem with leaves


Other stuff:

- Cardboard

- Watercolor paper

- Distress Oxides

- Flower dies

- Ribbon

- Charm 

- Foam


See ya soon *mwah*


Friday, September 03, 2021

Wall hanger by Arwen

 Hi peeps 💜❤

For today, I created a wall hanger.

I made it look like a little bit creepy - I love creepy 💀

Maybe you've watched the movie "The return of the living dead".

Love all this horror stuff. 

I also created a gift box for this wall hanger. So it's a perfect gift for a lovely person.

And that's it:


Some close-ups? Voilá :

I also added some charms:


The gift box:

The wall hanger in the gift box:


all stamps I used:

- Smear/smudge

- Cemetery

- Bat

- Striped spider

- Spider

- Realistic skull

- The return of the living dead

- Scrabble alphabet

- Bubble wrap texture

- RIP

- Skeleton punkess

- Skeleton punk

- Moon


other stuff:

- Staz on

- Cardboard

- Cardstock

- Lukas Watercolors

- Distress Reinker

- Distress Oxcide

- Chains

- Eyelets

- Charms

- Scor Pal


Hope you like it - see ya soon *mwah*


Tuesday, May 18, 2021

Biohazard gift box by Arwen

 Hi peeps ❤

Here I am again.

Today, I wanna show you my gift box, which I created for today.


And that's the way, I made it

First, I choose black cardstock to build my box and fold it:


 2nd step is glueing:


The 3rd step is, I choose a piece of cardboard and some fabric - both for the top of my box:


The 4th step - I used Brusho to create some background paper:


5th step - after spraying my fabric with colorspray, I sticked it onto the top of my box:


6th step is to wrap my piece of cardboard into my background paper and stamped with my chosen images:


7th step - I cut my background paper in pieces of equal size and stamped with my chosen image:

Last step - glueing all pieces together and finished the box:
 

All stamps, I used:

- Biohazard 

- Warning

- Jagged chain link fence


Other stuff: 

- Cardstock

- Cardboard

- Exacompta white cardstock

- Brushos

- Staz on

- Scor Pal

- Fabric

- Dylusions Color Spray

- Ribbon

- Scrappers floss

- Charm


I hope, you like my project - see ya soon with more creative stuff 😻