Thursday, October 31, 2013

Happy Halloween!!!

Hi Folks!! DeeDee here today sharing with you the outcome of our most recent swap... Halloween Themed Altoid Tins!!

I cannot tell you how much it feels like Christmas every time I get a new swap in the mail! We're always so thankful for any and all artwork that arrives at our steps here @ VLVS! -- We proudly display each and every one! This collection of tins will have customers drooling for a long time :) 

 The outside of Anne Squire's Tin


  The talented artist behind this piece is one Christina Anderson! Flip the Devilish Face around and reveal a Ruffled Collar Clown!


I created this piece! 


 This beauty is by Eileen Wood!

 She used the 31, Nevermore and Full Moon stamps.


This one is by Lyneen Jesse!


 Mary Lozinak altered this spooky bit!!


 Marilyn Hughes has put together this deliciously glittery bit!


 And last we have this little book covered tin by Michele Kosciolek!
 She utilized the Fly, Cemetery, Full Moon, All Hallow's Eve and Dictionary Page for her tin!!

Can you believe all the talent contained in this one blog post? Every time I see them again I just die! And isn't that the point? SPOOOOOOOOOOOOOOOOOOOOOKY! ♥

Leave these girls some love!

Interested in being in our next swap?? We're currently taking SIGN UPS for a MAIL ART swap! Join our Facebook Group here, read the rules (pinned to the top,) and let us know if you'd like to sign up!!


Wednesday, October 30, 2013

Mermaid love!

Hi there Glenda here with a new prompt from over at the A Year in the Life of an Art Journal and here it is:

PROMPT: Wicked
SHOOTERS: Shoot your mug in a Dark setting.
BOOKERS: Remember that Wicked Witch of the East, and her striped stockings? Get painting! Stripe those pages up. http://pinterest.com/pin/57702438946925014/

When I saw the journal prompt was about painting stripes I was inspired to paint monochromatic stripes in blues which inspired this art journal page about mermaids! I have loved mermaids ever since I was little and love this 2 page spread using the fabulous mermaid stamps by Viva Las VegaStamps! (how gorgeous are they??)

 I put a bow in the hair of this fabulous Mermaid 2 x 3 1/2
 and I love this Mermaid lying down
 and the lovely Mermaid 2 x 3
 and I used gold embossing powder for the Bullseye stamp
 as well as the Star pin
 and I love how shiny they look! Here is a list of the other stamps I used as well:

Row of stars
6 hexagon background
Number strip
Washi lines background

I hope you enjoyed my art journal spread and have a great day!

Tuesday, October 29, 2013

Welcome to a Winter Wonderland... October's 12 Tags of 2013 Viva Las VegaStamps! Style!!!


Welcome to Viva Las Vegastamps! Susan here today to with my take on T!m Holtz' October installment of the 12 tags of 2013. I had to break the Halloween habit... and finally move on to the winter holidays. And since I am creating a winter version of this tag... I also am adding a splattering technique to give the effect of snow falling for the Craft Stamper Take It, Make It Challenge #5.


On a 4" x 6 1/2" section of off white cardstock, I created the marbelized background using Ranger Distress Paints (colors Weathered Wood, Crushed Olive, Dusty Concord and Antique Linen). I applied a second layer of just Weathered Wood and Antique Linen to tone down the bright colors.


I heat set to dry completely. Using an ink blending tool I applied Broken China, Weathered Wood and Iced Spruce Distress Inks around the edges. I completed the background by splattering with a brush Picket Fence Distress Stain.


I needed a frame for this month's tag technique and I don't have one for this purpose... BUT... I do have a lacy oval frame stamp (Doily #18849) that would be perfect. I could use Ranger Embossing Ink and a glue heat embossable powder to add the Distress Glitter... NAH! I want MORE DIMENSION. So I'm got out my Amazing Mold Putty and made a border mold of my stamp.

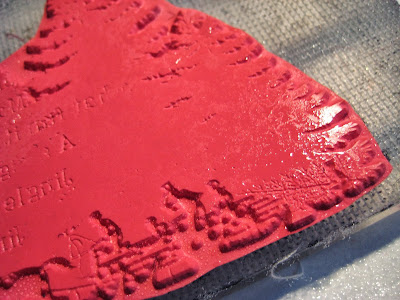
**WARNING** You need to thoroughly cover your stamp with petroleum jelly to protect your stamp - the rubber of the stamps and Amazing Mold Putty touching are reactive with each other. Watch closely and limit the time of stamp in contact with mold putty and remove it as soon as curing is completed.


As you can see here with stamp removed from mold. Some of the Amazing Mold Putty has stuck to stamp, which I cleaned off with soap and water immediately so the detail of my stamp is not clogged up and to stop any reaction the two compounds may have.


Now with a mold of my decorative border stamp - I filled it with Creative Paperclay® and let it cure. When paperclay is dried I inked and covered with Ranger Embossing Ink and heat embossable glue powder; then dredged in Antique Linen Distress Glitter. I went back with Vintage Photo and Broken China Distress Inks to add some depth and color to the edges.


I stamped several stamps (see list below) creating a collage scene using Weathered Wood Distress Ink and also Stone Grey Staz-On Ink. I really love how the Distress Ink just fades into the painted background giving subtle depth. I stamped snowflakes (see list below) with the embossing ink and applied the heat embossable glue powder; then applied a blue iridescent glitter to give the snowflakes shimmer.

Welcome to a Winter Wonderland...


The finishing touch was a Tattered Angels vintage icicle chipboard embellished with Distress Inks and a combination of blue iridescent and Antique Linen Distress Glitter. I accented Santa Collage #18933 with a little color using water brush and Ranger Distress Markers. Because of warping and to give the tag some stability to support the frame and icicles, I mounted the tag to chipboard with a section of Miracle Sheet cut to size and I embedded a sheer organza ribbon to act as a hanger from the top.

• • • • • • • • • • • • •

Viva Las VegaStamps used: Small Snowflake #18945; Medium Snowflake #18947; Large Snowflake #18946; Jingle Bells 10686; Early in Morning Swahili Script #1692; Christmas Trees Large #18942; Christmas Trees Small #18941; Santa Collage #18933; and Doily #18849 (oval lace border used to create mold). Supplies used: Cardstock; Stone Grey Staz-On Ink; various Ranger Distress inks and Picket Fence Distress Stain; Ranger Embossing Ink; various Ranger Distress Paints; Miracle Tape, Diamond Glaze Dimensional adhesive; Creative Paperclay®Amazing Mold Putty; Antique Linen Distress Glitter; Iridescent Blue Glitter; Ranger Distress Markers; and Heat Embossable Glue Powder.


Thanks so much for dropping by. Have you entered the monthly challenge - you have two (2) days left to make a creation using the inspiration and your stash of VLVS! stamps... you could win more RUBBER! CLICK HERE for challenge details. Also, you definitely want to subscribe to the blog feed and to the Viva Las VegaStamps! newsletter to be IN THE KNOW of everything going on at the Viva Las Vegastamps! store. There's so much amazing inky inspiration to see!

If you would like to see more of my creations please visit my blog, sbartist : painting in the dark HERE. I'll be back soon with another stamping adventure!  Sb

Saturday, October 26, 2013

tutorial with bold stamps and Lyra

Hi Hermine here! I made this tutorial due to a card that I made for a challenge and people wanted to know how I did it. This is so easy, awesome and fun to do. THE way to make your Christmas cards for instance, its looks great and because one has to make a lot of them its a good thing that it is so easy and fun to make.


This is the end result of my tutorial, below you find a step-by-step of how I did this.


start by making you stamp a little damp (not to wet, if you make it to wet put a piece of paper towel on it to absorb the water)


Take different colours of Lyra aquacolor and scribble on your stamp.


Take a spray bottle and spray water on it (again not to much)


Stamp on paper and let dry, I prefer to let it dry by air, but you can dry it with a heattool.


Take a Sukura of America micron 005 pen and outline the stamp.


This is a close-up after I outlined it.


Take a water brush and take some colour directly from your crayon.


Splatter this on the right hand side of the card.


Take a scrap piece of paper and stamp the tekst on it, colour this with a water brush and the same colours of the Lyra crayons you used for the main image. Glue in place.


Another sample I made with the same technique and same colours, only different stamps.

Used Stamps:
Xmas Silhouette Collage 19317
Bring on the twinkle 19313
Set of three ornaments 19309
with love 19302
All these stamps can also been found on plate 1411
Stazon jet black
Sakura of America micron pen 005


Friday, October 25, 2013

October 31 - by GDT Kathy Clayton

Hi, Kathy here . . . I'm back again!!! Last time I showed you a mixed media layout I did, so I thought I would show you a mixed media "tag". As many of you know, I am still pretty new at doing mixed media . . . but I am in LOVE with it. I try to add something extra to everything I do now, even to most of my CAS projects. :)

Since I absolutely LOVE Halloween, I decided to combine the best of both worlds . . .mixed media and Halloween. After a couple false starts, I finally got it together. Here's how it turned out:


VLVS products used:
Kids with Giant Jack 'o Lantern stamp #19209 http://www.vlvstamps.com/latest-releases-summer-2013/kids-with-giant-jack-o-lantern-3-1-4-x-3-1-4.html
Brick background #19077 http://www.vlvstamps.com/brick-background-2-1-4-x-5.html
High Gloss Embossing Powder
Miracle Tape


Other products: Mischievous by MME, wood paper from MME, UmWowStudio October 2012 kit, chipboard, cardboard, plastic lid, block letters from Tim Holtz, Vintage Photo and Black Soot distress ink, gesso, orange glitter, Timeless, Taupe & Tattered Leather mists, geltos (banana & blood orange), black Pitt pen, sandal & latte alcohol inks, cheesecloth, misc. flowers & grass, Tim Holze bottles, misc. dictionary pages, and misc. bottle labels,


The first thing I did was take and 2 of the orange pieces of paper from the Mischievous by MME and cut them to 9 1/2" x 12. Then cut the top two (2) corners to make them into a big "tag". Then using miracle tape adhered the paper to each side of the chipboard and then distressed it. Then using the brick background, I embossed it here 'n there on the front of the tag. Taking my dictionary pages, I distressed them with distress inks and then glued them on each side of the tag. Then using three (3) sprays (Timeless, Taupe & Tattered Leather),sprayed around the tag. I also sprayed some misc. pieces of cardboard and using glossy accents, put glitter on my lid . . . then adhered to my tag along with the cardboard pieces..I also colored my stamped
image and adhered it above the lid.


I used some wood paper and made my fence. But since I didn't like the color, I used Sandal and Latte alcohol inks and changed the color. Once it was dry, I adhered it on each side of the tag so it would bow out.


I fussy cut "O-C-T-O-B-E-R" from the block letters and used my geltos on them to help them match my tag a bit better. Using a glue gun, I adhered the letters to the outside edge of my lid. I also glued bats in three (3) places.


Using a burlap-wrapped toilet paper roll, I placed it behind my fence to use it like a table. I adhered several small bottles and added some fake grass and flowers.


I also sprayed some cheesecloth . . . then added that and a small book & tag from UmWowStudio Oct. 2012 kit. Added a few more drops of spray and I was done.


Thanks so much for stopping by today. If you want to know how you can win a $20 gift certificate from VLVS from ME, visit my blog "UpintheNightwithKat.blogspot.com" for details. Thanks again!!!


Thursday, October 24, 2013

Sneakers In Da House!


They say that women LOVE to collect shoes!  But did you know that a lot of men LOVE to collect sneakers!!  I found these words, and found it a great creative resource for designing a wood frame.


This is my soon to be son-in-law's rack of sneakers!  Sure some maybe for sports, but most are for styling.

VLVS Images:

19292 Star Sneaker
19233 Grunge Plus sign
19171 One Way
19186 Pulse Rate
19232 Pylon
19175 - 2 Hands Pointing (one hand used)
19129 Star Pin
1067 Screw


The wood frame used was inexpensive, as such, there were a lot of rough edges.  Use a fine grit sand paper to sand the wood the way you like it.  For this project, a lot of texture was left to show through the wood.

Gesso is painted on the frame as a base coat.  This seals the wood so you do not waste a lot of your expensive paint.  One coat was used, again because the texture was wanted.  Normally, 2-3 coats works well.

Paint, stain, stenciling, and collage techniques before stamping.


Some stamp images are stamped right to the wood, and others are stamped, cut and layered on wood.  Further paint, and accenting with Gel Pens, Paint, stain added.


UmWow Chevrons added for dimension, texture and directional ques.


Pulse Rate image is genius!  Fits with the theme of music playing and adds so much to a collage!!

Sneakers used to be boring, but now they are a part of stylish fashion!!!!

Cre8tivelea Yours - Lea