Showing posts with label This Book Belongs To. Show all posts

Monday, June 17, 2019

Mail Art Monday

Hello Crafty Friends!

Hope you all had a wonderful weekend!
Happy Mail Art Monday!


Today I want to share a super fun postcard I created for a friend.
I wanted something fun and bright, so I went with an Alice in Wonderland theme.

Stamps Used:

I started with a 4x6 base for my postcard. I started by stamping the Mad Hatter in memento ink and masked it off. 

Next, I stamped return library card in watering can archival ink.  To add extra detail, I stamped library return dates, and "this book belongs to". 

Next, used my distress ink to add a gradient for my background colors. 

After removing my mask, I stamped my stars in cornflower blue. 
I used various markers and colored pencils to color my Mad Hatter. 

I also used a few flicks of black dylusions ink, and perfect pearls sprays to add a bit of grunge.

I hope you all like this postcard as much as I do. 


Friday, March 08, 2019

Book Week 18 | Sue Plumb


Hi everyone!
It's Sue Plumb here with my latest design team project for you. Today I am sharing an 8.5x11" mixed media scrapbook layout I created to document some photos of my daughter from last year. These were taken when her school was doing a book character parade to celebrate Book Week.


To create my page I first decided where my photos were going to be placed, then painted a quick background using Dina Wakley acrylic paints. Once the paint was dry, I added my stamping using black StazOn ink.


At the top of my page I used the This Book Belongs To: stamp, adding it twice, then once again below my photos. I then added the Chevron Banner and Triangle Banner, so they would adjoin each of my photos and help create flow across the page. 


At the bottom of my page, I added the Be Adorable quote stamp (which is filled with sentiments that I absolutely love that are very appropriate for my daughter). 

I then added a few papery layers to go under my photos. First, I stamped a pair of paint sample cards with the Library Return Card stamp. I love using these cards in my layering, as it makes it so easy to coordinate colours and they are free from my local hardware store. 


I also added some book paper, a paper doily, washi tape, frayed gauze and some black cord into my layers before sticking the photos on top. 

For my title, I used Cocoa Vanilla Studio alphabet stickers, then stamped the "18" using the Grunge 1 and Grunge 8 stamps. 


After that, it was simply a matter of adding some quick journaling with a felt pen and I was done. I couldn't believe how quickly this page came together - I love it when things just fall into place! 
Thanks for stopping by today so I could share this, I hope I have inspired you to get inky too!


Stamps used:
Grunge 1 

Other materials:
- white cardstock
- Dina Wakley Media acrylic paints
- Tsukineko StazOn ink
- paint sample cards
- assorted collage materials (as mentioned above)
- Cocoa Vanilla Studio alphabet stickers

Tuesday, November 20, 2018

Awesome | Sue Plumb


Hi everyone!
It's Sue Plumb here to share my latest Viva Las VegaStamps design team project with you. Today I have a 12x12" mixed media scrapbook layout to share that features some new release library-themed stamps, as well as a few others from my stash.
I created this page to document some photos of my boys that I captured in a hospital waiting room one day, while they both practised their reading and writing skills.


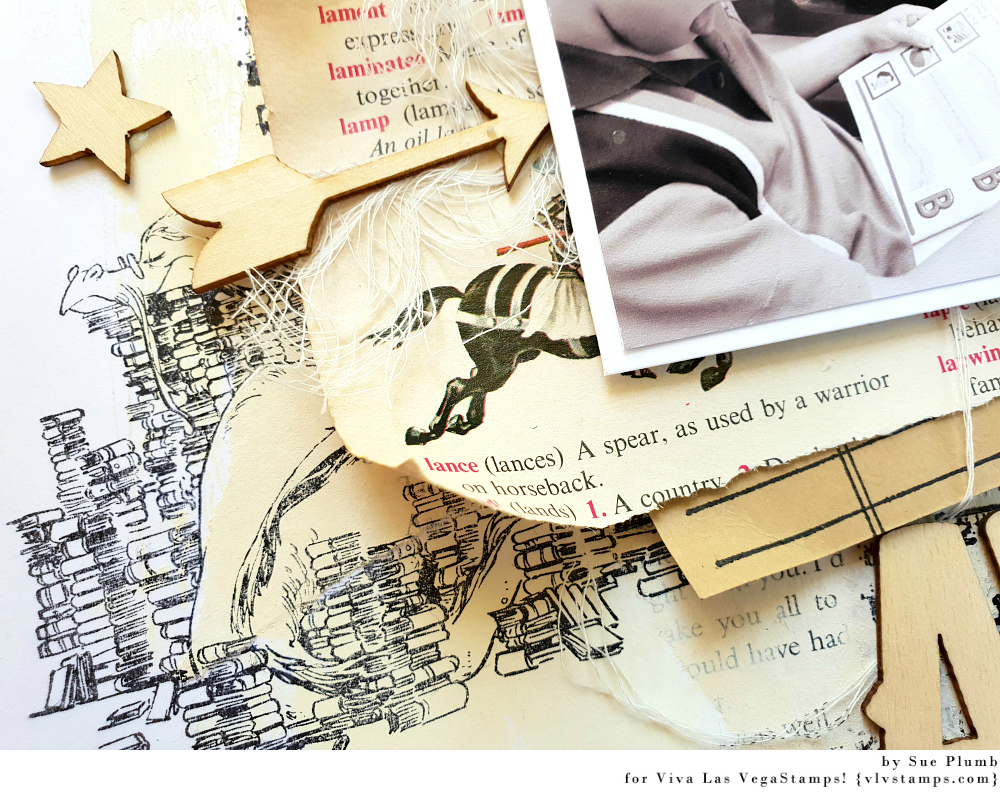
I began my layout with a sheet of white cardstock, and a couple of pages torn from some old books. I collaged the pieces onto the cardstock, then applied acrylic paint over the top with a brayer to give the page more of an aged paper look. 


Once the paint had dried, I stamped the new Library Return Card stamp multiple times to define the focal area of my page where my photos were going to be placed.
I then used the This Book Belongs To: and the Library Return Dates stamps to add some extra interest and structure to my background. 
(These three stamps are all available together on plate #1508.)


With all that text in place, it was time to add a few images to my page. I used a series of dragon images (all with a book theme) designed by Brian Kesinger - Aagar the Emotional; Telkyn the Learned; and Vornii the Bookish. (These three stamps are all available together on plate #1499.)
I stamped the three dragons around my page to form a "visual triangle" around my photos. 


With all my background in place, it was time to add some papery layers to form a mat for my photos. Naturally, I turned again to book paper (a logical choice for this page, right?) 


I layered some torn pieces of paper, along with some brown paper, small white tags, and a large kraft tag that I had also stamped with the Library Return Card stamp. 


I stapled all the papers in place along with some frayed gauze, and then added my photos on top before turning my attention to adding some embellishments to finish off my page and tie it all together. 


In keeping with the reading theme of my page, I chose a handmade book paper star from Charms Creations, and tucked it under the right edge of my photo.


I added three wood veneer stars from Cocoa Vanilla Studio, layering one on top of the book paper star and using the other two to again form a "visual triangle". 


To the left of my photo I added a wood veneer arrow, and then below my photos the large awesome wood veneer piece for my page title (all from Cocoa Vanilla Studio). 


I added some simple handwritten journalling below my title using a felt pen, and my page was complete.

Thanks so much for stopping by today so I could share this with you. I hope I have inspired you to get inky too!


Stamps used:

Other materials:
- Bazzill cardstock
- Mont Marte acrylic paints
- Book paper, brown paper, gauze, tags
- Tsukineko Staz On ink
- Cocoa Vanilla Studio wood veneer pieces
- Charms Creations handmade book paper star
- Felt pen