Showing posts with label Design Crosses 2x2. Show all posts

Thursday, November 20, 2014

November Challenge/Counting Numbers Art Journal page

Hello and Happy Thursday!  Tina here today with my take on the November challenge.

If you haven't seen the challenge yet, here's a peek!  When I saw it, I just knew I had to play along.


I'm not sure if the it was the color palette, elements, or overall fun that inspired me most, but here's what I was inspired to create!


As you can see, my Art Journal page is almost a literal interpretation of the challenge, but with elements of my own.

I began my page by building color with PanPastels.  I LOVE the blendability and intense colors with PanPastels.  They are great for all types of Mixed Media projects, especially Art Journal pages.

I set the PanPastels with a quick layer of water.  Once the page was dry, I randomly stamped the background with background stamps and a bit of stenciling.


I really love the number theme of the challenge, so I added stenciled numbers, that I doodled with a black and white pen.

I also added another stamp to the bottom of my page that was colored with Shimmerz paints.


I hand drew my sentiment and done!


VLVS Stamps Used:
Periodic Table
Directional Circle
Dictionary Page
Design Crosses


Will you be playing along with us this month?  A great prize package is up for grabs for playing along!

Thanks for stopping by!  Have a great day!


Thursday, November 06, 2014

Doodling with a Stamped Background

Hello and Happy Thursday!  Tina here today with an Art Journal Doodle page, using stamps to create a textured, whimsical background.


I am currently obsessed with Doodling.  I love creating whimsical pages using stamps to create a wonderfully textured background. 

This is such an easy fun way to create and any stamp will do to create an amazing background.

To create my background, I started with a sheet of heavyweight watercolor paper, spritzed with multiple colors of Shimmerz Sprays!  Love the gorgeous color!

After the sprays have dried, randomly stamp on the background, overlapping images and shapes.


VivaLasVegaStamps Used:
Periodic Table
Color Wheel Lines
Design Crosses
Design Open Ovals
Texture Open Suburbia


Once you are happy with your stamping, add your doodles or whimsical shape.  I first drew my Owl shape with a pencil, then outlined the shape with a Scarlet Lime pen.


I then colored the Owl Image with Montana Markers, allowing the textured background to peek through the drawing.


Once I had finished painting the Owl image, I wanted the background to blend into the background, so I covered the entire thing (minus the owl) with watered down Gesso.  I love how you can still see the color and pattern underneath, while muting the intensity.


Here are a few close-ups of the details and doodles!


I hope you enjoyed my Art Journal Doodle page!  Thanks for stopping by!  Have a great day!


Wednesday, October 22, 2014

The Elephant is in the room, Art Journal page

Hello and Happy Wednesday!!  Tina Walker here today!

Today, I am sharing an Art Journal page, full of texture, color, and fun!  If you have seen several of my past posts, you know that one of my favorite techniques is to create Art Journal pages using Gelli Plate Prints.  I love the  instant background you achieve with the prints and I love to embellish them to create an art journal or doodle page.


To create my art journal page, I enhanced the circle design to add more texture and interest.

But before I did this, I created my focal point....the stamped, embossed elephants.  I LOVE this Whimsical Elephant stamp.


I added color to each elephant using Gelly Roll Pens.  (love these).  They have a great opaque, bright color and are perfect!


Once the pen dried, I started added texture and embellishing the circle design.  To do this, I punched a circle from a scrap piece of cardstock to use as a mask.  I then stamped within the punched shape.  This only added the stamped image to the circle.


Super easy, but effective.


The stamping added great texture and interest to the plain background.  I love this technique and will be using it again.

Stamps used:
Dictionary Page
Design Crosses
Lacy Lines


I hope you enjoyed my page today!  I am always looking for new stamp techniques.  Please share them with us.

Thanks for stopping by!


Tuesday, September 23, 2014

Creating texture with stamps and stencils

Hello and Happy Tuesday!

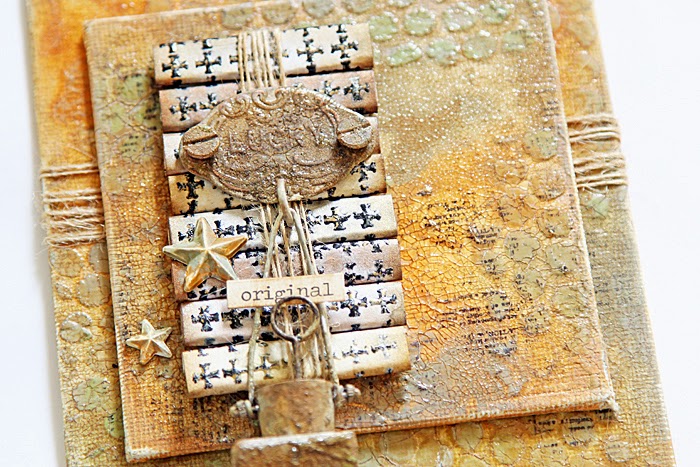
Tina here today with a dimensional Mini Canvas project that is FULL of texture created by using Stamps and Stencils - two of my favorite tools!


If you only had a couple of favorite stamps and a stencil or two, you could create an unlimited number of unique canvases!  The possibilities are endless.

To create my background texture, I applied Shimmerz Dazzelerz through a Crafters Workshop stencil and let dry completely.  I then applied several shades of Distress Paint (over the stenciled pattern) and let the colors mix and blend.


For more texture, I covered both canvases with a layer of Crackle Paint.  Once dry, I applied Distress Ink (watered down) and allowed the ink to seep into the cracks.


I added a bit of stamping, using the Dictionary Page stamp.  This added more texture and interest.

To create my focal point, I heat embossed a sheet of heavy cardstock, using the Design Crosses 2x2 stamp.  I then painted each square with Shimmerz Inklingz, cut each stamped image out, then rolled each square into a flat piece.


I glued each rolled square to a scrap piece of cardboard, and wrapped twine around the entire piece.

To finish my canvas, I added several metal embellishments, painted and enhanced to match the colors of the canvas.


Done!

How do you create texture on canvases?  Please share your tips and ideas!  I am always looking for new ways to create!

Thanks for stopping by!  Have a wonderful day!