Friday, January 27, 2023

You Had me ..... by Tracy Blackwolf

 Hello everyone!

This weeks project is a tag. With Valentines day looming I made art to reflect that. Enjoy!


For this tag I used several distress spray stains. First I stamped the moon. Then  sprayed the yellow on half the moon and down on the left. Then I took Two reds and sprayed all over but in short sprays to get more of a bloody look.

I did it all at the same time and then dried it with my heat tool.

Then I stamped and fussy cut my two characters. I painted them using spray stains and a paint brush.
I stamped the five hearts stamp randomly all over the tag.

I put foam tape on the backs of my characters, and "fluffed" them by bending parts of them so they are more dimensional. Then I placed them down. I used double the tape on the woman so she really stands out. 
it doesn't show well on the screen, but its very dimensional.
Then I stamped the verse on a piece of cardstock, stamped the hearts and foam taped that on. done!
I hope you enjoyed this project today~ until next time, stay crafty!


Stamps Used:
The moon    20157
Beautiful lady retro looking up  8280
You had me at woof    12378
Five hearts    5730
Wolfman   19725

Other supplies:
Distress spray stain- Lumber jack plaid, Candied Apple, Squeezed Lemonade, Saltwater Taffy
Versafine clair- Nocturne
Colorbox chalk ink pad-Warm red


Tuesday, January 24, 2023

Folded card by Arwen

 Hi Lovelies ❤


Today, I'm back on the Blog with a new project.

From the outside:


and from the inside:


And that's the way, I made it:

1.) You need 2 stripes of cardstock (size in the pic). Number 1 is for the outside and number 2 for the inside.


2.) Now we must score the two stripes. In the pics, you could see where to score.


3.) Same with the second stripe.


4.) Fold both parts of number 1 to the middle.

Fold number 2 like zigzag (the third part is a little less smaller - that's correct!)


5.) To decorate the card, I choosed green cardstock and watercolor paper. The green one is 0,5cm smaller than the card, the watercolorpaper 1cm smaller.


6.) To close the card , I used 3 sizes of a circle, You need this two times. Also 2 brads and a piece of elastic band.


7.) Now, I had to finish my decoration. I attached the elastic with the brad under the circle and through the paper.

The second circle, I attached with the other brad at the other piece of paper.


8.) The outside of the card is finished now. But we need to add the inside card. To do this, glue the zigzag part in the middle of the card. The shorter side points upwards.


All stamps, I used:

- Pair of butterfly wings

- Whimsical bug

- Girl in princess costume

- Flowers on stems

- Long stem with leaves


Other stuff:

- Cardstock

- Staz on

- Bazzill paper

- Distress reinker

- Distress oxides

- Elastic band

- Brads

- ScorPal

- different circle punches


See ya soon 💋


Monday, January 23, 2023

Age is a Number - by Fran

Hi everyone!

Today I have made a postcard for you.


 First I made a background by smooshing distress inks together on my mat


I then stamped out the main image and coloured with copic pens


Round the postcard I stamped the edging to give some interest


I then stamped the sentiments onto die cut speech bubbles and added to the card


I mounted the postcard onto black card to make it pop.


Stamps Used:

Ladies - Plate 1344

You are Old 17899

Age is a number 17902

Writing and scribbles 20695

Other Items Used:

Distress Inks in Picked Raspberry and Mustard Seed

Versafine Clair in Tulip and Nocturn

Memento in Tuxedo

Copic Pens

Black Card

See you next time!


Sunday, January 15, 2023

Hellooooo ► Majo


Hello, friends!

 Time for another AMF project and some upcycling.

 AMF = Art Meets Function


I used a plastic container to pep up and have a “ready to go” gift for (m)any occasion(s).

 I used design paper and stamped the flowers and leaves randomly with Pumice Stone (leaves) and Hickory Smoke (Petals). I heat embossed all images to make the container last for a while.

 I added the little tag with packthread.

 A very simple and quick present with the lovely flower stamps, which are so versatile.

 The other sides .....


Go on, try them out:

Viva Las Vegastamps

 I used the following stamps on my project: 

 10289

14094

14088

14090

14097

14849

14102

14087

Helloooo

Have a good start into the new week.

Luv ya ♥


Friday, January 13, 2023

Castle in the Fog by Tracy Blackwolf

 Hello everyone!

For this weeks blog, I made a card. I hope you enjoy it.


So for this card I started out using my jelly mat or plate. I took a rubber brayer and inked it up with dye ink from my kaleidacolor pad. Roll the color onto the jelly plate.

My ink pad is very wet so it works good. I then sprayed on a few drops of distress spray ink. Happy with that I took my cardstock and laid it onto the plate. I went over the back side with my now clean brayer. Pull it off and let it dry a minute.
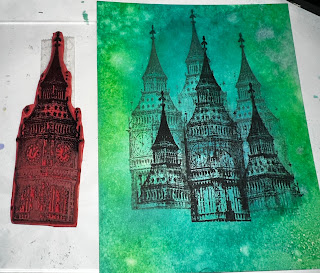
I took my stamp, and inked it using morning mist versaclair ink. I did this three times.Then I took the black versaclair and stamped three times a bit lower. For the center building, I inked the whole stamp. For the ones on either side I only ink part of the stamp as seen in the photo.

Then I took a brick stencil and a sponge, and I blotted the morning mist ink through the stencil. I did it many times to get it darker. I then took the sponge and used the brown or pinecone ink to fill in more on the corners and around the edge of the whole card. At this time I took a paint brush and started to paint in the buildings. I didn't want to change the colors too much so I did a bit at a time. The card will lighten quite a bit as it dries. I used TH heavy mix media cards.
Once I felt done with the coloring, It was time to do the fog. I used a very well inked Moonlight white Brilliance pigment ink pad. Use a decent size makeup sponge for this and ink in the center of the roundest part of the sponge as you don't want lines, they are very hard to get rid of. You may need to tap on paper first then to your card, you do not want too much ink. Keep pouncing to get a good smooth,  blend. Make it as foggy as you wish. Last I stamped the balloon and the fence. I used the distress spray ink and a brush to color the balloons. Mounted it to a black card and that is it!
And that is it! A nice way to use one stamp to make a larger focal piece.


Stamps used:
Big Ben    19391
Hot air balloon flags   19006
Tree with tire swing    19717
Spiked fence     18919

Other supplies:
Kaleidacolor dye ink pad- Caribbean sea
Brilliance pigment ink pad- Moonlight white
Various distress reinkers for painting big ben and balloons.
Rubber Brayer
Gellie plate
Versaclair ink pads- Nocturnal, morning mist, pine cone


Tissue box with pets - by Arwen

 Hi Lovelies 

First of all:

HAPPY NEW YEAR ❤❤❤

My first Blog project for 2023 is this tissue box.

My sister needs a Birthday gift for a friend. She said, she has pets and loves nature.

So I created her this box with pictures of her own pets :)

I hope, she will like it.


And some detail pics:


All stamps, I used:

- Flowers on stems

- Wildflowers Silhouette

- Wildflowers Silhouette

- Long stem with leaves


Other stuff:

- Cardboard

- Watercolor paper

- Distress Oxides

- Flower dies

- Ribbon

- Charm 

- Foam


See ya soon *mwah*


Monday, January 09, 2023

A Masculine card - by Fran Chalmers

Hi everyone.  Happy New Year!

Today I have made a card for a male friend of mine.  I don't often make cards for men, but I am pleased with the way this turned out.


I made the background by brayering Hickory Smoke distress ink straight onto the card mat with a small brayer. I like the texture this gives.


I stamped the image with the writing onto the card mat, as I wouldn't be able to cut it out after stamping the image onto thick paper.


After stamping both the images onto thick paper, I coloured them with pencils and added metallic copper and gold to add a bit of interest.  I then cut them out.  This was extremely fiddly with the above image!


I also stamped the sentiment onto the thick paper, and outlined it with the metallic copper pen.


After sticking the images and the sentiment onto the card mat, I edged it with black pen.


Stamps Used: 
All stamps used are from Plate 890

Other items used:
Distress ink in Hickory Smoke
Small brayer
Gold and Copper metallic gel pens
Polychromos pencils
Versafine Clair ink in Nocturn
Black pen for edging mat

See you next time!