Tuesday, December 30, 2014

bye bye 2014 happy 2015


step by step:
step 1: Take a large wooden spool and four little ones. The large one I decorated with a origami fold ( you can find it here: http://www.minieco.co.uk/accordion-paper-folding-candle-holders/ ). I started with wh9ite paper and coloured it with different colours alcohol ink, then stamped on it with several stamps from plate 1455.
step 2: stamp the grunge 4 19455 on a seperate piece of paper, wrinkle it, colour it with distress inks and glue on one of the little spools.
step 3: stamp the grunge 2 19453 on a seperate piece of paper, mask of and stamp the paint brushes in jar  9235, cut out and colour with distress and a waterbrush. Do the same with the grunge 0 19461 and double coffee rings 19568, the grunge 1 19452 and pointed pen tip 18793, and the grunge 5 19456 and whimsical mouse 18755. Colour in with distress inks and waterbrush.
step 4: stamp the letters happy on craftpaper, using steampunk alphabet 5888, punch out with an inchy punch and make some highlights with a white gel pen.
step 5: take some twigs and spray them silver. Glue the images on the twigs and tie some string. Decorate the little spolls with some washi tape. Glue the little spools with glue dots on the large spool.


SEE YAH back in 2015!


Warmly Hermine


Used stamps:
plate 1455
grunge 4 19455
grunge 2 19453
grunge 0 19461
grunge 1 19452
grunge 5 19456
paint brushes in jar 9235
pointed pen tip 18793
whimsical mouse 18755
Double coffee rings 19568
Steampunk alphabet 5888
Stazon


Monday, December 29, 2014

Design Team Introduction!

Since they'll be posting soon on our blog, I suppose we should be introducing the Design Team who will be taking up residence on our blog the first half of 2015!! A few of our oldies are joining us, a few newbies, too! And... maybe you'll see some familiar faces because a few of our previous DT members have come for another go 'round! Exciting!

In alphabetical order we have :

Hi, my name is Corrie Herriman and I live in Venlo in the Netherlands with my husband David. I have been crafting all my life but only discovered rubber stamps, ink and mixed media a few years ago. I stopped working in 2010 so I have lots of time to spend on my inky hobby. I am stoked to be on this team and hope to inspire you with my, mostly colourful, projects.


Hi, my name is Glenda Tkalac and I live in Saskatchewan, Canada.  I love scrapbooking, making art journal pages, ATC's & canvases. I work full time but wish I could just play in my art room full time! haha  I also love watching movies, playing with paper, scissors, stamps & paints, Pinterest, funky runners, going to concerts, hoodies, Marianas Trench, baubles & purses, the Goo Goo Dolls, unicorns, rainbows, mermaids, a good laugh, Coors Light, my Sony Reader, flannel sheets, my scented wax burner, Sid Dickens memory tiles & I have a new appreciation for red wine.


Hi, my name is Hermine Koster and I am from The Netherlands. I am a rubber stamper for many years now, but I still can't get enough of it.  I love making cards, but also do love Mixed Media, altered things, art journaling, in fact anything you can put a stamp on.


Hi, I'm Karen, Aussie gal, Wife and Mummy and Stamper! I love to create on tags, and am happiest when my fingers are inky!


Hello, my name is Mary and I'm a crafty gal living in sunny AZ with my husband and three kiddos!!   When I'm able to carve out a bit of free time you'll find me in my craftin' corner with the music loud, surrounded by a pile of scraps.  I'm a huge fan of working with different types of media, from paper and clay to fabric and more.  You'll always find a stack of stamps right next to me on my table and most often, I'm covered in glitter.  Yeah, my husband loves that.  What man doesn't enjoy being dubbed 'Mr. Sparkles' at work??!!?


Hello all, Michele here and I am one super super excited crafty girl!  So honored to be a part of this team.  I hail from southeast Michigan where I recently found my way back to live out the latest chapter of my life.  When I am not crafting I am running around with my nieces who keep me on my toes!  I work for a local company and visit Los Angeles regulary, I spent 13 years there (what is that, 2 or 3 chapters?) having a ball.  These next 6 months are going to be a blast!!!


Shanna Shands   
Hi everyone I am Shanna and I am so excited to be a part of the VLVS team. I have always been inspired by previous team members creations and I am excited I get to share mine with you. I love all types of crafting and have been crafting for 4 years now. Mixed media is just such an amazing way to get creative because there is no wrong way to do it and you can use it on any project.


During the daylight hours... I am a graphic artist working in the fast-paced printing industry. I spend my days working in a busy print shop doing my computer wizardry producing printed materials and at night... I create with abandon while all the world is asleep. My style is varied and unique – altered and edgy… using materials in new and unexpected ways - especially stamps! Its no secret I'm a VLVS! rubber addict ... I can't have enough. I'm so thrilled to rejoin the fantastic team at VLVS! and share my rubber adventures with all of you. 


That's it! Our new team :) Be sure to leave them some love and welcome them to the blog for 2015. We we will be losing a few of our members for various reasons, and we will surely miss them! So before we switch over the DT list on the right side of the blog please take a moment to visit and follow all of our current members. ♥

Sunday, December 28, 2014

Make a wish (+ background tutorial)

Hello all! Nataliya is here :)
Happy New Year  and Merry Christmas! Let all your dreams come true!
And I want to show my new card:


It's some kind of vintage, but in a light shining palette:


I love when my card have the many layers & volume:


And background in close:


Do you want to know, how it was making? It's easy peasy!
I took book pages & paper doily laces and glued them on scrap paper:


After that I painted my background with gesso:


and added some stamping with acrylic paint:


Before the paint has dried, I sprinkled little bit of glitter:


mmmm, shiny!


It's time for adding more stamping!


And more...


How about more shine?


And final step: texture paste with sand!


Background is ready ^.^

And my VLVS!
Victorian Flourish 2 1/4 x 5
Stars 2 x 2 1/4
Waybill/Invoice Background 4 1/4 x 5 1/4
Make A Wish 3/4 x 2 1/4

Have a great New Year Party!!!!

Saturday, December 27, 2014

Steampunk for New Years

Hello Again!!!! 
It's me Tera Here with my last post for VLVS.
I will miss you all but i'm so thankful for the opportunity that VLVS has given me and i hope to come back after I finish school. 

Today I want to share a fun steampunk tag just in time for New Years!


Supplies: 

- 1 Large tag cut from chipboard 
-Various chipboard die cuts 
-Metal embellishments (Tim Holtz or other) I used a Tim Holtz wing and metal fastener, as well as a button
-Black Dylusions spray ink
-perfect pearls shimmer spray
-InkaGold -Silver, Orange, Black
-Scrapbook paper ruler
-Favorite Adhesive (I used Glossy Accents)
-distress markers to color yours stamped image


Start by spraying your chipboard pieces and tag with black dylusions ink, then allow them to dry. Next use your finger to dry rub the inkagolds on your chipboard pieces for a metallic feel. Also add some inkagold to your metal pieces. :D 

I then arranged the pieces on the tag and glued them down with glossy accents. For my stamped image I stamped her on cardstockwith verafine ink, I colored her then misted with the perfect pearls shimmer spray to keep a consistent shimmery look.


Thank you for all of your support! 
Have a wonderful and Happy New Year!


Friday, December 26, 2014

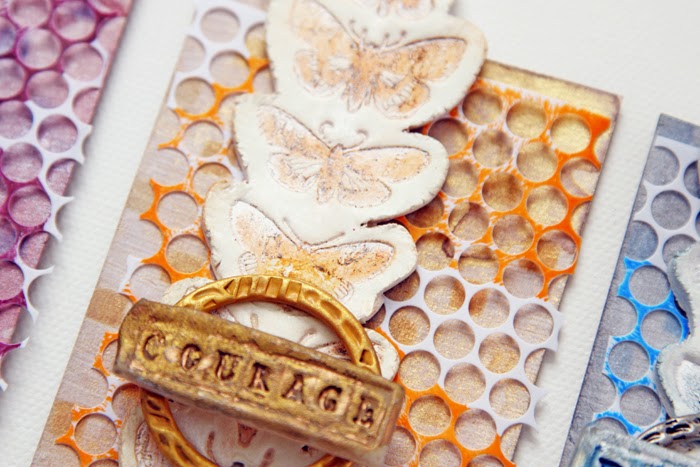
Stamping on Clay to create ATC cards

Hello and Happy Friday!  Tina here today with my final Designer project for VLVS!  I want to say Thank you to DeeDee and the wonderful VLVS team.  I have loved be part of the VLVS family and I will miss seeing you each month!

For my final project, I though I'd share a type of project that may be new to you, stamping on clay.


My first experience with clay, was at an Art Is You Retreat in Petaluma, CA, back in September.  I was immediately hooked and have been wanting to create with clay once again.

The clay we used during the retreat was oven baked, but I wanted to create a faster, easier project using air dry clay.  I used Fimo Basic. (FYI - this was the first time I used this clay and it was very easy to work with.  Just follow the enclosed directions.)


I rolled the clay out to approx a 1/4 in thick, then inked up several stamps with Staz On ink and stamped away!

VLVS Stamps used:
Butterfly Specimens
Crackle Background


I cut around each image (and cut shapes), then set them aside to dry.  (the instructions said to let them dry for at least 24 hours, but I let mine dry for 48 hours)


Once my clay had cured, I began assembling each ATC card.  Using Shimmerz Paints and UmWowStudio stencils, I created a colorful background on each card.  I then colored pieces of punchinella with coordinating colors of Staz On Ink.

(Note:  the ink on the finished stamped pieces appears lighter because I colored each piece with a Pearl colored Shimmerz Paint.)


I embellished each stamped clay piece in coordinating colors and Viola - Done!


I hope you enjoyed by ATC cards today and next time when you are looking for a new, creative way to use your stamps, try clay!

Thanks for stopping by!