Showing posts with label gifts. Show all posts

Thursday, December 13, 2018

Bookmarks and Notebook - Gift Ideas | Sue Plumb


Hi everyone!
It's Sue Plumb here to share my latest design team project with you. As we head into the festive season, I thought it would be a good time to share a couple of simple appreciation gift ideas with you. There are always people in our lives that deserve a small token of our thanks - whether that be teachers, neighbours, friends, the mailman, or even the staff at the local store. So I decided to whip up some simple stamped bookmarks and notebooks featuring some of my fave Banksy stamps to give out.

For the notebook, I started with a plain, kraft cover notebook (purchased from Kmart). I used Dina Wakley acrylic paints, applied with a brayer and layered randomly to add some colour. I then took the recently released Victorian Flower Background and used it to stamp a border around 3 sides of the cover.


Next, I chose the fabulous Banksy Wall Singer for my feature image on the cover, before I also stamped the Banksy Life is Beautiful as the accompanying text. I love how it turned out! I paired it with a pen before wrapping it up.


After I created the notebook, I decided to re-visit a project I have created previously and shared here - bookmarks. (You can find my original watercolour bookmark post HERE) This time however, I wanted to use a more minimalist style to showcase some cool Banksy stamps. 


I started by cutting some smooth white cardstock into strips measuring 2x8.5". I then stamped a focal Banksy image onto each one, and an accompanying quote as well. 

Here is a list of all the stamps I used on the bookmarks (as shown from left to right above):


I also stamped the back of each bookmark with the Banksy stamp.

Once they were all stamped, I used Faber-Castell gelatos to add a splash of colour to each one. I wanted to keep them simple, so I only used a single colour on each one and left the focal images uncoloured.


I then took all the bookmarks and laminated them, trimming off the excess laminate with a trimmer.

I then punched a hole into each bookmark and added a variety of twine, tassels and a metal charm to decorate them.


I am so happy with how these turned out and cannot wait to gift them to their new owners! Thanks so much for stopping by so I could share this with you. I hope I have inspired you to create some special handmade appreciation gifts for the people in your lives too. 


Stamps used:
Victorian Flower Background
Banksy Wall Singer 
Banksy Life is Beautiful
Banksy Man on Bicycle 
You Only Live Once
Banksy Frida Kahlo 
Banksy Just Because
Banksy Spray Can Cop 
The Unicorns Made Me
Banksy Einstein Protestor 
Banksy Love is the Answer
Banksy Girl Floating with Balloons 
She Was a Dreamer
Banksy Ladder Painter
Banksy Gas Mask Flower Girl 
Where is My Mind?
Banksy Child Sitting 
I Hope You Know
Banksy Swing Girl 
She Spread Her Wings
Banksy

Other materials:
- Plain notebook
- White cardstock
- Tsukineko StazOn ink
- Faber-Castell Gelatos
- Dina Wakley acrylic paints
- Laminating sheets
- Assorted twines, tassels and charm

Thursday, August 06, 2015

A Little Note.

Hello, Mary here with a little back-to-school stampin' project.

I'm always in need of a notecard to send a note of thanks, or just a little card to let someone know I'm thinking of them.  So, I stamped up this set of kraft notecards with 'X' and the 'O' from the Checklist Cube stamp.  I use this set of stamps all the time in my planner, and I love how cute the notecards came out!


Then I got to thinking that the box and check images from the Checklist Cube would make some really cute notecards to give to each of my daughter's teachers!

I began by cutting 5 sheets of kraft cardstock into half and folding them into card bases (5 for the 'X' and 'O' and 5 for the box and check).  Then stamped a different pattern onto each notecard with a white pigment ink to create a set of 5 matching notecards.


And because I'm all about the packaging, I ripped a length of unbleached cotton fabric and stamped the Measuring Tape Section image repeatedly to create a custom ribbon perfect for wrapping up my set.  Now, it's ready for giving!


For the 'X' and 'O' set, I used the Scribble Heart to create my ribbon.


I love the soft look of the white ink on kraft.  And the set all tied up with the rustic ribbon?  SO shabby perfect!


And that's it for me today.  Now, grab your favorite stamp and get to stampin'!!

Wednesday, November 27, 2013

A STAR is Born... from Viva Las VegaStamps! and 7 Dots Studio Goodness!


Welcome to Viva Las Vegastamps! Susan here today to share a handmade star book created using 7 Dots Studio Papers and my stash of VLVS!. I love making mini books for gifts and the double sided 12" x 12" cardstock is so beautiful - I knew it would make a perfect gift for my husbands' niece {her birthday is the same as mine}. She's 16 and I just know she will love this. I have to say - my stash of Miracle Tape made this so much easier than using glue stick as I have in the past... so easy and no sticky-gooey fingers.


Since I wanted to get the most mileage out of the 12 x 12 sheets, I used some strips of natural cardstock offcuts from work as my book base {I don't get offcuts of paper often at the printshop where I work, but when I do it comes in handy}. The size of them are 4 1/4" x 23" so I cut 7 sheets at 15" wide and also 13 1/2" wide; then scored to fold in half making long rectangular pages This will be a nice variation from the dozens of square books I've made previously. I cut the 7 Dots Studio Papers to 4 1/4" x 12". I like to make the book have a little more detail so I use the scraps and stitch them into the center of the book base pages. These sections were 4 1/4" x 3 1/2" and 4 1/4" x 2" - each then scored to fold in half. Before I assemble I swipe the edges of all sheets with coordinating colors of Cats Eye Chalk Inks to get rid of the white edges.


I decided my order of colors and patterns and nested the smaller pieces inside the largest base pages and punched two holes for stitching using a pushpin.


For each of the sections, I laced some May Arts natural burlap twine and tied a knot on the inside to secure. Now I have 7 little booklets sections.


I again arranged my sections by color and pattern as I wanted them in order in preparation for adhering the layered nesting pages. These nesting pages float freely and are adhered aligned to the edge of the page using 3/8" Miracle Tape. You can vary the amount of pages and dimensions to add more rays to the star book.


Keeping my sections in order, I used 1" Miracle Tape to adhere the sections together by taping the largest cardstock base pages back-to-back. This makes for a nice sturdy book. There are simpler ways to make a star book - I am just all about the "EXTRA" little details. You can leave out the stitched portion to make it quicker.


Now with my book assembled I added more Miracle Tape {I would have used Miracle Sheets, except I didn't have enough to do the job}. A adhered green crinkle satin May Arts Ribbon loosely around the spine area and layered more miracle tape over the top. I also added a blue sheer organza ribbon around the length to tie the book closed and layered tape over this as well. All this extra taping ensures the book and the ribbon won't pull apart.


I cut two sections of scrap chipboard to fit the cover and leaving a slight overhang; then wrapped with the gorgeous blue 7 Dots Studio "Love Is In The Air" patterned paper and my remaining Miracle Sheet cut to size... easy peasy!

Using a couple of the leftover patterned paper scraps, I stamped a quote and collage for the cover and matted onto navy blue cardstock leftover from my November T!m Tag; layering images in blue and black ink for added depth. **A NOTE** I started to stamp directly onto the cover AFTER I assembled and messed it up... yep this is a total "COVER UP". Note to self... stamp your cover art before mounting to book because it's not flat!!!

a STAR is Born...


I finished off with glittery We R Memory Keepers Sticker letters that matched perfectly and a few clear sticky-back bling colored to match with a green permanent marker. VOILA! All I need is a fancy pen and this gift is good to go :)

Would you LOVE to be a part of this Awesome team of Stamp Addicts???
Here's your chance!!! CLICK HERE for all the details... hurry up Nov. 30th is the deadline.


• • • • • • • • • • • • •

Viva Las VegaStamps used: Bulls Eye Target Solid #19196Bulls Eye Target Open #19193"Be Adorable..." #19038"Dream" #18886"Inspire" #18888"Time Flies" #19008Large Bird Flying Left #19001Hot Air Balloon with Flags #19006; Flying Watch #19004; Card Suits #14109; Writing Arrow #19078; Paris Address #17539; Steampunk Heart Small #16010; and Dotted line from the December Daily Plate #1430. Supplies used: Natural Cardstock; scrap chipboard; Stuart Superior Black Memories Ink; Ancient Page Cobalt Blue Waterproof Ink; Miracle Tape 3/8"Miracle Tape 1"; Miracle Sheets; Clearsnap Cats Eye Chalk Inks; WeR Memory Keepers "Feelin' Groovy" Alphabet Stickers; May Arts fibers and Ribbon; Blue sheer organza ribbon.

http://vivalas.blogspot.com/2013/11/november-challenge.html

Thanks so much for dropping by. Have you entered the monthly challenge - you have a couple days left. Make a creation using the the November inspiration and your stash of VLVS! stamps... you could win more RUBBER! CLICK HERE for challenge details. Also, you definitely want to subscribe to the blog feed and to the Viva Las VegaStamps! newsletter to be IN THE KNOW of everything going on at the Viva Las Vegastamps! store. There's so much amazing inky inspiration to see!

If you would like to see more of my creations please visit my blog, sbartist : painting in the dark HERE. I'll be back soon with another stamping adventure!  Sb

Friday, August 09, 2013

Guest Designer {Samantha}

Welcome to the blog today :) -- It's time for our August Guest Designer to make an appearance -- Welcome Samantha Klaebe!!


"Hi there, my name is Samantha Klaebe. I live in Adelaide, South Australia with my wonderful husband, Adrian, and gorgeous soon to be one-year-old boy, Liam. We also have a furbaby - a very playful, energetic, loving and intelligent (though at times a little on the dopey side) Golden Retriever-cross-Labrador.

These three are the light of my life, inspiration and driving force behind many of my creations. I started my scrapbooking journey in 2003 when my husband and I moved to Brisbane, Queensland, for work. I needed a hobby and discovered a scrapbooking shop close by to where we were living.

From there, I started creating calendars and Christmas cards which over the years has evolved into a full-blown passion - some may call it an obsession. I now create invitations, cards, scrapbook pages, artist trading cards, mixed media and wall art. Anything really!

Over the past 12 months I've been able to build on my scrapbooking/craft skills after taking a year off from working as a registered nurse to be a stay-at-home mum. During this time I have created a blog called “my little paper world” (http://mylittlepaperworld.blogspot.com.au/) and branched out into the scrapbooking community. I am beyond thrilled to have been asked by Viva Las VagaStamps to be a guest designer and cannot wait to share my work with you.


Products Used:

o Kaisercard – Grey
o White Card Stock - Bazzill
o Pink Card Stock - Bazzill
o Pattern Paper (from my stash of paper scraps)
o Embossing Folder – Cricut Happy Birthday / Darice - Chevron
o Distressing Tool
o Silouette Cameo (though it’s easy enough to cut these with your paper trimmer)
o Double sided tape
o Memento Tuxedo Black Ink Pad
o VersaMark & White Embossing Powder
o Heat Gun
o Stamp-a-ma-jig
o VLVS Happy Birthday Sentiment (wood mounted)

*tip - post it notes make for fantasic masks.

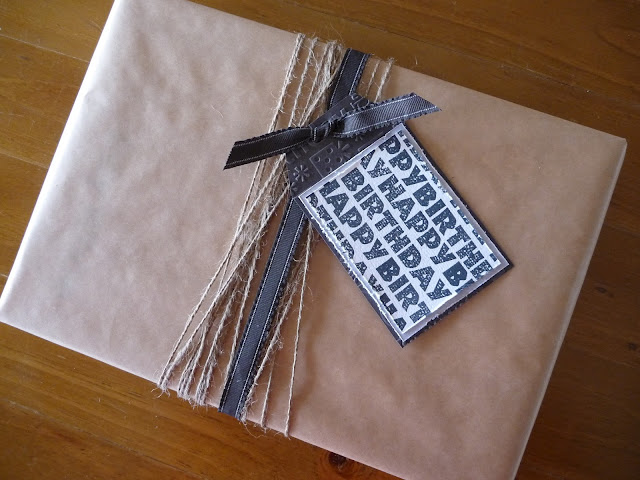
I started with white cardstock cut 12x10cm. I then stamped VLVS Happy Birthday in the centre of the cardstock. Using my stamp-a-ma-jig I then filled in around the initial stamped imaged (using a masked technique to avoid stamping over the already stamped sentiment).

I then cut the stamped cardstock to fit pre-cut tags that I cut from my silhouette machine (9.5cmx6.5cm). I distressed the edges. I then glued this to some patterned paper and distress the edges again.


Next I embossed the tag using my cuttlebug. I stuck it all together and created a very simple tag that as you can see was used immediately as August/September seem to be the months where everyone I know has their birthday.


With the second tag I used the same method, except I used VersaMark and White embossing powder on pink cardstock.