Wednesday, September 11, 2013

Wall in the garden

Hello all! Nataliya is here :)
Today in our program - the wall. Old brick wall in the Forlorn garden


To create this brick wall I used VLVS! Brick Background 2 1/4 x 5 stamp.
I stamp it on cardstock, add some tone and paint it with crackle paint :)

Tuesday, September 10, 2013

Challenge - Accepted!

Hi Everyone - Karen here with you again today. Have you seen the awesome new inspiration challenge that we have here at VLVS this month??


I love the colours.. So I decided that I would use this as my inspiration ,
 
This is what I came up with..
 
 
 I used a base of the VLVS Grunge writing 1787 , then layered down  lots of different elements, including book pages and lace added in some Tim Holtz embellishments and some hexagon chipboard from UmWow Studio .  I've coloured the chipboard with brown ink, even though I love the natural colour of the UWS chipboard, I wanted it a little darker this time, and  lastly some stitching and flowers.
 
and a couple of close ups..
 
I love the detail in this crown.
 I stamped  both the crown and the bee on manila coloured cardstock, the inked the edges with walnut stain distress ink.

 
I've  used Miracle tape to stick my vintage lace down..  Is there anything this tape wont stick??
 
I used three different VLVS images for this one..
 
 Crown 2 x 1 1/2
 
 For the background  I used
Grunge 1787 Writing Background 3 x 3 1/2
 
And I fussy cut the bee from
 
Italian Sonnet Background 4 1/2 x 3 3/4
 
 
Thank you for stoping by,
I hope you have a fantastic day, and get a little stamping in
 
Happy Stamping..
Karen.

Monday, September 09, 2013

Door hanger

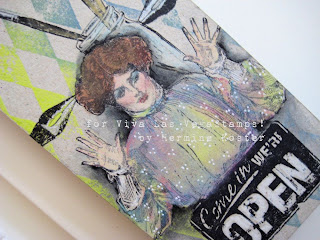
Hi, Hermine here. It was fun to work on this doorhanger. At first I wanted to stamp "keep out, stamper at work"on it, but then I thought it is far more fun to invite friends over and craft together, that is why I choose this tekst, it fits perfectly.


it all stamping and masking, the thing I love most when I want to relax.
1. Stamp the Gibson girl with hands up 12744 on the greyboard doorhanger with Stazon jet black. Stamp the girl also on masking paper and cut out. Mask of the girl. Stamp the Paintbrushes in Jar 9235 on the right hand side. Make a mask of it. Then stamp the pointed pen tip 18793 on the left and right side. Mask it as well. Stamp the open sign 19228 and mask it. Put 2 colours of Colorbox Crafter's ink on the Harlequin diamond Background 18920 and stamp on the whole door hanger.
2. Remove all the mask and colour the images. I did this with Derwent colouring pencils and white spirit.

Stamps used:
Gibson girl with hands up 12744
 Paintbrushes in jar 9235
Pointed pen tip 18793
Open sign 19228
Harlequin Diamond Background 18920
Stazon Jet Black

Sunday, September 08, 2013

August Challenge Winner

It's time to share the winner of our August Challenge!

Random.org chose..

 Tera (The Crafty Sugar Addict)  !!!!!

She linked up this beauty :


She used:


Congrats Tera! Email me @ deedee430@gmail.com with your shipping address and we'll get you some good ol' rubber!

Friday, September 06, 2013

She Leapt for Joy-Viva Las VegaStamps!

She Leapt for Joy...Ideas were Proliferating Like Rabbits

Ah! You've been there as a crafter, yes?  Days where the blank page mocks you.  Dares you to create.  And your muse is silent, offering no help.  And then suddenly, ideas begin to flow, welling up and hopping about like bunnies, out of control.  Bursts of color and energy leap onto the page, and you leap for joy.

It seemed like a good theme for an art journal page!

Supplies:
VLVS! Images Used--

Dictionary Page Item 19015 Plate 890

Wind-up Bunny Item 19218 Plate 953

Sakura of America Gellyroll- Stardust: Rose-star, Purple-star, Golden-star, Lime-star/Standard: White

Dyan Reaveley Creative Art Journal
Dylusions Ink Sprays-Cut Grass, London Blue, Pure Sunshine, Lemon Zest, Postbox Red, Dirty Martini
Montana Marker Standard tip-Shock Yellow Lt, Shock Blue
E6000 Glue
Amazing Casting Resin Spills
Amazing Clear Cast Resin 
Acrylic paint-flesh tones, green, red, blue
Permanent Marker
Alumilite Dyes-Flo Red, Blue, Flo Yellow, Flo Green
UnWow Studio Mask-Light Bulb
Paper Doily
Paper Towels
Water Mister

Several months ago, I made up some backgrounds in my Dyan Reavely Art Journal using Dylusions Sprays.  For this particular spread, I sprayed Dylusions ink spray in several colors, then used the reductive method of lifting some color by placing a paper doily down, spraying liberally with water and soaking up the moisture with paper towels.  When you lift up the doily, the color is lighter where the water was soaked up.

I used the Light Bulb mask to place a light bulb on each side and colored them with the Sakura Gellyroll pens.  Then I used the Montana Markers to glaze the page, allowing the color behind to show, while unifying some of the rougher places where color had leaked through from other pages.

I stamped the Wind-up bunny images and colored their heads with white gellyroll pen.


A while back I posted about a resin spill from one of my Amazing Mold Putty design team projects. The spill was painted with Acrylic Paint, defined with permanent marker, and stamped with the Dictionary Page stamp.  She looked to me like a woman leaping, and she seemed perfect for this page 

I glued her down with E6000 glue.  


Now I needed something else with weight on the other side!  I took a 1x2 inch piece of Eco artboard and wrapped rubber bands around it.  I made a mold with Amazing Mold Putty and then made 5 different castings using a different color each time.  They made me think of oriental character and I think they provided a good balance down the page.


To finish, I used a permanent marker to write my saying.


For more of my work with Viva Las VegaStamps!, Amazing Mold Putty, zentangle-inspired art, and daily links to tangles, tutorials, and giveaways please visit my "Life Imitates Doodles" blog.   ~ Sandra Strait

Helpful Links: VLVS! Store for all your stamping needs; the  VLVS! Blog for new projects; VLVS! on  FaceBook,  PinterestInstagram. and Twitter.  Be sure to check out the Challenges posted each month.


Thursday, September 05, 2013

Be Brilliant {Mini Album and Video Tutorial}

Hello, stampers! It's Amy here today to share a mixed media mini album I created, using some of my favorite Viva Las VegaStamps!
13, bottom stamping The stamps I used for this project were: Don't Blink ,That's Brilliant, Hello Sweetie and the Grunge Writing 1787 Background stamp.
Here's a video to share the process of making this mini album cover:

13 flag, ALL, VLVS
13 full fanned out. All, VLVS I'm really pleased how this little mini took on a fun life of its own, with the help of these fabulously themed stamps, and helped me to express the awesome personality of my 13-year-old daughter, Brynne. Now, I have a place for all of those photos we shot on her first day of high school! Thanks so much for having a look! For more mixed media and stamping inspiration, visit my blog: www.sparklinggnome.com

Wednesday, September 04, 2013

Swap Time!!

Hello Friends! Every couple of months(ish) we host a swap through this group on facebook. Our most recent swap were large match boxes. This post today shares the matchboxes that were received and sent back out!

Right now we're signing up for the next swap.. Altoid Tins in a Halloween Theme! Stop by, read the rules, and join us!

But take a gander at these beauties!

This one is by Mary Vogel Lozinak. She used Caution Frivolity Enclosed and  Braids Lady.


Carol Hodges used the Mermaid with Drink. I really love the gorgeous watery effect of the whole box.


Lea Cioci used Whimsical Fish, A fish out of water, and  
Mermaid holding tail in her nautical themed goodie!


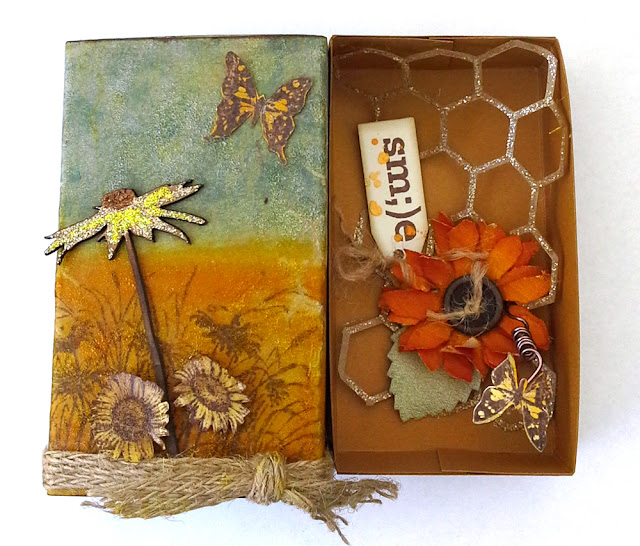
Michele Kosciolek used Sm;)e, Sunflowers and Small Spotted Butterfly to
create this gorgeous nature based bit.


This is by Anne Squire and this girl uses so many stamps all the time, it's INSANE. 
The two major ones on this piece are Eye and Lashes and Butterfly Eyes.


This box is by Marilyn Hughes and she's really great at using a lot of stamps, too! I can't get over that adorable little kitty on the chair, and how witty putting in corrugated cardboard to line the walls!


This one is by Barb Rankin -- full of lots of beautiful sewing goods and
is a total gorgeous vintage sewing box with Lady Sewing ATC on top.


Jennifer Walker combined lots of found goodies with our Wanderlust, Leaves blowing from Tree and Children Playing on toy Car stamps. 


Karen Knight chose to open the front of her box and peek her Steampunk Cat through. She also used Adventure Awaits, Dictionary Page and Hot Air Balloon With Flags.


I knew as soon as I opened this one it was from Dawn. She used our  
Dress From stamp to complete her Paris Match Box.


Lyneen Jessie brings a little softer side to her normal steampunky goodness with this box 


Can you believe all the goodness that arrived at the store for me to sort through? Just glorious! Each and every one.

Tuesday, September 03, 2013

Sunday's Tag Demo catch up!

The first Sunday of each month we meet up @ The Crafting Place locally on Russel and I do a two hour tag demo. It's very mixed media based -- focusing on paints, ink, stamps, chipboard, and other materials.

For September I shared with the group the post-it-note masking technique for layering and scene stamping.


This was the base tag for the demo that everyone based their creations from. I did bring a few different bottles, plant type stamps, bugs and celestial bits for some variety and ease of use. The base tag includess the Bottle, Sunflowers, Dandelion with extra seed, Don't Let Anyone and Moon Circle stamps. The tag also has Distress Ink in Mustard Seed, Peeled Paint, Tumbled Glass, and Walnut Stain, UmWowStudio Chipboard Daisy and Light bulb mask, Archival ink in black, Sakura of America Micron and May Arts Burlap String.

Here are some photos from the class as they worked on building up their scenes :

We had 10 or 11 people stop by to do tags, and they all turned out SO AWESOME!  You can see my demo area here, using the kraft mat. It works out pretty well with these nice big long tables provided by The Crafting Place, we can pass around lots of supplies easily. Here are some attendees inking up stamps, stamping post its and tags! They're fussy cutting and layering. It's pure awesome.


And here you can see some closeups of the girls at work :

You can see the postits working as a mask really well in these shots. Each month we explore a different technique and or medium (sometimes several!) -- we'd love to have you down :) Get all the info HERE and stop by the Meetup HERE (Look for Free Demonstration of Mixed Media) if you'd like to register and or need a reminder. They're completely FREE!

Monday, September 02, 2013

Doing My Part to Creatively Save the Planet...
with my Stash of Viva Las VegaStamps!


Welcome to Viva Las Vegastamps! Susan here today to bring you some inspiration using September's Challenge Inspiration Board. I am all about recycling and greencrafting so this was right up my alley... and my crazy "one touch rule" decided to tag along also.


In gathering up goodies to create with I came across an Altoid tin... so this project is also inspiration for the current Viva Las VegaStamps! Altoid Tin Swap {CLICK HERE for swap details}.


I have these scraps of book pages that are leftover from cutting out a niche in an altered book which is a perfect size for ATCs... and for today's project... papering the inside of an Altoid Tin. I put down a base layer of gesso, then overlaid Peeled Paint, Old Paper and Antique Linen Ranger Distress Stains. This made a nice background for scene stamping on top of.


I hammered the lid of the tin to flatten out the raised embossed letters - and it left a nice bumpy texture and rounded convex finish to the lid.


Inside the tin, I primed with a mixture of gesso and Peeled Paint Distress Stain. I mounted and prepared my stamps; "Panda Eating" #963 and "Flower Background" #18369. I stamped the panda onto white cardstock using Staz-On Black ink and added touches of color using my Ranger Distress Markers and waterbrush.


I stamped the flower background onto my painted paper using Frayed Burlap and Peeled Paint Distress Inks; then overstamped with Staz-On Black ink to give the effect of depth in the foilage.


Now to add some color and "POP" with my Sakura of America Gelly Roll® Stardust® Glitter Pens and also Souffle® 3-D Opaque pens. The colors of the Souffle pens are opaque and dry a little raised, and the Stardust pens are translucent and give that touch of glittery shimmer. I really love smudging the color of the Stardust pens around to get subtle color with a little bling.

I finished off with some buttons, a knot of natural raffia and painted corrugated around the outside of the tin – all in the flavor the inspiration above. Built the scene with layers of texture and various chipboard details - a disassembled UmWowStudio Cattails and a balanced in the opposite corner with a decorative flourish; each painted in the same fashion as the book page base. To add that final bit of detail, I ran a bead of Diamond Glaze around the edge of each side and dropped in some pale green iridescent glitter... one can never have enough glittery goodness!

Doing My Part to Creatively Save the Planet...


I hope you are INSPIRED and will link up your creation to this month's Challenge.


Left side detail... with a field of button florals and glittery goodness.


Right side detail with the panda nestled amongst the foliage.

•••••••••••
Supplies used: STAMPS - "Panda Eating" #963 and "Flower Background" #18369. Other supplies: white cardstock; recycled book pages and Altoid Tin; gesso; Staz-On Black inkMiracle TapeRanger Distress Markers; Sakura of America Gelly Roll® Stardust® Glitter Pens; Sakura of America Souffle® 3-D Opaque; Ranger Distress Stains - Peeled Paint, Old Paper, and Antique Linen; water brush; Peeled Paint and Frayed Burlap Ranger Distress Inks; Cattails Chipboard from UmWowStudio; buttons; glitter; Diamond Glaze; and natural raffia.

Thanks so much for dropping by. I invite you to play along with the monthly challenge - make a creation using the inspiration and your stash of VLVS! stamps... you could win! CLICK HERE for challenge details. Also, did you receive the latest Viva Las VegaStamps! newsletter??? If not - you may have missed the LABOR DAY SALE and the Altoid Tin Swap info. Make sure you SUBSCRIBE to be IN THE KNOW of everything going on at the Viva Las Vegastamps!. There's so much amazing inky inspiration to see!


If you would like to see more of my creations please visit my blog, sbartist : painting in the dark HERE. I'll be back soon with another stamping adventure!  Sb

Sunday, September 01, 2013

Monthly Challenge - September

It's already time for another challenge -- can yo believe it? I feel like we just released them again last week.

Visit this time next week for the winner of August's Challenge - there were some SERIOUSLY beautiful pieces entered. Thank you so much everyone!! Also visit tomorrow for inspiration from Design Team member Susan!

And for this month's challenge :


Don't forget the rules:
-Create a new project based on our inspiration board
-Use at least one (but certainly more if you want) Viva Las VegaStamps! rubber stamp (please no competitor's stamps on your entries)
-Post it to your blog with a link back to us
-Upload to our linky using your direct blog post link (You may also upload via facebook, flickr or other gallery)
You could win a Project Spotlight post on our blog + some new rubber of course!

You are welcome draw inspiration from any portion of the board, as well as create any type of project. Cards, layouts, tags, altered bits n bobs. Draw inspiration from the roses, the ribbon, the stitching, the images, the colors.. whatever! You do it, we wanna see it!  

Don't forget to visit tomorrow for Inspiration from SUSAN!
-

-