Tuesday, January 19, 2016

A little inspiration from me...

Hello everyone,

For my DT post today, I have made a pocket letter. I see lots of people making these and thought to have a look what all the fuss is about !! lol

Anyway, here it is, complete with a tutorial of how I made it ! Enjoy....

This is the finished product ...


It is based on this mood board with the following words:

femininity, women, exploration, rainbow, neutral and nature, storm, maps, vintage, writing, script, yellows, tans, black and white, stripes, bold, rainbows, storms and more!


I hope I did it justice... 

Here is the process:


I started with a piece of white card stock measuring 10,5 x 7,5 inches. This is 9 ATC's. 


I used distress ink (scattered straw) and a blending tool to colour the paper.. 


I also used Walnut Stain to age the edges... 


Like so... 


Next I used a stencil with Walnut stain Distress Ink and a blending tool and also with water in a spray bottle so you get darker than the page and lighter than the page... 


Next I stamped the background using Archival Inks. I did use more than one stamp for this. A list of all the stamps I used is at the bottom of this post with links to the shop... 


This is how it looks after stamping....


Here's a close up... 


Next, I cut the now finished background into 9 ATC's.. 


and started looking for stamps to use, remembering the words from the mood board. 


Work in process, I just stamped the images, some on white card stock some straight on the background. I coloured the ones I stamped on white card stock, cut them out and adhered them to the cards. 


And here is the finished project again... 
I quite like how it came out..  I slipped all the cards into an ATC page and put some washi tape at the edge where the holes are. I did re-punch the holes... 

I also took pictures of the separate ATC's: 


I hope you like my project and got some inspiration to play along with us... and NO you don't have to use that many stamps or make 9 ATC's.... Just take some of the words and colours and make something ! 

I used the following stamps:


Thank you so much for stopping by today and I really hope you will play along with us this month !


Monday, January 18, 2016

Mail Art Monday with Michele

Today is my first Mail Art Monday, thanks for joining me!!!

I started out by cutting an envelope from a heavy white cardstock.


Then I did some masking with washi tape and stamped images.  I fussy cut the Whimsical Lady Walking and Whimsical Poodle and made them into a sticker with my mini Xyron.


I stuck the images down and did some background stamping with the Numbers Set, Writing Circles and Writing Triangles.


Then some spraying with Distress Sprays Broken China and Crushed Pistachio.


I peeled up the masks.


Then stamped the images in their spots.


 I did some coloring and doodling to finish it up.

When it was completely dry I assembled the envelope.


Of course I had to create the matching card...


I sprayed with the colors I colored with on the envelope, Pickled Raspberry and Wilted Violet.  The sentiment, Don't Waste a Moment, is stamped and then cut apart.


Fun right??!!  Hope you try it and if you do make sure to share with us on our Facebook page, Viva Las VegaStamps! Groupies!.

Until next time, get inky!!

Friday, January 15, 2016

Fan FEATURE!

We have a few pieces to share via Friends and Fans of VLVS! today. Nothing super long to read, or intense details -- just a quick inspiration post :) Enjoy!


by Alie Hoogenboezem-de Vries‎


by Petra Tillmann


by Anne Zandt


Good stuff right??

Monday, January 11, 2016

Mail Art Monday (With a Manly Twist) video Tutorial

Hello and Welcome back to another Mail Art Monday #MAM with me Tera


Today we have some mail art with a fun masculine twist.

This would be perfect for Father's Day,  Birthdays, an anniversary, or just a note to say Hello!! 

I hope you are enjoying these video tutorials and I hope the are helping to get your creative juices flowing!!  All stamps used are listed below.


Stamps Used:

Plate 1455 (if you don't have this plate yet I recommend it Highly! These are some of my most used stamps!!! You'll want them all!)


Until next time!
 Thanks for joining me and stay Inky!


Friday, January 08, 2016

Design Team Update ♥

After our Design Team call ended last month we had a hard time choosing who would work with us through the first half of 2016. Today we have five talented artists to share with you! We'll introduce three more shortly.


Corrie Herriman has such a fabulous style. 
It's full of whimsy and color and we're glad she's continuing on with us!


Fiona Paltridge is brand new to our team, but she's sure to inspire you! 
Her work is best categorized as mixed media and full of LAYERS. 


Hermine Koster is another "old timer" for the VLVS! team and we couldn't be happier! 
She has a very unique and innovative style that never lets us down.


Michele Kosciolek is also returning! 
She's always inspiring with delicious layers of grunge and fibers. 


And last for today but certainly not least is Tera Callihan.
You may know her as our resident Mail Art Maven -- and we love it! 

Leave our girls some love would ya??? 

Hello From Australia

 SQUEAL!!!

I am soooooo stoked to be here as a new design team member for VLVS
My little heart beat so fast when I received the email! I simply LOOOOOVE these stamps and I can't wait to show you what I have created with them!

These are my application pieces with a little explanation of how they came about.

"Please Notice This"


First up is a little journal page I created. I love to "experiment" in my journal. This time around I was playing with some of the 7 Dots Studio papers incorporating their earthy colours into a small page spread.

These little guys fit just perfectly! I created the background using Gelatos and then highlighted it with my black Stabilo Aquarellable (my absolute favourite item in my studio).

Stamps I used included: 

"Journey"


So you'll hear me say time and time again that I am not a card maker! I get by but I have nothing on these girls here in this team. I'm hoping to learn so much from them about this truly amazing skill. However I have the attitude that while I have hands I can stamp! So I will continue to practice.


This little card is about my card making journey. I have used gloss white card and created the background by blending chalk inks. The Bell jar is stamped separately and fussy cut out along with the Whimsical Feather in the foreground. I used the bottom half of the Whimsical Horned Boy stamp to add the numbers.

 Stamps I used include:

"King of the Tree"


My last piece I want to share with you is this little wire tree ornament that I made to hang on my Christmas tree. I formed a wire frame and then gave it a book page base to mount my stamped image on to.

I only added a little bit of rust colour to grunge it up and some Um WOW chipboard pieces. I absolutely love creating with wire. I love the unpredictable element it gives to my work. You'll see a lot of this from me.

Stamps I used included:

So that's me! Well that's my art .......As for me, I am 43 and a 3/4 years old, I'm a teacher of 4 year olds at a Kindergarten (yes I am insane) and I have two adult children of my own. A boy, Cameron who is almost 23 and a girl Kaity, who is about to turn 21. I live in Australia with my hubby (right down the bottom on the edge but not quite in Tasmania!) in a little town called Mount Gambier. We are famous for our Blue Lake, which is a dormant volcano (see I told you I live on the edge!) No seriously it's beautiful and very safe. Or so we're told!

I began creating at a young age. My Grandma was an artist. She mainly painted with oils and water colours and my mum was an interior designer and painter. My sister is an actress and my daughter is a 3D artist currently working with some amazing technology in the virtual reality art world, so as you can see the women of the family have all the artistic talent!

I create anything that my heart desires but my true passion is scrapbooking. You can find more of my work HERE. I am truly blown away to be here on this amazing team and I can't wait to get to know you all better.

xx Fiona


Thursday, January 07, 2016

Made to match

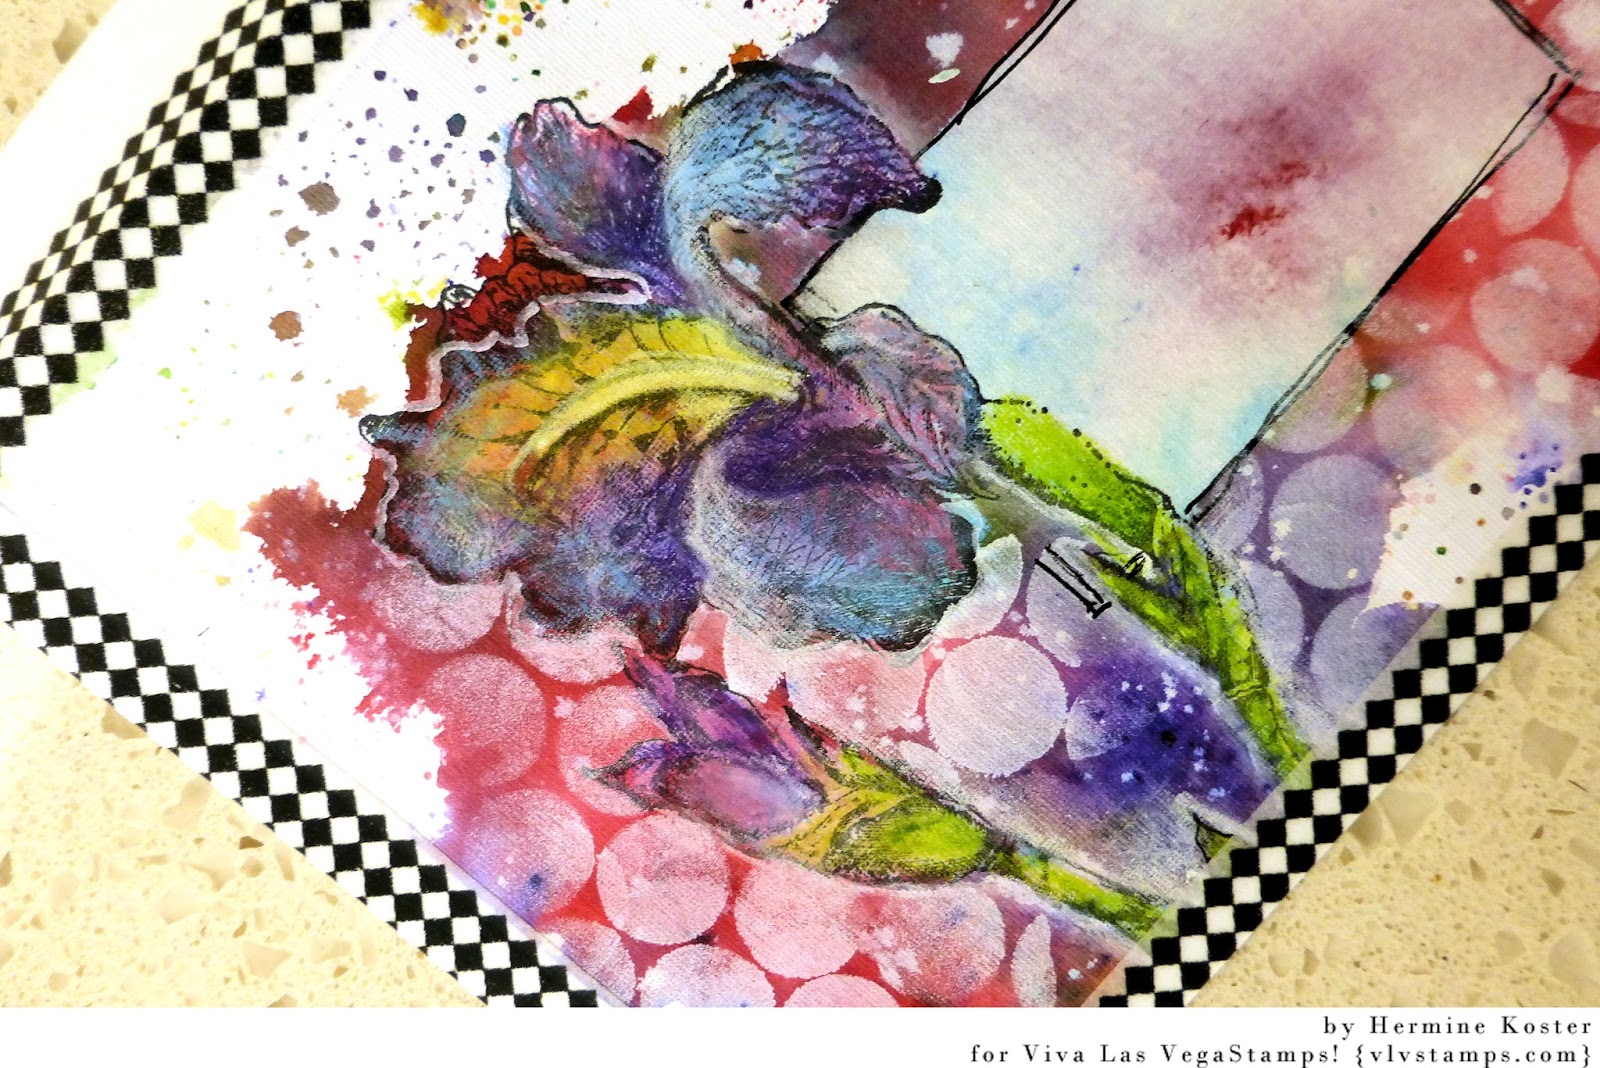
Hello, Hermine here. Made this card and matching envelope, using Magenta Nuances and colouring pencils.


step 1: spary some water on your craftsheet and sprinkle some Magenta Nuances powder into it. Then put your cardstock and your envelope onto the craftsheet. Leave to dry.
step 2: for the envelope I masked of a little rectangle and bleached the inner side. Remove masking paper and stamp the Fris ChamairisLatifolia  18733 (not inking the text), and stamp the same flower onto you card. Discolour with bleach and colour in with colouring pencils.
step 3: Mask the flower and use sequin scrap and Memento Luxe wedding dress to sponge.
step 4: handdrawn some lines around the rectangle on the envelope with a black fine liner. Stamp with stazon the text inspire 18888 on the lefthand bottom side.
step 5: Use black/white washi tape all around the outside  on both card and envelope.


Warmly Hermine


Used materials:
Fris ChamairisLatifolia 18733
Inspire 18888
Stazon

Wednesday, January 06, 2016

The Moon, Stars and Fairies

HAPPY NEW YEAR!!!
Hello stamping friends, Michele here today with my first post of 2016.  I am super honored and excited to back for another term on the VLVS! team!
Today I have a card I made for my bestest friend in the entire world, born on New Year's Day.


Other items used: Um Wow Studios star confetti stencil, star confetti chip and man on the moon chip, Distress spray, ink and markers, archival ink, micron pen, Ultra High Gloss Embossing Powder, gold embossing powder and Viva gold-silver.


I just love the dimension stamping creates in a background!!


A little doodling around the edge and VIOLA!!

I almost kept it for myself BUT I did end up mailing it out and I am sure he will love it too!!

Until next time...get inky!!

Tuesday, January 05, 2016

A little more mail art....

Hello everyone,

and happy New Year to you !

Over at VivaLasVegaStamps! we are totally smitten with mail art. So I thought I'd share this envelope with you. I made this for a swap with a friend. I hope she has got it by now and this doesn't spoil the surprise !


Here's the front and the back.

I coloured the envelope by brayering it with blue, green and white acrylic paint until I was happy with the result. I then stamped it with a great variety of VLVS! Stamps using different colours (similar to the paint colours and grey and black) of Archival Ink. And that was it, really. 

I used the following stamps: 


Thank you for stopping by today ! 


Friday, January 01, 2016

January Challenge

Well HELLO Folks!!! Welcome to 2016!!!!

We're excited to have you playing along with us for the 2016 challenges. Thank you to those of you who played in our 2015 ones, as well.


We know resolutions, one little words, pacts and more are in everyone's thoughts, so keep those in mind when working on this month's challenge. We'd also like to inspire you with words like femininity, women, exploration, rainbow, neutral and nature, storm, maps, vintage, writing, script, yellows, tans, black and white, stripes, bold, rainbows, storms and more!

Don't forget the rules:
-Create a new project based on our inspiration board (it has to be posted this month, but you can certainly link up to other challenges as well!)
-Use at least one (but certainly more if you want) Viva Las VegaStamps! rubber stamps
(We are now allowing competitors stamps to be on your work, but please make VLVS! the focus of the project, thank you.)
-Post it to your blog with a link back to us
-Upload to our linky using your direct blog post link (You may also upload via facebook, flickr or other gallery)
You could win a Project Spotlight post on our blog + some new rubber of course.
And visit us back here for inspiration!