Wednesday, January 31, 2018

A Process Video by Fiona


Hello VLVS! peeps. Fiona here with you today to share a process video I have created using the awesome stamps from our favourite stamp store Viva Las Vegastmps!!!


Here is the video. It is nice and short and sweet.


 And here are some close ups for you to get a good look at that amazing gold shimmer. I like me a bit of gold!


Viva Las Vegastamps! used:


Thank you for popping in to check my page out. I'll see you all again next time xx


Tuesday, January 30, 2018

"She Was a Wildflower" scrapbook page | Sue Plumb


Hi everyone!
It's Sue Plumb here and I am excited to be sharing my latest design team project with you. Today I have a mixed media scrapbook page that features some fun photos of my fellow VLVS design team member Fiona Paltridge and I. The photos were taken at a scrapbooking retreat after I did a class with Fiona; and as soon as my latest batch of stamps arrived I knew I had the perfect stamps to document these pictures!


I started my page by using the Wildflowers Silhouette stamp several times across my page to create a "garden" for my background; then I added some colour using Colour Blast Colour Artist Inks (Marine, Berry and Mermaid) and a small brush; allowing the colour to run down the page. I also added some splatters of Lime ink around the edges of the flower silhouettes.


While my background was drying, I stamped a large Gossamer Butterfly image onto some extra cardstock, then coloured it using Faber-Castell watercolour pencils and a waterbrush. I then cut around it, and added some shimmer to the wings using a Colour Blast (Silver) Shimmer Brush Marker before sticking it down amongst my garden.


I used several stamps to create the quote at the top of my page:
I also used the Row of Chevrons stamp to help highlight it.


I used my very favourite Doodle Dots stamp to lightly stamp around where I had splattered the lime ink to add more depth to the background.
 

I then added my photos to my page (using Miracle Tape and some scrap cardboard to mount it up) before sticking the She Was a Wildflower quote (stamped onto cardstock with watercolour pencil used to highlight the edges) onto my photos.


I added some subtle pops of texture by creating a few small "flowers" from cotton thread, using enamel dots as the centres.
I also added some coordinating enamel dots to the butterfly body.


Thanks for stopping by so I could share this - I hope I have inspired you to get inky today!


Stamps used:
Wildflowers Silhouette
Gossamer Butterfly (large)
She Was
An Artist
She Was a Dreamer
She Was a Wildflower
Row of Chevrons
Doodle Dots

Other materials:
Miracle tape 1/2"
- Colour Blast Colour Artist Inks
- Colour Blast Shimmer Brush Marker
- Staz On ink
- Faber-Castell watercolour pencils
- enamel dots
- cotton thread

Monday, January 29, 2018

Mail Art Monday On Craft Envelope

Hello VLVS! Friends,
It's Mail Art Monday! Elina here, sharing with you my very first mail art project!

For some reason I had only admired gorgeous mail art projects here in our blog and in Pinterest, but had never before tried it out myself. I love the idea of not just sending something beautiful and handmade to a friend inside an envelope, but also creating art on the envelope itself!
Decorating this craft envelope was so much fun that I'm convinced it will not be my last mail art project. Quite the opposite; my head is already spinning with new ideas!

Here's how I made it:

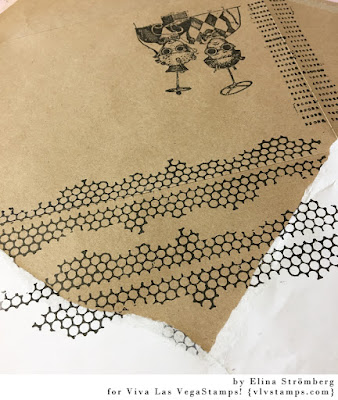
I used a ready made craft envelope, and before starting I gently opened completely using a kitchen knife. I started with stamping a few images on the envelope front, letting the images continue on the backside, too.


Using a piece of white paper as mask, I continued decorating the back lid. Masking was not absolutely necessary, but I wanted to leave a blank border around the lid.


The address shall be written inside a thought bubble. I sketched the bubble with a pencil, and drew over the sketch lines with a black marker.


I colored the main images with color pencils, and added some hightlights to the thought bubble and patterns, too. Light tints look great on dark craft background!


Here's the finished project:

Backside looks like this:

For my mail art project I used the following VLVS! stamps:

Whimsical Kids in Futuristic Hats
Punchinella/Sequin Waste Border
Typeset Scallop
Rows of Numbers
Carved Xs

Other supplies used:
Craft envelope
Coloring pencils (white, yellow, orange, light and dark green)
Pencil
Thin black marker pen

Happy stamping!


Friday, January 26, 2018

Sweetie Darling !

Hello everyone,

and welcome to my second post for this month. I have made an art journal page and I have filmed the process. So if you want to know how I made this then you'll have to hop over to the VivaLasVegaStamps! YouTube Channel ! There is also a link at the bottom of this post.


I can tell you which stamps I used :


Here is the video ! 


Thank you so much for stopping by today ! 


Thursday, January 25, 2018

Tarot Pen-/Brush Holder by Majo


Hi all, it's Majo here with my first tutorial as a member of the Design Team.

The first creation I will share with you is a pen-/ or brush holder.

You can use it for many other items as well and it makes a great gift filled up with candy, tea bags, cosmetics etc. :)
 

 I used to cut and fold the chipboard myself, but since I can buy the plain holders at the “Swedish Store”, I use them instead. They’re very sturdy! 
  I started by spraying a piece of cardstock with Distress Spray Stain and cut it into pieces.


 I stamped the four Tarot cards and also some stars in the background, I added the word “mysterious”.

  I applied acrylic paint on the edges of the box. 


 After adhering the panels with strips of Miracle Tape to the box I used bleach to lighten up the images … and a little distress ink to soften them again. I added Washi Tape on the inside of the pen holder.


   The following pictures all sides of the pen-/brush holder ….


 .... and a little close up of the background:

 I used the following stamps:


Tarot La Forza  - Strength
Tarot XVIII - The Moon
Tarot XVII - The Star

I hope you enjoyed my little tutorial, happy crafting