Wednesday, April 27, 2016

Mini Art Journal Page: "She Was" by Jenn Engle

Hey all! Sometimes, I get the itch to make something but I don't have a ton of time. Luckily, with Viva Las VegaStamps! the images pack such a punch, you really don't need a ton of 'other stuff'.
 
Today is one of those days. Here I made a very simple background and let this bold image do the talking. 


I used these stamps from Viva Las VegaStamps!:
 
 
If you want to see exactly how I made this page, you can check out the process video at the bottom of this post!


Thanks for looking!
~Jenn

Tuesday, April 26, 2016

She Spread Her Wings Journal Page by Fiona Paltridge

Hello VLVS friends. Fiona here with you today to share a little art journal page I made.


I am really enjoying exploring a lot of colour in my creations lately.


I suppose you could say I'm spreading my wings just like my journal page suggests.


All of the colour I've added is with my watercolors. I have a little set of "Brights" that are my absolute favourite.


A lashing of gesso and then a seriously amazing amount of colour!! My fave new recipe.

 Thank you for popping by and checking out my latest creation xx


Viva Las Vegastamps used:


Monday, April 25, 2016

Spring Fever Mail Art Monday Video Tutorial

Hello Everyone! 

Tera here....
Welcome Back for another awesome ....


Mail Art Monday Video Tutorial!!! 


As many of you may know, I love creating Mail Art.  So to share that love with you I created this super fun Spring themed envelope to share with you and to hopefully inspire you! 


This would be perfect for Mother's Day, Birthdays, I miss you, or any occasion!!! 

Also if you want to see more mail art ideas and inspiration I have officially created and Instagram account just for my rubber stamped art!!  >>> HERE

Stamps used:

Caterpillar 1 x 2 1/2

Stitching Lines 1 x 6


Friday, April 22, 2016

Wanderlust

Hello everyone,

Today it is my turn to share a project with you. I have made a postcard with a little step-by-step to show you how I made it. As always I'll start with showing you the finished article.
I suggest you get a nice cuppa and sit down and enjoy !


And here is how I made it :


I finger painted a pre-gessoed piece of card stock with 4 colours of Dina Wakley's acrylic paints and also some white by Americana. 


FInger painting is great fun and you have a lot of control. 


This is how it looked after I finished... 


Next I used a Dylusions Stencil and with the same colours of paint I started stencilling. I used a blending tool for this. 


I did the same with the white paint and this is how it looked. 


I thought it was a little too bright and decided to put a wash of diluted white acrylic paint over the top. I liked this much better. 


Next I used this number stamp and some Archival inks in similar colours to add some interest. 


Here is a close up of how that looks. 


Next I stamped the fence (a complete list of the stamps I used is at the bottom of this post). 
As you see the stamp doesn't quite reach the top and the bottom of the card but with a black pen that is soon corrected... 


Here is how that looks.. 


Next I stamped the Rooster directly onto the card and onto some Mixed Media paper. I also stamped the word Wanderlust and cut it out. I used some of the pink paint to go around the sentiment for extra interest. The Rooster on the MM paper was cut out and glued onto the one on the card. That way your stamped image looks perfect even if you didn't cut it out perfectly. 


And here is the finished result after I glued everything on the card. 


I used the following stamps:


Thank you so much for stopping by today ! 


Thursday, April 21, 2016

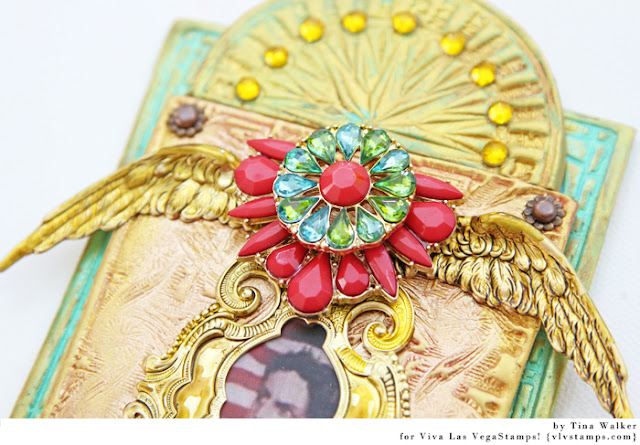
Stamping in Clay to create a Mixed Media Wall project

Hi...

Tina here today with another VLVS project and I can't wait to share it with you.

Today, I'd like to share with you a new project, a Stamped Clay Wall Hanging piece.  I am always wanting to try new stamping ideas, so why not stamp in clay?  Last September, I attended Art Is You and took a clay class by the talented Laurie Mika.  It was the first time I had stamped into clay and I was instantly intrigued.  I have dabbled a bit since the retreat, but I thought I'd get out my clay and get creating!


For this project, basic Craft store Primo Sculptey will work just fine.


Before I began, I layed out a rough idea of what I wanted to do, using the stamps as a guide.


I conditioned the clay and rolled it out, then stamped my images directly into the clay.  Working with unmounted rubber works great for this step.


Stamps used:

Directional Circle (cut in half)

Stained Glass Mosiac

Tangle

Before you bake (per manufacturers instructions), paint and embellish your clay pieces, using gently pressure so you don't smudge the stamped design.  You can embed gems and metal pieces directly into the clay before baking.  (special note:  Some pieces may 'melt' in the clay oven, so be cautious on what is used).


Once the piece is baked and is hardened, adhere any remaining embellishments onto the clay surface using your adhesive of choice.  (mine is Weldbond)

Preplanning clay pieces is crucial.  I knew I wanted a 'hanging brad' piece at the bottom of my sculture, so I made sure to embed the brad into the clay before baking. This ensured that the piece would be in place and there would be no need for glue.

You can also touch-up any sections with paints, etc. if desired.  You can attached a hanging wire to the back prior to baking or add an adhesive type hanger after baking.  (the latter option may not work depending on the weight of your project.)


And done.  VLVS stamps work great to create beautiful backgrounds and focal pieces on your stamped project.  

Have you ever stamped into clay?  I'd love to see your VLVS Stamped clay projects!  

Thanks for stopping by!  Have a great day.

Wednesday, April 20, 2016

Tutorial pretty in pink

Hi Hermine here. I made a photo step by step tutorial in tun-sur-ton colours.


step 1: Stamp with Stazon black  Roller-skating teens 19749 and make a mask of it.

step 2: Put mask on and stencil with different colours Memento Luxe.

step 3: keep mask still on and stamp with the different colours Memento Luxe the Clock face 19468, Lines of Chevrons 18965, Sawtooth Stitching lines 19643 and the alphabet of the December Daily plate 1430 and with Stazon Black the Striped border Arrow 19202

step 4: Remove mask and colour the focal image with the same colours Memento Luxe and a water brush. Glue with magical tape onto a doble square card.

Hope you like this little tutorial.

Warmly Hermine

Used materials:
Memento Luxe


Tuesday, April 19, 2016

Adventure now or tea first ?

Nikki here, sharing some inspiration for this months Coffee Fiends challenge ... But I am a tea drinker, I don't really drink coffee ! Did I just hear you gasp ? LOL. But fear not .. I still get my caffeine fix :)

The inspiration for the April challenge includes : 

caffeinecoffeeteatea timewarm drinks, hyper, hype, cups, recycle, fancy, stainspillcoffee ringsdripsdropssplatters, vintage, cardboard, corrugated,tanbrownblack, dark, roasted, light, vapor, and last of all.. date time with friends.

Here is my make : 


As my focal point I used this dapper gentleman, Man with teacup 18484. Isn't he great?

I stamped and colored him with alcohol markers and fussy cut him. The rather delicate pink bone china tea cup is embossed with clear embossing powder. I also used the tail from the Fantasy Bird 17852 to make the vapor/steam from his cuppa. Its stamped onto velum, embossed and fussy cut.

The background is sponged with tea dye distress ink and the corrugated cardboard is actually a recycled Starbucks cup sleeve :) I sponged it lightly with distress ink and added black and white splatters of acrylic paint. I also made the tea bag tag, instead of using ribbon.

This is such a fun quote from Peter Pan, and fitted perfectly with this gentleman I think. He looks like hes asking just this sort of question, or perhaps making a sarcastic remark ? LOL

Here is a close up :


If you feel inspired to come and join us, and check out the challenge HERE

Until next time .....  Nikki x


Monday, April 18, 2016

Mail Art Monday


It's mail art Monday!!!  And today I have a postcard to share with you!!


I started with a piece of watercolor paper and some washi tape.  I used the tape to mask off a place for the address and return address.


Next I stamped the Group of Girls on my card and on a bit of dictionalry page to cut for a mask.


With the mask placed over the stamped image I used the Brick Background for fun texture. 


I stamped the Sign Post on the card and on a scrap of paper and cut a mask.  I ran it through my mini Xyron.


I used Distress Ink to add color to the background.


To finish I colored the kids, 


peeled off the washi tape and mask and did a bit of doodling.


Easy peasy... now lets see what you create!!  Share over on our facebook page!!  We LOVE to see what you are up to!

Until next time....get inky!