Thursday, May 30, 2019

Art Journal Page by Jenn Engle "Wings"

Hey everyone! I have an art journal page to share with you today. This one has a lot of layers, a lot of steps and a lot of my fave VLVS stamps.
To see exactly how I made it, be sure to check out the process video at the end of this post.


STAMPS USED:


STAMPS USED:

Other Supplies Used:
Distress Paint
Distress Spray Stain
Dylusions Spray
Tim Holtz Dies
Silks Acrylic Glaze
Art Stones in Medium and Small
Clear Droplets
Embossing Powder
Acetate
7 Dots Studio Word Stickers
Jewelry Wire
India Ink

Thanks for Watching!
~Jenn


Tuesday, May 28, 2019

Circus Show - a series by guest Mercy


Greeting VLVS fans!  I’m here today to 
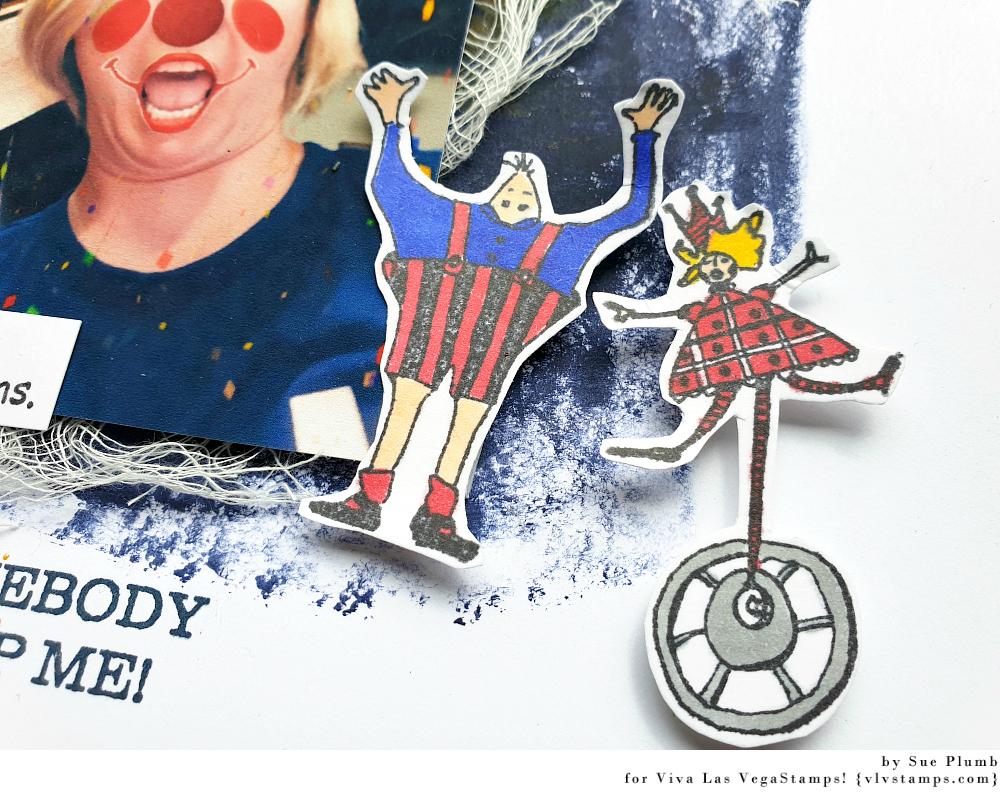
share with you these super simple and fun to make ATCs that I did.  After watching a documentary on Circuses on Netflix and seeing the trailer for a new dance flick coming out, I was all about doing some performance based ATCs.  I threw in the Mermaid as there was a famous side show that featured “a real mermaid.”  Of course that one was hideous, but I made due with the pretty stamp I had from Viva Las VegaStamps.

Supplies:
Nouveau Torch Lady SKU 17047
Lady Posing SKU 18615
White Cardstock cut into 2.5” X 3.5” ATC cards
Black Pigment ink (in this case I used Color Box)
Black Embossing Powder
Heat Gun
Alcohol Ink Pens [Can substitute any sort of colored pens, paints or pencils you have.]
Distress Ink
Spray Inks with glitter/shimmer
Baby Wipes

Instructions:
After cutting out my ATC cards (2.5” X 3.5”) out of my white cardstock I have hoarded away, I pulled the stamps I wanted to use and stamped one on each blank ATC card with pigment ink.  Most of these were centered.  After stamping was done, black embossing powder was used then heat set.


Once they are embossed, color with your markers of your choice. In this case, alcohol inks were used, but really any sort of pen or pencil will work with varying affects. Whatever you do, however, just keep the coloring super simple and quick. You don’t want to waste a bunch of time coloring, when you will be layering ink over and around these stamped images anyway.

Once they are colored, get out the base ink and one or two of the baby wipes. Lightly spray the distress ink on a craft mat or into the baby wipe and dab the ink around the images. Try to layer on the ink and leave white areas as you gently tap the paper surface with the colored wipe. Once you randomly add that, allow to dry before taking your glimmer sprays and apply those to your cards. What I ended up doing with these was leaving a lot of extra white surface and blending sometimes four different colors. I have on hand these Fireworks sprays and was just playing around the with color combinations.


These were super fun to do and the glimmer sprays on top really make these images pop.


Monday, May 27, 2019

What the Buck? | Sue Plumb


Hi everyone!
Sue Plumb here to share my latest design team project with you. Today I have an 8.5x11" mixed media scrapbook layout that features some photos of my daughter riding a mechanical bull that I paired with a super cool bucking horse stamp.


To create my layout, I started by making a watercolour style background using Distress Oxides (Tumbled Glass and Mermaid Lagoon).
I then added some stamping to my page using the Cross Marks Background and Bullet Hole stamps and black StazOn ink. I also added some small pieces of torn chevron print washi tape.


Next, I added some book paper and blue tissue paper to form a mat for my photos, before adding them on top. Alongside my photos I added a handmade felt and hessian chevron from Charms Creations.

For the feature embellishment on my page I chose the fabulous Cowboy on Bucking Horse stamp; which I stamped onto cardstock, coloured using alcohol markers and then cut out. I added some foam tape behind it to help pop it up from the background.


I then stamped the You Only Live Once quote several times across my page; added some wood veneer stars; my journalling; and finally my title, using a mix of Cocoa Vanilla Studio alphas and American Crafts Thickers.


That's all from me today, thanks for stopping by so I could share this with you. I hope I have inspired you to get inky too!


Stamps used: 

Other Materials:
- Miracle Tape
- Bazzill cardstock
- Ranger Distress Oxides
- Tsukineko StazOn ink
- Alcohol markers
- Book paper, tissue paper, washi tape
- Charms Creations chevron
- Wood veneer stars
- Cocoa Vanilla Studio alphabet stickers
- American Crafts Thickers
- Foam mounting tape, Sharpie

Wednesday, May 22, 2019

What Are You Made Of?

Well...is it sugar and spice and everything nice???  Or is it snips and snails and puppy dog tails????
Michele here and for me I would answer class and SASS and ...  the desire to create art!

I have LOVED using the new release from my good friend Tina Walker.  I just ADORE the look of hand carved stamps and these are oh so good!
I created a home decor piece using Ethos What Are You and Ethos Flowers.


I stamped the flowers on vintage dictionary page.


I added some length the the stems and a bit of color with my Posca paint pens.


All stamping is done with archival ink...my go to for all my stamping!!


So here is the question now...what color frame should I use?  Wood or black??  Let me know what you think.
Can't wait to hear your opinions!!
Until next time, GET INKY!!

Tuesday, May 21, 2019

City morgue

Hello everyone,

For today's project I have made a journal spread. I only just noticed that I used almost the same colours as for my last project.


And here's how:


I used a brayer to apply these colours on the pages. This paint is very chalky so you don't have to use any gesso. 


I did the same with these two colours. 


Next, I collaged some dictionary paper on the page. 


Some stamping.


and some stencilling.


My focal images, stamped on tissue paper. 


And here it is put all together. I doodled around the edges and the sentiment with a pencil. I also coloured the doctor and the skeleton with Faber Castell Big Brush Markers. 


I have used the following stamps:


Other materials:
Archival inks:
Magenta pink - Viridian - Aquamarine - Jet Black - Watering can

Distress Oxide Ink:
Weathered wood 

A Tim Holtz zig zag stencil 

PaperArtsy Fresco Chalk Acrylics:
Sage - Teresa Green - Mermaid - Snowflake

Faber Castell Big Brush Markers:
Cold grey and Raw Umber 

Ranger Distress Collage Medium 

Thank you for stopping by today ! 


Monday, May 20, 2019

Late for Facebook...

Hello, It's me Tera again...

Today, I am here to share another super fun and easy Mail Art Monday 
card and envelope set!


You know I love snarky mail, and this one is just too perfect for so many people...
(Myself included)


Stamps Used:

I started with and A2 envelope and card base. 
I began by stamping my woman with her hands on her face on both the envelope, the card, and on scrap paper. (the scrap paper was to make the mask).

Next I stamped my sentiment on my card base then set this aside. 


Returning to the envelope, I covered my woman with the mask. I also created a mask for the address box from some scrap paper. 

With everything masked off, I began to add my background detail using a Tim Holtz shifter stencil with distress ink. 


When the background was complete, I removed my masks and colored my card and envelope with various alcohol based markers. 


I hope you all like this fun little set!!
Have a wonderful week!!


Thursday, May 16, 2019

Art Journal Page on Burlap with Jenn Engle

Hey everyone! I have an art journal page to share with you today. The base is the burlap from the Dina Wakley journal. If you want to see exactly how I made it, you can check out the process video at the bottom of this post.

STAMPS USED: 


STAMPS USED: 

Other Products Used:
Dina Wakley Media Journal
Vintage Paper
Dina Wakley Media Acrylic in Sky, Lapis & Lime
Ultra-Fine Tip Posca Paint Pen in Black

Thanks for looking!
~Jenn


Tuesday, May 14, 2019

be an ADVENTURER by Guest Elisa


Hi Viva Las Vegas Stamp fans,

Elisa here from the Guest Inspiration team with my next project for you featuring some gorgeous VLVStamps.

I had cleaned and dried a lot of old teabags recently for another project and had a few left over and decided they would be perfect to stamp on for an off the page project. I had come across this lovely VLVS Shell stamp and it hadn't been used as yet....so of course I had to test run it on a sea-themed project and I think the teabags are a perfect addition to achieve a vintage look on your project.


Let's take a closer look at the Viva Las Vegas Stamps that I have chosen to use on this project.


The main feature stamp to my project is the gorgeously detailed 'Nautilus Sea Shell', stamped directly onto a dry recycled tea bag. I tore the edges of the tea bag a bit to make it look a little more worn. The tea staining on the bag gives a great vintage look and ties in well with the Vintage Photo Distress Oxide Ink colour on my project.


TIP: Add modelling paste or texture paste to your project with a palette knife and then tip a paint brush upside down and poke the paste with the end creating circles in the paste. Dry the paste and colour, creating textured coral - great for a sea themed project!


I also used a 'bubble background' stamp to create texture in my background, you can see glimpses of it in the close ups!


Lastly, the 'Be An Adventurer' saying stamp was used to finish up my sea themed project. I stamped and then hand coloured to match. then fussy cut out and adhered to my project.


VLVS! Supplies:
Bubbles Background.

Ink pads : Staz on - Black 
Other Supplies:
Box Board ATC
Coral Die - Kaisercraft
Crafting Wire
Netting Chipboard - 2Craftychipboard
Green Seed Beads - Finnabair Art Ingredients
Prima St Tropez Anchor Embellishment
Music Paper
Tea Bags
Modelling Paste
Paint Brush
Straw
Black Gesso
White Acrylic Ink
Ranger Distress Oxide Ink = Cracked Pistachio and Vintage Photo
Colour Blast Colour Spray in Lagoon
Faber Castell - Gold Gelato
Dental Gauze

Thank you for stopping by the blog today !
Hugs

Elisa xo


Monday, May 13, 2019

Clowning Around | Sue Plumb


Hi everyone!
It's Sue Plumb here to share my latest VLVS design team project with you. Today I have a fun mixed media scrapbook layout to share that I created to document a couple of silly SnapChat selfies of my sister and I. (We just love clowning around! hehe)


To create this page I started with an A4 sized sheet of cardstock; then I mixed some Dina Wakley acrylic paints (I used a combination of 'Night' and 'Lapis') to get the right shade I wanted for my background. I applied it roughly using a spatula and set it aside to dry.

Whilst it was drying, I chose some stamps for my background. I wanted to continue the confetti theme from the photos and have the patterns cascading down the page, which I also planned to stamp using acrylic paint. 


I started with the Grunge Circles, which I stamped using 'Ruby' paint repeatedly down the page. I then used the Sky of Stars Background stamp with 'Cheddar' paint and followed the same line down the page.
I then switched to midnight blue ink and stamped the Smiley Face and Somebody Stop Me.


To go with the theme of my page, I stamped out a few images from plate #1383 designed by Mary Vogel Lozinak - Unicycle LadyMan in Short Pants; and Director. I coloured each of the images using markers and then fussy cut around them. I also stamped the All Circuses quote. 


I added some frayed gauze to my page before adding my photos on top with the quote stuck along the bottom edge.


I then stuck the little characters across my page using foam tape to give them a bit of dimension. 


To finish off I added some scattered sequins for a bit of sparkle and I was done!

That's all from me today, thanks for stopping by. I hope I have inspired you to get inky too!

Stamps used:
Grunge Circles
Sky of Stars Background
Smiley Face
Somebody Stop Me
Unicycle Lady
Man in Short Pants
Director
All Circuses

Other materials:
- Miracle Tape
- white cardstock
- Dina Wakley acrylic paints
- Tsukineko Staz On ink (black and midnight blue)
- markers
- foam tape
- frayed gauze; sequins