Showing posts with label Mary Vogel Lozinak. Show all posts

Wednesday, August 28, 2024

Colorful postcard by Cathy N

 Good morning, all Cathy here with a colorful postcard for you.


I started off with some watercolor paper and distress inks. I was trying to make a smooched rainbow background, but I dried between layers instead of blending when wet. 

                                                                        Stamped used:

                                                                17545 grunge 1787 background

                                                                18254 fat fish in heels  

                                                                19563 grunge circles


I randomly stamped grunge 1787 background and grunge circles around the card. I then stamped fat fish in heels  4 times around the postcard. 

Lastly, I added a saying to the middle.


Wednesday, September 18, 2019

Whimsical Wednesday

Hello Again Crafty Friends!

Today I want to share a fun little art journal page using Viva Las VegaStamps.
(this would also be perfect on an envelope)


Stamps Used:
Whimsical Leaf
Whimsical Tree Lady

I started by stamping the leaf and masking them off between each stamping.  Once all of my wanted leaves were stamped, I stamped the whimsical tree lady.


I removed the masks and used various alcohol markers to color my images. 


With everything colored, I re-masked off the leaves, then I used Distress oxide ink in mustard see to ink the background. 
(I just lightly inked around the lady rather than masking her off)


Next, I used one of the Tim Holtz layering stencils, and Picked Raspberry distress oxide ink to add background depth. 


I used a black ink pen to start adding that art journal feel.


To finish everything off, I used white distress stray stain and a white gel pen. 


I hope you all love this mini art journal page... 
Now to add a little journaling or a quote stamps... 
Tough decisions!


Friday, August 02, 2019

Summer walks with Lady Grey by Cheetarah


Hi all, it's Cheetarah here and I'm glad to be back on the design team for VLVS! this term and contribute regularly to the blog. Today I wanted to share a page I made in my Molskine watercolor sketchbook using wonderful whimsical Lady Grey Stamp by Mary Vogal Lozinak as focal point. 

I stamped her in my molsekine with Memento Tuxedo black, masked her off and added the butterfly wings for some extra whimsy. She looks like she is wearing a poncho so I decided to give the background a feel of light summer rain and work with complimentary colors. The watercolors I used are from Daniel Smith, Winsor and Newton, Schmincke and a few other brands. I like creating my own custom color palettes which you can see here in the picture. 


Lady Grey looks like she is walking down some steps and I used the row of Scribble squares to emulate them. Stamped them with memento Dove grey and used light grey green tones to give her a loose yet convincing grounded look look. In the background I have lightly stamped row of numbers set for some extra texture. It looks like she is having a lovely walk in the summer rain. 

Stamps used: 


Until next time, have a lovely weekend!

Monday, May 13, 2019

Clowning Around | Sue Plumb


Hi everyone!
It's Sue Plumb here to share my latest VLVS design team project with you. Today I have a fun mixed media scrapbook layout to share that I created to document a couple of silly SnapChat selfies of my sister and I. (We just love clowning around! hehe)


To create this page I started with an A4 sized sheet of cardstock; then I mixed some Dina Wakley acrylic paints (I used a combination of 'Night' and 'Lapis') to get the right shade I wanted for my background. I applied it roughly using a spatula and set it aside to dry.

Whilst it was drying, I chose some stamps for my background. I wanted to continue the confetti theme from the photos and have the patterns cascading down the page, which I also planned to stamp using acrylic paint. 


I started with the Grunge Circles, which I stamped using 'Ruby' paint repeatedly down the page. I then used the Sky of Stars Background stamp with 'Cheddar' paint and followed the same line down the page.
I then switched to midnight blue ink and stamped the Smiley Face and Somebody Stop Me.


To go with the theme of my page, I stamped out a few images from plate #1383 designed by Mary Vogel Lozinak - Unicycle LadyMan in Short Pants; and Director. I coloured each of the images using markers and then fussy cut around them. I also stamped the All Circuses quote. 


I added some frayed gauze to my page before adding my photos on top with the quote stuck along the bottom edge.


I then stuck the little characters across my page using foam tape to give them a bit of dimension. 


To finish off I added some scattered sequins for a bit of sparkle and I was done!

That's all from me today, thanks for stopping by. I hope I have inspired you to get inky too!

Stamps used:
Grunge Circles
Sky of Stars Background
Smiley Face
Somebody Stop Me
Unicycle Lady
Man in Short Pants
Director
All Circuses

Other materials:
- Miracle Tape
- white cardstock
- Dina Wakley acrylic paints
- Tsukineko Staz On ink (black and midnight blue)
- markers
- foam tape
- frayed gauze; sequins

Monday, May 06, 2019

Whimsical Snail Mail

Hello Crafty Friends!
Happy Mail Art Monday!


Today I want to share a fun and whimsical envelope for mail art Monday.


Stamps Used:

I started with an A2 envelope, and began by stamping the whimsical snail in black memento ink. I then masked him off, and stamped the punchinella/sequin waste along the bottom in Mowed Lawn- Distress Oxide ink. 


Next, I stamped my creepy creature sitting.  I used a mask to create an address box.  Last, I stamped doodle circle on the boarder. 


I used various alcohol based markers to color my base images, then I masked everything off. 


With everything masked off, I used salty ocean- distress ink to color the background. I used more salty ocean ink and mowed lawn distress oxide ink, through Tim Holtz layering stencils. 


I hope you enjoy this fun little envelope!


Thursday, March 28, 2019

Guest Team Inspiration : Julia

Hello!
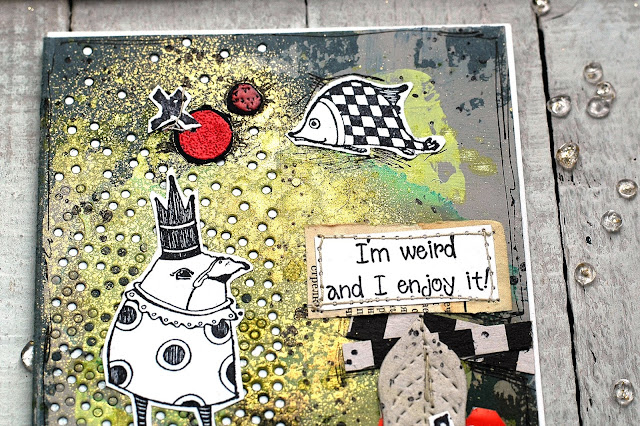
I wanted to make unusual and colorful postcards with unusual and fancy stamps from Viva Las VegaStamps.


I stamped various funny characters on white paper and cut them out.


And prepared backgrounds for postcards.
 I took the gray paper, dyed it with acrylic paints and sprays, and then made holes in them with a special paper die.


On the reverse side I also decorated the cards with stamps.


Good luck!


Julia

Monday, February 04, 2019

Feeling foxy on Mail art Monday

Hello crafty friends!

Happy mail art Monday!


Stamps used:

Today I want to share a fun and bright card using Mary Vogel's awesome fox, and some of my favorite art journal style stamps. 

I started my stamping my scalloped boarder in memento black ink. 
(I then masked this off, sorry I got excited and didn't take pictures until I started coloring).

Next, I stamped the fox from Mary Vogel.  I also masked this off, and used a notecard to mask the space for the address box. I used a black micron to trace the address block. 
(I also drew a few "stitch lines around the address box" before placing the mask back down)


With everything masked off. I used distress oxide ink in peacock feathers to color the background.  To add extra depth I used a Tim Holtz layering stencil (ths061) and added twisted citron distress oxide ink. 


To color everything,  I removed all the masks.  I used blick alcohol markers to color all of the images, then I added extra details with colored pencils and a white paint pen.


Finally,  I stamped my row of numbers in black soot distress oxide ink. 

I hope you've all enjoyed this fun little envelope and feel inspired to create some too!


Wednesday, June 27, 2018

Artist Trading Coins: Three Amigos

Hi!
A short while back I participated in an international swap of artist trading coins. ATCoins have become really popular lately; ATCoins are just like artist trading cards but circular, with diameter of 2.5 inches.

These were my very first ATCoins, and I ended up creating two identical sets of three coins; three of them I sent to my swapee, and three I kept to myself.

Here's how my 'Three Amigos' ATCoins looked like:

They were really fun and easy to make:

I started with die-cutting the circles from white cardstock (one of the nesting Sizzix circle dies has a diameter of 2.5 inches!). For coloring the coin backgrounds I used a purple Distress Ink, then splashed the inked surface with water, and dried with my heat gun. For the finishing touch I used a VLVS! pattern stamp ('Doodle Dots', my favorite!).

I stamped the main images on white cardstock, colored with Promarkers, and cut out. Lady Grey and the cute fox (which I colored like it was a raccoon, lol!) had some fine details that could not be fuzzy cut, so instead of trying to cut out the fox whiskers or Lady Grey's hair I stamped the complete images on the purple background, and glued the simplified fuzzy cut images on top. Worked well!


I love the shape and size of the ATCoins. They were so fun to create, and I'm sure I'll make many more!
Have you created ATCoins already?


For my ATCoins I used the following VLVS! stamps:


Wishing you a wonderful day! Thanks for stopping by!