Wednesday, October 31, 2012

Altered Halloween File Folder Part II


Happy Wednesday everyone! leslierahye here with part two of my altered folder project that I began two weeks ago. Today I am finishing up the labels on the pockets making the base tags for my recipe cards. To catch up on the beginning of this project start here.

For this project :

[list for the 1st part of the post is here]

The base of the tags was formed in the same manner as the base of the file folder--black was "dry-brushed" around the edges. Images were stamped to mimic the images on the folder. Space was left on the middle of the tag to label your recipe and the entire back side was made available for the recipe. May Arts ribbons and trimmed were colored with ink to match.


using the alphabet from the December Daily plate and a ¼" square punch I created letters for my words from a piece of water colored paper. I kept my alpha intact for this express purpose. I love how the words on my pocket turned out with this stamped alphabet!
I hope you enjoy my project! Thank you for looking~leslierahye


Tuesday, October 30, 2012

Awesome little gift

I love making presents and these sticky back notebooks are perfect for it.


1. Cut a piece of Kromecote cardstock size 8,9 cm x 8,9 cm. Drag a stripe with you ink pad direct onto a craftsheet, do so with 3 different colours, then spray some water onto your craftsheet. Layer your piece of cardstock onto the craftsheet. Stamp with Stazon Black the Whimsical Peacock onto the cardstock. Make some accents with a white gelpen. Stamp with Stazon Black on a scrap piece of cardstock the text birds of a feather and cut out in two parts. Glue that beneath the bird. Make some lines around it with a black fineliner.
2. Stick the stamped cardstock onto the notebook and finish it off with some washi tape at the top and the back.
3. Use the leftover Kromcote carstock and cut it into a tag. Stamp the Bird head on Stick with Stazon Black. And stamp the text Don't let anyone ever dull your sparkle above the head. Then sponge the background with 3 different colours, the same as you used for the notebook. Take a brush and use some water and take some colours directly from the inkpad to colour the face and the shades. use some washi tape to glue over it.
4. Gift wrap it in transparant foil, take some matching ribbon and fasten the tag to the present.

All stamps used are also on plate 1398.

Enjoy
HERMINE

Monday, October 29, 2012

Bye...Bye...Bye... Hurricane Season! Well, Almost!

Happy Monday - Welcome to Viva Las Vegastamps!!! Susan here with my bottom of the month post and Halloween is just TWO DAYS AWAY!!! EEEK! Guess what - today's how-to has nothing to do with Halloween. Living in South Florida, I am in Hurricane alley and over the past week, we have been dealing with the mess of Hurricane Sandy - which is now moving up the eastern seaboard. I hope everyone in the path of this rainy mess stays safe. There is a silver lining - storms are a perfect time to get crafty!


For today's project I am sharing a shaving cream technique to make a swirly background to go with my Hurricane Blowing Trees #18145 stamp. This is so much FUN! I can't believe I've never tried it before.


I sprayed some shaving cream into a paper plate, spread around with a plastic knife, then dripped in three colors of Distress Ink re-inkers {peeled paint, old paper, and iced spruce}.

I dragged the knife through the shaving cream to swirl colors around in patterns. If you do this too much, you will complete blend ink into shaving cream.


Then you place your piece of cardstock into the shaving cream mixture and press flat to make sure entire paper has made contact. **A NOTE** I used a smooth natural ivory colored cardstock as my base.


I gently removed the paper from the shaving cream and then scraped off shaving cream with the plastic knife. I placed paper onto a paper towel and wiped the remaining shaving cream off using a soft towel. I gave papers a zap with the heat gun to dry and to set color.

This technique is really easy and this project would be great for kids, too. I colored several pieces of paper using the shaving cream mixture. When the color became too solid, I added a spray of fresh shaving cream and swirled it in. The white areas of shaving cream result in a color resist.


I inked up my Hurricane Blowing Trees #18145 stamp with Versafine Black Ink and stamped onto the background. **PLEASE NOTE** The shaving cream leaves a film on the paper that makes the stamped image slightly distressed. I also stamped with dye ink on another paper and the image was blurred and resisted in areas. The Versafine ink came out the best and I heat set to dry.

Now for assembly! I tore the edges away on each side of my stamped image. A SECRET... I layered this onto the unusable stamped image torn in the same fashion, leaving a larger border. Card base is section of distressed corrugated mounted onto a Kraft card base using Miracle Tape. I adhered the base painted paper, then mounted a strip of burlap, and overlayed the stamped image on top all using Miracle Tape. I finished off with two sea glass nuggets for a little bling.

Presenting my windblown Hurricane Card!!!


Thanks so much for dropping by today! Hang around a little while and check out what the rest of the Viva Las Vegastamps! Design Team has been up to. Don't forget to visit the Viva Las Vegastamps! store - for all your stamping needs and for every occasion...even a hurricane!

If you would like to see more of my creations please visit my blog, sbartist : painting in the dark HERE. I'll be back with another stamping adventure real soon! Hope you have an inky day! Sb

Sunday, October 28, 2012

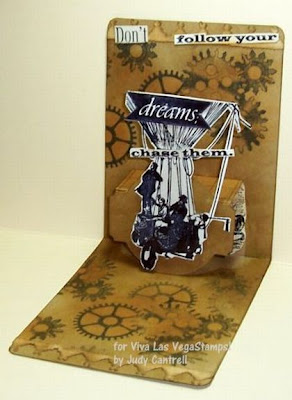
Don't Follow your Dreams; Chase Them!

 Hello Everyone, Judy here! This is my second tutorial as design team member.
I'm so excited to be here to share this tutorial with you using these stamps from VLVS! 


Stamps:


Supplies:
Sizzix pop 'n cut die
Sizzix strip die; vintage lace
Kraft resist paper
Ranger distress inks
Ranger archival black
Scissors
Foam dots
Vagabond die cutter


The fabulous stamps from plate #893 and nesting gears stamp were used on a kraft resist pop-up card. A strip from vintage lace die was applied to each end on inside card. 
Distress inks were used to color the card.

The men in balloon basket stamp was inked on Kromecote and cutout. A little bit of blue distress ink was applied to the white area of balloon. I used foam dots to adhere the balloon to the pop-up portion of card.


The quote, don’t follow your dreams, chase them; was inked on Kromecote with black ink and cut up. Miracle Tape was used to apply the words.
You might not be able to tell from the photo but camera collage was inked and placed behind the pop-up cut out.


The outside of the card was inked with distress inks and then inked and stamped with Time Flies and the clock collage.

Thank you for stopping by and have a nice day!
Judy Cantrell


Saturday, October 27, 2012

Quote the Raven Nevermore

Hello again. I'm back with another Halloween journal page for you.

Back in Sept. Retro cafe art gallery on their facebook page posted a free Halloween collage sheet, and of course a challenge. To use at least one item from the collage in your art piece. I did a journal page in my little Straphmore Visual Mix Media art journal.  chose to use 3 of the collage images and of Course a couple of VLVS! stamps! :)


I printed the collage sheet and right then cut out the Poe image. I did a gel medium transfer with it. After i cut the image out. i put some good amount of Gel Medium on the picture. I then placed it on the Journal page. I burnished it to make sure I get a good transfer. Or as close as a good transfer I can get. these transfers can be  little temperamental. After sitting on the page for a few seconds, I lifted the picture off. 


as you can see I got a pretty good transfer. Though he is missing part of his stash.:P After it dried i painted the page with purple water color paint.I used some Screamin Banchee Black Lindy's stamp gang starburst spray with some punchenllia and some Golden Doubloons Moon shadow mist. 

I then cut out the raven and wings from the collage sheet. I glued the raven down with the gel medium since I still had it by me. When that was drying I stamped the Wheel lady on white cardstock. Colored her with markers. Cut her out and then glued the wings to her.Before glueing her down. I put some drips of water down craft paint. Was trying to get a dark look to the page. I then stamped "Nevermore" on a piece white cardstock Sponged Seedless Preserves Distress ink on it, Cut it out and glued it on the page. For the title I wrote the it on a scrap of black cardstock with a silver pen. Last step I distressed the edges of the page and used black soot distress ink pad.


Stamps used

Items used
Straphmore Visual Journal Mix media
Retro art Cafe art gallery Collage sheet
Artist Loft Water Colors
Punchenllia
Water down black craft paint
sprays
gel medium
markers
Black card stock
silver gel pen

Friday, October 26, 2012

Fan Feature + Free Shipping!!

Morning stampers!!

I thought it would be nice to share some Fan Features with you again, today.
We really love seeing our products in use and are so thrilled each and every time someone shares a project with us that shows off our wonderful stamps! So don't forget to share them on our facebook wall!

Today I'm sharing projects from TWO fans... 


Michele has done not only one, not only two.. but SIX Cards using our Butterfly Spotted.


and this tag

is by Gerrie, who won during our Halloween Blog Hop!! She put together this tag using our Tree Background and Giant Head Skeleton which can be found on plate1433.

Thanks for sharing, girls!!

Don't forget about our free shipping... FIVE DAYS LEFT!


Thursday, October 25, 2012

Summer Memories

Hi my art friends. I have an awesome ART journal page using a VIVA LAS VEGASTAMP


The stamp is called SURF SHACK.

Here is the stamp

First I stamped the image with clear embossing ink, and then embossed with a green and blue embossing powder.

One of my favorite mediums is watercolor. And i love love love twinking H2Os.
I created a lovely blue,teal and green watercolor background.

Simple eh? But the results are so pretty!

Then I added some journaling doodles using a black pen and a whiteout pen.

For the journaling part I wrote about one of my favorite summer memories.

Swimming in the ocean, watching the dolphins swimming in the distance.

Its fun to let yourself go and remember the moments that feed your soul. AND to find a stamp that helps with that process.

Art on!

ANg

Wednesday, October 24, 2012

Get Well Soon With A Sense Of Humor!!

Good morning VLVS friends, 

Pinky here today with a quirky sense of humor "Get Well Soon" card. 
When I saw these stamps I knew I HAD to use them but I wasn't sure
how I was going to incorporate them into a card, I asked friends and the
consensus was that it HAD to be done (of course) and maybe a Get Well card. 
  1. Trim out 4.5X6 black cardstock.
  2. Trim out 4X5.5 kraft cardstock.
  3. Trim out 9X6 sturdy cardstock for card base. (I used plain white 80 weight).
  4. Using black ink- stamp King Henry VIII  image onto kraft cardstock.
  5. Layer trimmed pieces as shown on card using 1/2" Miracle Tape & Miracle Tape Dispenser.
  6. Trim out 3" pieces of ribbon.
  7. Using 1/2" Miracle Tape lay tape onto back of ribbon- adhere to card.
  8. Using scraps of kraft cardstock & dark purple ink- stamp sentiment Ask Me About 1X1 1/2". Trim out. 
  9. Matte sentiment in black cardstock. 
  10. Using foam pop dots, pop sentiment up over ribbon. 
  11. Add "Go Ahead" using sticker alphabet. 


The Miracle Tape works great on the ribbon and cardstock!
In my opinion it's a must have. 
And this card is a must have for any friend with a quirky sense of humor!!
I really love the VLVS outrageous, 
modern stamps that leave the perfect impression!

I hope you try your own card today, until next time-


Products Used: 1/2" Miracle Tape
Kraft Cardstock
Black Cardstock
Card base
Black Ink
Dark Purple Ink
Dark purple ribbon


Tuesday, October 23, 2012

It's scrappy time!

Not only do I love using stamps for my ATC's but I also love using them in my scrapbook layouts! I find that they give a unique look to them and can really personalize them. In this scrapbook layout I used the fabulous Hitchhiker stamp
as well as Miracle Tape and May Arts floral trim to make this, which now of course you can't see as I had to remove it for publication, sorry!

but here is a little close up of the fabulous hitchhiker stamp
I have also used this hitchhiker stamp in some of my ATC's

as well as in an art journal page

So there you have it! Look at how many ways this fabulous hitchhiker woman can be used. I love using stamps in so many ways and find it a challenge to make them "new" again in different projects.

Until next time,

Glenda

Monday, October 22, 2012

I Steam 4 U

DeeDee here, we're taking a break from Time 2 Stamp, and instead today I'm sharing a card I made that ended up being declined for an ad. No biggie, because it's still super cute and I got to give it to my honey!!


The steam for the engine is a cotton swab cut and I've done a tiny bit of doodling with a black pen. The letters are TH Grungeboard and inked with the Memento pad. 

Super easy, but super effective!!

Sunday, October 21, 2012

The Mystery of the Giant Eye

I love Halloween. There are many reasons but first and foremost, it’s the candy. Not the eating of it, but the giving and getting that makes it such a fun holiday.

I work for a large non-profit but in my neck-of- the woods, the second floor, there are around 50 folks. Most days, especially around Halloween, our communal kitchen is filled with candy. I occasionally take a few miniature candy bars for 911 moments, but usually just pass them up – too mundane.

This year I wanted to do something special for my co-workers. My inspiration was the story that was sweeping the Internet last week - the errie eyeball that washed up on a beach in Florida.


Supplies
Cellophane Bags
Eye Ball Candy
Black Ink Pad
Scalloped Punch
TH Baroque Die
Stapler
Spooky Paper
White Cardstock
Vintage Photo Distress Ink
Miracle Tape
Mini plastic bugs


Directions
1. Stamp on white cardstock then punch out tag using the scalloped punch.
2.Color in the tongue and eye balls with Stickles. Set aside to dry.
3. Cut out the Spooky Paper with the Baroque Die. This will be the top of the bag.
4. Edge both the bag top and the scalloped tag with Vintage Photo Distress Ink.
5. Fill the cellophane bag with assorted plastic bugs and candy eyes.
6. Fold the baroque die cut in half. Place over the cellophane bag and staple in each corner.
7. Attach the scallop tag using Miracle Tape.

BTW that giant eye was the eye of the shark, not the eye of the newt. Either way, it made a great Halloween story. What kind of candy are you giving out this year?

Saturday, October 20, 2012

Art Journal Time

Hello, hello!

Aimee here with a couple of art journal pages for ya.

Both of these use Mary Vogel's stamps.
 Want to make 'em?
Alrighty!

For page 1 you'll need:
A book to work in (I use a Moleskine watercolor journal)
Gelatos and watercolor paints
Water and a brush or two
Permanent pen (I used Pitt Micron)
Fiskars cloud punch
Scrap of watercolor paper
Miracle Tape sheet
Colored pencils
Scissors
Permanent black ink (I used Archival)
Colored pencils

 Create your back ground using Gelatos and watercolor paints.
Let dry.
Use pen to sketch in ground and little circles in the sky.
 Stamp elephant onto page, and onto a scrap of paper.
Add color to elephant on scrap using watercolor paints and
colored pencils.
Trim close, and add Miracle Tape sheet to back.
Fussy cut the elephant out, peel off the second liner
from the Miracle Tape, and place on page over stamped image.
 Paint a scrap of paper blue, let it dry.
Punch three clouds.
Use pen to add detail to clouds. 
Place clouds on page.
 Sketch a word bubble, and stamp Yee Haw in it.
Add to page.
****************************************

For page two you'll need:
Watercolors
White card stock
Permanent inks- black & brown (I used Archival)
Markers
Smooch inks
Acrylic paint (mine is from Ranger)
Washi/decorative tapes
Letter stickers
Miracle Tape


 Create your background with watercolor paints.
Let it dry (or speed it up with a heat gun!!)
Stamp background stamp twice across page with brown ink.
 Smear some acrylic paint across middle of page
to hide the seam where the background was stamped.
Let dry.

 Stamp images on white card stock with black ink.

 Color them.
Trim into rectangles, and edge with brown ink.

 Put some tapes randomly across the page.
Add the rectangles across the page.
Add Smooch around the images.
 Add letter stickers, or hand write, in the boxes.
Mine says 
"You will not break me".


And, no wiener today...
But the next best thing!
Snoopy!!!