Showing posts with label ultra high gloss. Show all posts

Monday, June 10, 2013

More melted crayon fun

Last year I showed an ATC I made using the Melted crayon technique that I learned how to do from Martha,Seeking for Art(Martha's ustream of this technique). Today I'm going to show you 2 more ATC's I did recently with the melted crayon technique, this time using Kromecote.

I wanted to see if the Melted crayon technique would work using Kromecote. So, I started playing around with it. I did 2 ATC's using both sides of the Kromecote. The glossy side (left side) and the matte side(right side). You can see the different results I got.


I'll start with the left one. The glossy side

I stamped on the Kromecote with the Brick background stamp with Black Versafine ink pad. Because I stamped on the glossy side The ink is still very wet, so I embossed with the Ultra High gloss embossing powder. Yes, more experimenting. After it was embossed I  took some crayons in blue hues and with my craft iron melted the crayons and wiped them on the Kromecote. When I was done I heated the back of the atc to get the way hot. I turned it back around to wipe off the wax. But I was starting to wipe off the color off as well(even some of the embossing). So I left it alone. i like dhow it looked anyway. I stamped the Boy in cape on white cardstock. and colored him in with my Prisma's. I used foam tape to put him on the ATC. I stamped the all my Heroes sentiment and cut the words apart and glued with glossy accents because there is wax where I was putting the words at I had to hold there a little bit to make sure it didn't pop off. 


Now to the Matte side
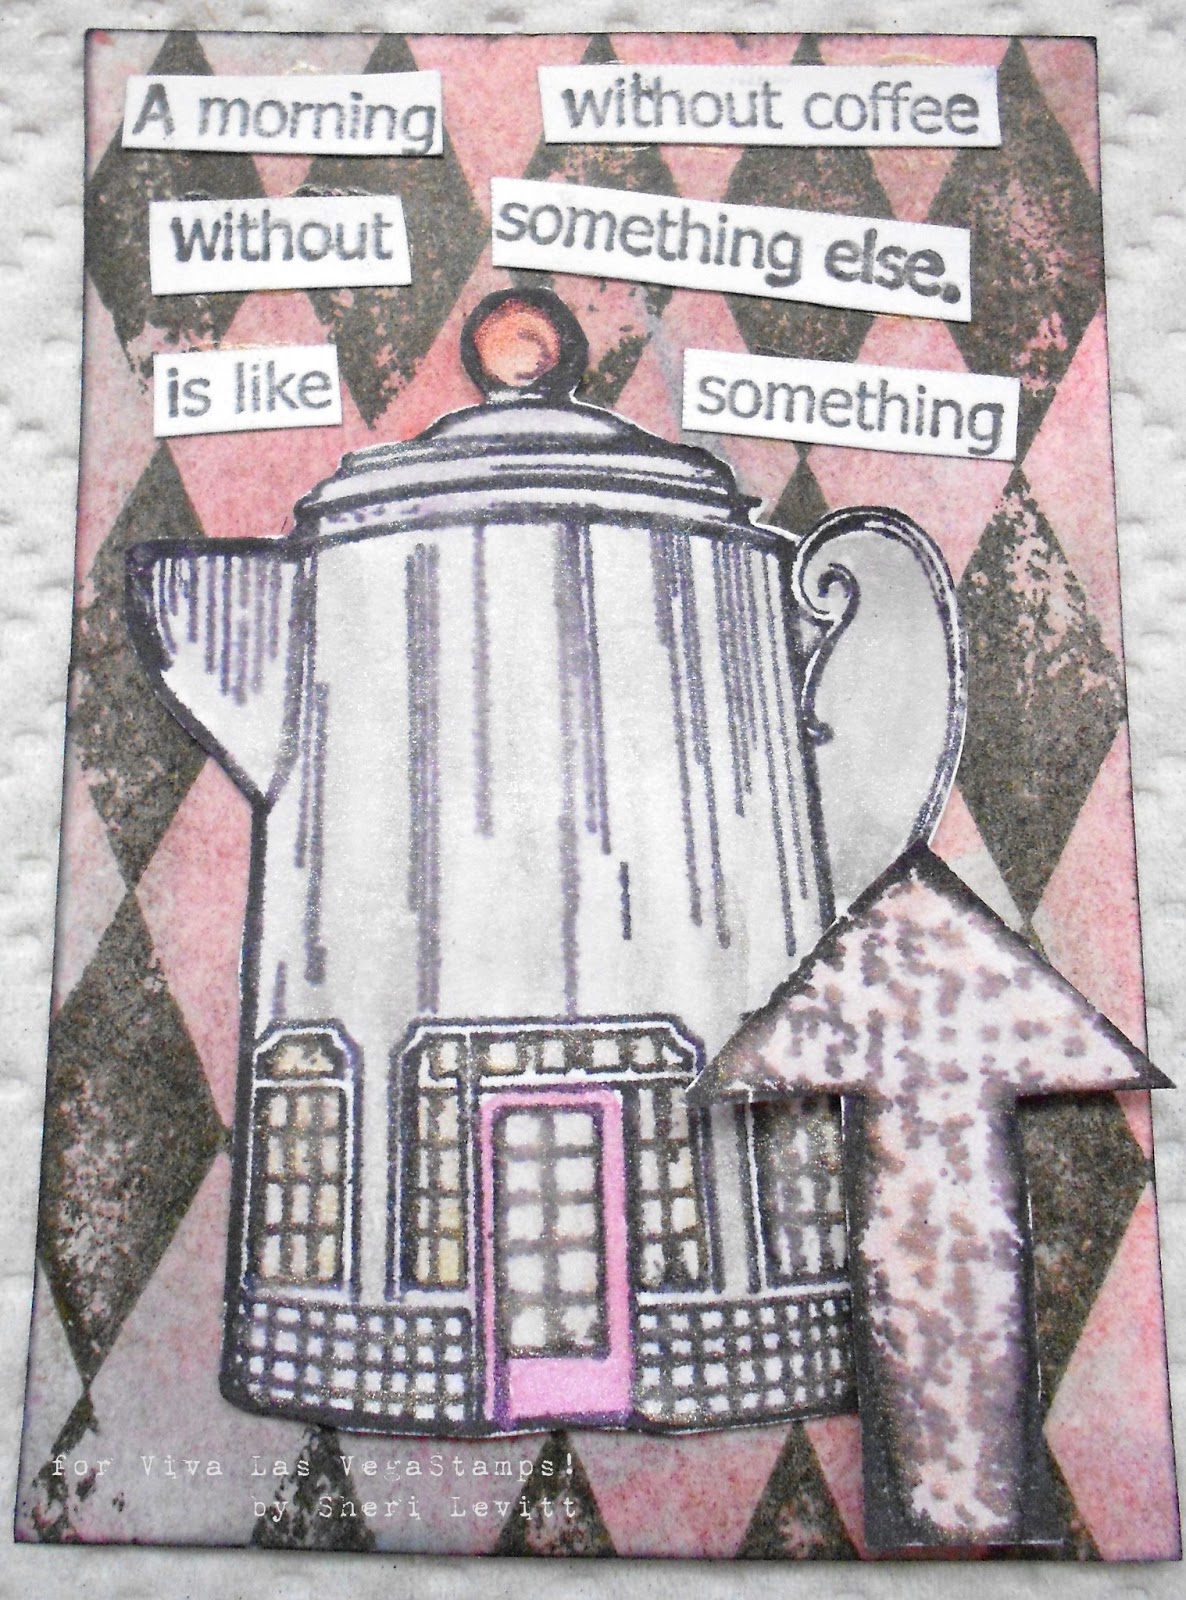

I stamped the Harlequin Diamond background with the black Versafine ink pad. I used magenta and purple crayons with my craft iron. I turned the paper over to heat the way. then I took a paper towel and wiped the wax off leaving the color.

On white cardstock I stamped with Black Achrival ink pad the Writing Arrow, coffee pot inn. I painted them with my Pearlesent water colors. The arrow smudged a little, but I was fine with that. I used Miracle tape to the coffee pot on the ATC. The arrow I made it like a tree and used foam tape to put it on the ATC. I stamped the A morning without coffee sentiment. and cut out the words. Glued them on with glossy accents. 


Stamps used
brick background
Boy in cape
all my heroes
Harlequin Diamond background
Coffee pot inn
A morning without coffee

Items used
Kromecote
Miracle tape
Black Archival ink pad
Black Versafine ink pad
crayola crayons
foam tape
glossy accents
pearlesent water colors
water brush

Saturday, March 09, 2013

It's Time to Be Kind


The inspiration for my tag today came from the Be Adorable stamp. I had purchased this stamp along with a plate and never had really read it. It didn't dawn on me for several weeks that it had wisdom in the form of simple commands from a to z : Be adorable, be brilliant, be crazy, be daring be excellent, be FUN....be kind... . Upon realizing the true extent of this stamp I felt that it embodied things I believe and have tried to instill in my children. It embodied feelings I have recently expressed about current events in the world. I needed to incorporate this stamp and remind people that NOW is the time-- the time to be caring, to be thankful to be wise to be kind and among others, to be NICE. I hope you enjoy my project!


The base of the tag is painted with acrylic paints and then distressed. The Adorable stamp and the grid stamp were stamped  and then the whole base was misted with Copper Maya Mist. 
The pieces of the Worn Clock Face and the Watch Movement were created on misted Kromecoat with embossed stamping.

All layers were adhered to the tag and metal embellishments were added to represent hardware in the gears of the clock faces and on the dry embossed piece. Trim and Misted May Arts Ribbon were added to the top and bottom of the tag to complete the look!
I hope you enjoyed my tag! ~leslierahye

For this project you will need:
shipping tag
brads, trims, metal embellishments, gold paper scrap
May Arts Ribbon
acrylic paint, Maya Road Mists, Smooch Spritz
Ranger EP and Mix'd Media Inx


Wednesday, January 30, 2013

Making Backgrounds!

It is always fun to try new techniques using what is around the house, shop/garage or in our creative supply stash.  Today's post is about making backgrounds. 

Faux Wood Background
This is an ATC from a SWAP... The theme of the swap was "FROM THE SHOP." My shop items are masking tape and locking washers! over lapping layers of Masking Tape on the base card stock (2 1/2 x 3 1/2), swipe with Chocolate Brown. Stamp VLVS! Harlequin Diamond Background with Barn Red after stamping off. Note: stamping off is inking the stamp then stamping on another sheet of paper before on the actual project.  Next stamp the VLVS! Easy Dog Rider and Route 66 Road Sign with Black. Cover the entire card with VLVS! Ultra High Gloss Embossing Powder, heat the embossing powder until clear, this gives the card a nice finish. Add locking washers (available at the hardware store) for embellishment and a touch of color with COPICS.

Supplies:
VLVS! Stamp Harlequin Diamond Background
VLVS! Easy Dog Rider
VLVS! Route 66 Road Sign
VLVS! Ultra High Gloss Embossing Powder
Masking Tape (shop)
Card stock
Inks: Chocolate Brown, Barn Red and Black
Heat Emboss Gun
Locking Washers(shop)
COPICS

RESIST With
Stamp the VLVS! Nike Statue and VLVS! Two Columns in the back ground with white ink (one statue with violet ink), using masks to keep from stamping over previously stamped images. Heat emboss with VLVS! Ultra High Gloss Embossing Powder.  Spritz with mists, wipe the mist from the embossed images. Randomly stamp VLVS! Swirls to create borders with violet ink. Ink May Arts Lace with chocolate ink and adhere with VLVS! Miracle Tape. What a great background!!!
Supplies:
Journal Clairfontaine
Ink White - Violet - Chocolate
Mist - Winter Grass Stewart Superior
Mist - Sandalwood 
Add VLVS! Lady with Arms stamped on Kromecote Cardstock, fuzzy cut and add her in the foreground.  


Washi Tape Background
To see step by step instuctions on making your own Washi Tape check out Dee Dee's Washi Tape Tutorial posted earlier this week. It is well worth watching!!!
For this card place VLVS! Miracle Tape 1 inch on white tissue. Use an dauber or sponge to apply brown ink directly to the white tissue. 
Randomly stamp images of VLVS! stamps Draw,Pen TipsPointed Pen TipA Drawing Is and This is where I draw the line on the tissue. Note: the images are partially stamped on the tape. Now you have beautiful one of a kind Washi Tape.   
For this card the Washi Tape was cut to fit the card stock panel and used as a background. A few pen nibs were added in the lower left.  Stamp the VLVS! Feather Pen Collage on coordinating card stock and mount with foam tape.
Supplies:

White Tissue (dollar store)
Pen Nibs (thrift store)
Card stock
Ink Brown & Black

Curtains
Another background can be done using VLVS! Stage Curtains stamps to create a mini stage. This is a background I used last weekend when the VLVS! Design Team had their fantastic blog hop BLAST FROM THE PAST using VLVS! Oldie But Goodies Stamps! My stamp was the VLVS! MAN WITH HOOP! Here I created an altered tin with a stage.


Supplies:
VLVS! MAN WITH HOOP
VLVS! Chevron Banner
VLVS! Stage Curtains
VLVS! Ultra High Gloss Embossing Powder
May Arts Ribbon & Fibers
Altoid Tin
Transparency
Cream card stock
Pink Card stock
Black ink
Red ink
Stickles
Sakura Crystal Lacquer
Hearts Made from Creative Paperclay®
Be Mine - Sticker
Foam Tape
Small blocks


Now is the time to stock up on your Viva Las VegaStamps! 
They are now  47% OFF!!! 

Wednesday, January 09, 2013

Dreaming Big in the New Year


 Happy Wednesday!! Leslie-Rahye here with my first post in the new year. I hope everyone is having a fantastic New Year. I have adopted the word B L O O M as my focus word for the new year and so far it is manifesting itself in ways I never dreamed possible. In just a short week and a half so many fantastic opportunities have presented themselves making me want to DREAM BIG! I celebrated my happiness with this 4×4" art tile using stamps from the latest stamp release! I hope you enjoy my tile...see below for how I created this fun cracked background.


For this project you will need :
card stock
Chip Board Blank
Watercolor Crayons Distress Markers/Ink
Maya Mist Pearl
Glitter


I began the layers of this background with watercolor crayons which I loosely colored and then misted and blended to get a base color. Next I stamped with Black archival the written stamp and the banner stamp. I misted with Maya Mist in Pearl and quickly dusted the wet surface with High Gloss Emboss Powder. I melted the dry powder and built up layers of molten emboss powder on the surface until I achieved a thickness. I let it cool completely and then bent the surface to make  cracks. I rubbed Ranger Archival into the cracks to accentuate them! This fun technique gives a broken glass look to the embossed surface. I hope you enjoyed my technique and my tile! Happy New Year!
~leslierahye

Tuesday, January 08, 2013

Attention...Please look up at the Blackboard Stampers!


Welcome to Tuesday at Viva Las Vegastamps!!! Susan here with a technique the you definitely want to try... the BLACKBOARD technique. It seems to be the hottest thing in the past week in my email inbox...so I wanted to give this a try and it's SUPER EASY and really INKY!


A little known secret... I am a rubber hoarder and I have acquired a significant stash of rubber from VLVS! in the past year. I just can't resist their Pound O'Rubber and I always look to see if they have "Delinquent Dies" {these are my secret gems - a grab bag of slightly defective rubber dies that have some defects from pressing}. So in my recent order I received a new class of little delinquents... I received this Mary Vogel Lozinak stamp #18366. You can see in the stamped image that the image is mottled and with interesting imperfections. So I'm going to use this to make an interesting background. 


OK - I had a sheet of Kromecote that got wrinkled so I put it to good use also - because the Chalkboard Technique is DISTRESSED. I cut two pieces two  4" x 6" and stamped all the new Washi borders on one and stamped my delinquent sun #18366 onto the other - all using Ranger Resist Ink. Then I heat set and applied Black Soot Distress ink directly to paper on both. I rubbed the color in with a makeup sponge and buffed excess away with a paper towel. These are the results...


For the background on the left using the delinquent stamp - I stamped it 4 times on the sheet.

Now for a variation...that has more contrast! I stamped using Ranger Embossing ink and applied VLVS! Ultra High Gloss Embossing Powder, then hit it with the heat gun. I rubbed it with the black soot as previous and rubbed in and buffed away and this is the result! Love it!!!


*USE CAUTION with Kromecote*... your fingerprints will act as a resist. See my thumbprint?

I trimmed out my pieces and added some dusty concord Distress Ink. This had to be heat set to stay put on the Kromecote. The high gloss coating soaks up the ink like a sponge, then the rest is buffed away. Drying the ink with the heat gun helped the purple soak in on top of the black. I used my Miracle Tape to adhere everything down and 3-d adhesive lines to pop up the stripes, arrow and phrase. I'm ready to fill up this blank journal that I found when dusting my bookshelves. I've chosen the word "INSPIRE" for this year and I'm ready to doodle in...

my new "Inspire" Art Journal


Supplies used: STAMPS - Sun Background #18366 {a DELINQUENT DIE}; several stamps from Plate #917: Six Hexagon Background #19076Washi Chevron Background #19072Washi Reverse Grid Background #19075Washi Lines Background #19073Washi Grid Background #19074 and quote "Writing Arrow #19078" and "Inspire" #18888; Also used Kromecote CardstockVLVS! Ultra High Gloss Embossing PowderMiracle Tape; 3-D Foam tape; Ranger Black Soot and Dusty Concord Distress Inks; Ranger Resist ink and Ranger Embossing Ink.

I hope you give this technique a try. It would be great in traditional green like an "old school" chalkboard. Thanks so much for dropping by. If you have a little time... check out what the rest of the Viva Las Vegastamps! Design Team has been up to. Or if you have a VLVS! gift certificate in your hands - head on over to the Viva Las Vegastamps! store - for all your stamping needs and for every occasion...and MIRACLE TAPE, too!

If you would like to see more of my creations please visit my blog, sbartist : painting in the dark HERE. I'll be back with another stamping adventure real soon! Hope you have an inky day! Sb

Monday, January 07, 2013

Time Flies Tag


I knew my Viva Las VegaStamps! would be perfect on this tag after experimenting with my stash of supplies to make the background.

Tutorial:
Wad up and smooth yellow tissue paper a few times. Place the wadded up yellow tissue paper on freezer paper or wax paper, spray several colors of dylusions spray ink over the paper, while wet sprinkle a little glass glitter over the paper along with a few sprays of heirloom gold. Move the paper away to a clean surface to start drying. (the remainder of ink on wax or freezer paper can be used to ink up several tags or cards)
Place the colorful tissue between two pieces of copy paper and then dry with craft iron. Choose a selected piece of tissue paper to cover a tag or card.

Distress markers were used to color the Large Bird Flying that was stamped on back of Kromecote. edge trimmed piece with a little distress ink and apply to tag with Miracle Tape.
Ink Time Flies with black ink, stamp on background, immediately pour ultra high gloss clear embossing powder over the stamped image, pour off extra and heat set. I wish my camera would pick up the high gloss finish.
White crackle paint was used on chipboard snowflake, when dry, add a little bit of broken china ink around snowflake. Apply distress stain to seam binding, crinkle up, heat set and add to tag to finish!

Supplies:
#19001 Large Bird Flying
#19008 Time Flies
Ultra high gloss clear embossing powder
Miracle Tape
Kromecote
Distress markers
Ranger archival ink
Ranger perfect pearls
Sizzix snowflake die cut
Ranger distress ink
Vintage glass glitter
Ranger dylusions spray ink
Ranger white crackle paint
#8 manila tag
Chipboard
Dry iron
Tissue paper
White seam binding

Thanks for viewing. All comments appreciated!


Monday, December 24, 2012

December Daily Tag


Judy here, this is a tag I made using three VLVS stamps! 


Broken china and tumbled glass distress inks were used to color #8 manila tag. 
Ink Christmas tree #18932 with Memento bamboo leaves and stamp on tag. 
Throughly heat set to dry tag before stamping December and 25 from December Daily with antique linen, while ink is wet pour ultra high gloss clear embossing powder over the inked images, pour off extra and heat set to a high gloss finish. Vintage photo distress stain was used to color the die cut deer, let dry or heat set, secure tinsel twine with Miracle Tape on deer. 
Apply deer to the tag with glue n' seal.
Blue star bling was added to the top of tree. 
Blue tinsel twine was added to top to finish this tag. 
Seasons Greetings!  


Supplies:
December Daily plate #1430
Christmas Tree #18932
Miracle Tape
Ultra High Gloss Clear 
Ranger Distress inks
Ranger Distress stain
Ranger Glue n' Seal
Tsukineko Memento bamboo leaves ink
Sizzix movers and shapers deer die cut
Ranger Tinsel Twine
#8 manila tag
Blending foam applicator
Chipboard
MS star bling

Thanks for Looking! 

Sunday, December 23, 2012

Have yourself a merry little Christmas

Its the the Holiday Season! This year I deiced to make some Christmas cards using Viva Las VegaStamps! of course!

 This first card is a quick fun card I made using Kromecote and Ultra High Gloss clear embossing powder for a fun emboss resist technique.

I stamped the Harlequin Diamond background stamp in clear embossing ink on the Kromecote. I poured the Ultra High Gloss embossing powder over it. After I melted the embossing powder with my heat gun, and it cooled, I took Barn Door distress ink pad and one of the foam pieces and went over the embossed image with the ink. I then took Fire Brick distress ink pad and did it again. I then took a paper towel to wipe off the ink from where it is embossed. it looks like this.


 I trimmed the Kromcote a pit so it can fit on the Kraft card base. I used Miracle tape to attached the Kromecote to the card base.

On white cardstock I stamped the Snow woman in flower hat with black Memento ink pad. I colored her hat and purse with markers. I stamped the head part of the stamp and painted the nose orange. I cut it out and glued it on her. I glossy accented the band of the hat and her eyes. I added some rock candy stickles to her body. I used foam tape to attache her to the card.

On a piece of scrap cardstock I stamped the sentiment, "have yourself a merry little Christmas" and edged it with Crushed Olive distress ink pad.


Stamps I used:
Harlequin Diamond Background
Have yourself a Merry Little Christmas
Snow woman with flower hat

items used:
Kromecote
Ultra High Gloss Embossing powder
Miracle tape
bard door distress ink pad
fire brick distress ink pad
kraft cardstock
white cardstock
black memento ink pad
orange craft paint
markers
rock candy stickles
foam tape
crushed olive distress ink pad

This card is another fun card to make. Its a triple stamping card technique  I saw a friend make one, then saw a youtube video on where she got the idea from. While watching her make the card I got an idea to use a VLVS! stamp with it. Turned out really cute! This is what it looks like uncolored.


I took the 3 white cardstock layers and stack them on top of each other. I then stamped the Santa hits plane with Black Versafine ink pad and then embossed in Ultra High Gloss clear embossing powder. After I embossed the powder I mounted the three white layers onto the green cardstock using Miracle tape. I then colored the image Artist Loft watercolors. I also used pearlesnt watercolors. I should of done that first before mounting them on the green. but live and learn! :P 

Taking a cue from George of the Jungle I stamped out "Watch out for that plane George" with the small alpha's from the plate 1430 on scrap of white cardsock with black soot distress ink pad. cut the words and mounted that on the bottom white layer. 


stamps used

items used
white cardstock
green cardstock
black Versafine ink pad
Black soot distress ink pad
artist loft water color
pearlesent water color


Tuesday, December 11, 2012

Embossed Greetings for the Holiday

Happy Tuesday stampers! Before I was a "stamper" I always loved the look of embossing on a card...especially a holiday card. With Viva Las VegaStamps High Gloss Emboss Enamel you can achieve the embossed look on you own cards. For this card I chose to use a collage image from Altered Pages but you could also use images from old holiday cards to stamp and emboss upon with this fantastic Ornament Ball Stamp!!
For my card I centered the ball stamp over the top of my collage image and stamped with Versamark Watermark Ink and sprinkled the ultrafine High Gloss Emboss Enamel. I dusted the very top of the ornament with Bronze Mixers to give the look of metal to the top. I attached a May Arts raffia ribbon through the hole of the ornament to finish it off. I mounted my ornament on top of an embossed piece of coredinations card stock which I had sanded to reveal the green for the leaves. I clear embossed snowflakes on the background piece. I clear embossed Season's Greetings in the bottom and then dusted it with Bronze Mixers. I zapped the top of the ornament and the sentiment one more time to melt the mixers into the emboss enamel.
For this project you will need:
Coredinations Card Stock
Emboss Folder and Sanding paper


Thank you for looking! I hope you enjoyed my project! ~leslierahye


Thursday, December 06, 2012

My VLVS! Christmas Smash Journal!

What is a smash journal? If you don't have time to  scrapbook pages of everyday life this is a fun way to keep the memories. Especially during the month of December, with so much happening we barely have time to breathe. For my December post I am starting a smash book! Use any book... it can be blank, lined, have pictures (mine is a school composition book). A place I can glue mementos from life this month. So many things happen and so little time to capture them on paper, random thoughts can be jotted down, bits and pieces of each day. You can make your smash book with a theme or just everyday life. This particular book will be a book for the month of December 2012.

Cut pattern paper, distress with ink and glue paper to the cover of the book. Repeat on the back and inside covers. On the front stamp the VLVS! Steampunk Christmas Tree and VLVS! Happy Holidays. Heat emboss with VLVS! Ultra High Gloss Embossing Powder. May Arts Leather is tied around the spine. Add 2012 Thickers and Scrabble pieces with a quick dry glue.
With quick dry glue add locking washers to the tree and trim with Stickles, add Gem and large key.

Now the book is ready to start adding my memories of the month. be sure to use scraps of pattern paper to cover the white pages!!!!  Have FUN.
My first page is a memory page for the Advent Calendar I made for Day 4 of the Week of Inspiration for VLVS! in November using Plate 1430 the December Daily. This month I am sharing each ornament in my Count Down to Christmas on my BLOG HERE!

The background paper for this page is a lovely holiday paper bag I couldn't resist using. On the edge I have added some May Arts Ribbon

Add: pictures, receipts, quotes, things people say, a thought that may trigger a story later, do some stamping, make lists. Anything and everything goes in a smash book. ENJOY!

Supplies:
Composition Book
VLVS! Miracle Tape
VLVS! Ultra High Gloss Embossing Powder
VLVS! Steampunk Christmas Tree Stamp
VLVS! Happy Holidays Stamp
May Arts Ribbon
May Arts Leather
Stickles
Locking Washers from the hardware store
Game Peices-Scrabble
Bakers Twine
Red Thickers
Key K&Company
Large Gem
Glue
Pattern Paper-Tim Holtz All Seasons
Brown Momento Ink
Black VersaFine Ink

HAPPY HOLIDAYS!!!

Sunday, November 11, 2012

Stamped and Embossed Tag

 Judy here, using VLVS images with emboss background and die cuts is always fun when making tags.

This fabulous image is from plate #893.  


Girl with wings 2 3/4" x 3 3/4"
item #19005
and
Just dropping in to say... 1" x 3"
Item #178

VLVS supplies:
Miracle Tape
Ultra High Gloss Clear Embossing Powder
Kromecote
VLVS stamps

Other Supplies:
May Arts
Ranger Distress markers
Ranger Distress inks
Ranger ink blending Applicator
Dlyusions spray inks
Ranger Archival black ink
Sizzix die
Sizzix embossing folder
Ranger Glue n' seal
Quickutz die
Vagabond tool


To make this tag, die cut a #8 tag with manila file folder. Apply color using foam applicator with broken china, tumbled glass and weathered wood distress inks and then embossed using an embossing folder. To give the vintage look I used walnut distress ink over the tag.

The girl with wings was inked with black ink on Kromecote glossy cardstock. Heat set to dry. The image was then colored with light shades of distress markers. The piece was torn to fit the tag and then broken china distress ink was used over the edges. Miracle Tape was added to back and applied to tag.

Just dropping in to say…quote was inked with black archival on Kromecote document die cut, place the die cut on scrap paper and pour ultrahigh gloss clear embossing powder over the word and heat set. Edges were inked with broken china distress inks. Ends were folded and applied to tag using Miracle Tape.


Use several spray inks to color a small piece of manila card stock, heat set to dry and then die cut with a mini flourish die, apply glue and adhere to tag.
MayArts ribbon was applied to tag to finish.

Thank you for viewing my tutorial!

Judy Cantrell