Showing posts with label background. Show all posts

Friday, August 09, 2019

Like a Queen - Art Journal Page | Sue Plumb


Hi everyone! It's Sue Plumb here with my latest design team project with you. Today I am sharing a whimsical style art journal page that I created on some loose leaf black A4 cardstock. I don't often create on dark backgrounds, but I felt like a change of pace.


I started by creating my background using Dylusions acrylic paints and a stencil from StencilGirl. I stamped over the top using black ink with the Wildflowers Silhouette stamp; and around my page using the Sky of Stars Background with a Distress Oxide. 


I created my "whimsical being" using a variety of stamped pieces put together - Striped LeggingsDressformSet of WingsCat Mermaid. I simply stamped, cut, coloured and pieced.

The border was stamped also using a Distress Oxide with the Doodle Frame stamp and I used the Treat Me Exactly Queen phrase stamp to add text to my page.


I used Distress Oxides again with the Beautiful Lily and Leaves and 3 Extra Leaves stamps to add extra detail over my background (love how these look over a black background!); and added gold splatters using a Heidi Swapp Color Shine spray. 


You can see how I put this page together in my process video on the VLVS YouTube channel:


Thanks for stopping by so I could share this with you, I hope I have inspired you to get inky too!


Stamps used:

Other materials:
- Black and white cardstock
- Ranger Dylusions acrylic paints
- Ranger Distress Oxides
- Tsukineko StazOn ink
- Miracle Tape
- White cotton thread
- Heidi Swap Color Shine

Tuesday, July 23, 2019

She Was An Artist | Sue Plumb


Hi everyone!
It's Sue Plumb here to share my latest design team project with you. Today I am sharing a mixed media scrapbook layout that I created to document some photos from a recent kids art class that I taught. It was so much fun teaching the kids - they are so free in their approach and have no reservations when asked to do something.


I started my page by creating the background, which was inspired by the piece I had taught in the class. I used the beautiful bright Ranger Dylusions paints, which I applied to my cardstock using a silicone spatula.


Once the paint was dry, it was time to add some stamping. The first stamp I chose was the Whimsical Leaf, which I stamped out over the green paint on my page using StazOn black ink.


I then used the Leaves and Three Extra Leaves stamp to add more foliage over the green paint. This essentially provided a "frame" for my page.


Next, I wanted to add an "arty" quote to my page so I chose the Art is Anything quote by Andy Warhol, which I also stamped using the black StazOn.


Now it was time to add some papery background layers. I wanted to incorporate some art themed things, so I used some Jane Davenport collage paper that featured a paint palette print. I also used a paint sample card from my local hardware store; as well as a doily and some folded tissue paper.


Once I had those layers in place I then collaged on the Magic Maker Paintbrush that I had stamped onto some tissue paper before adding some frayed gauze for texture, then my photos on top.


With most of the main elements in place for my layout it was time to go and add some of the smaller details. I found two more art themed quotes I wanted to add - handmade with he{ART} and then I combined she was and an artist (which I ended up deciding to use as my page title).


I then added some embellishments to finish off my page. First, a handmade heart from Charms Creations, which I placed near the handmade quote. I also added some pieces of twisted coloured wire for extra interest.


Next, I added the Cocoa Vanilla Studio yay flair button and some wood veneer hearts that I painted white.


I also added a black wood veneer arrow that I coloured black using a Sharpie.


To finish off, I stamped the Scribble Heart, then added a few enamel dots dotted around the page and a splatter of white Dylusions mist.


That's all from me today, I hope I have inspired you to get inky too. Until next time, happy stamping! 


Stamps used:

Other materials:
- Bazzill cardstock
- Ranger Dylusions paints and mist
- Tsukineko StazOn ink
- Jane Davenport collage papers
- paint sample card, doily, tissue paper
- Charms Creations handmade heart
- Cocoa Vanilla Studio flair button
- wood veneer pieces
- coloured wire
- enamel dots

Friday, March 08, 2019

Book Week 18 | Sue Plumb


Hi everyone!
It's Sue Plumb here with my latest design team project for you. Today I am sharing an 8.5x11" mixed media scrapbook layout I created to document some photos of my daughter from last year. These were taken when her school was doing a book character parade to celebrate Book Week.


To create my page I first decided where my photos were going to be placed, then painted a quick background using Dina Wakley acrylic paints. Once the paint was dry, I added my stamping using black StazOn ink.


At the top of my page I used the This Book Belongs To: stamp, adding it twice, then once again below my photos. I then added the Chevron Banner and Triangle Banner, so they would adjoin each of my photos and help create flow across the page. 


At the bottom of my page, I added the Be Adorable quote stamp (which is filled with sentiments that I absolutely love that are very appropriate for my daughter). 

I then added a few papery layers to go under my photos. First, I stamped a pair of paint sample cards with the Library Return Card stamp. I love using these cards in my layering, as it makes it so easy to coordinate colours and they are free from my local hardware store. 


I also added some book paper, a paper doily, washi tape, frayed gauze and some black cord into my layers before sticking the photos on top. 

For my title, I used Cocoa Vanilla Studio alphabet stickers, then stamped the "18" using the Grunge 1 and Grunge 8 stamps. 


After that, it was simply a matter of adding some quick journaling with a felt pen and I was done. I couldn't believe how quickly this page came together - I love it when things just fall into place! 
Thanks for stopping by today so I could share this, I hope I have inspired you to get inky too!


Stamps used:
Grunge 1 

Other materials:
- white cardstock
- Dina Wakley Media acrylic paints
- Tsukineko StazOn ink
- paint sample cards
- assorted collage materials (as mentioned above)
- Cocoa Vanilla Studio alphabet stickers

Thursday, January 10, 2019

Stay Cool | Sue Plumb


Hi everyone, happy new year! 
I am so incredibly excited and blessed to have the opportunity to stay on the Viva Las VegaStamps design team for another year and share my love of VLVS rubber stamps with you!

To kick off the new year, I have a 12x12" mixed media scrapbook layout to share with you that features a photo of one of my twin boys that was taken only a couple of weeks ago. I created this page to document how in a very short time he has gone from being terrified of swimming to loving being in the pool.

Here is my layout...


To create my page, I began with a sheet of white Bazzill cardstock and some Ranger Distress Oxides in Mermaid Lagoon; Cracked Pistachio; Twisted Citron; and Faded Jeans. I used the "packaging technique" to apply the inks - swiping the ink onto some plastic packaging, then adding a spritz of water before "smooshing" it down onto the cardstock. 


I started with the Mermaid Lagoon colour and then dried it off before repeating the process with the Cracked Pistachio and Twisted Citron. I love the layered watercolour style effect that it creates - perfect for my water themed page!


Next, I used the Faded Jeans Distress Oxide to add some splatters over the top. To do this, I swiped some ink onto my craft mat, then added water before soaking it up with my paint brush and splattering it over the top.


Then it was time to add some stamping! The first stamp I used was the Bubbles (Large Black), using Ranger Archival Ink in Paradise Teal. I added the bubbles in a vertical line down my page then added an extra group of bubbles where the left edge of my photo would sit. (This gave me the "visual triangle" I was looking for.)


Once I had the bubbles stamped out, I chose the Humpback Whale stamp for a bit of fun and to tie in with the water theme of my layout. I stamped the whale twice with the same teal ink, positioning it so that it was "swimming" through the focal area of the page and helping to draw the viewers eye in.


I also stamped the It's a whale of a tale... sentiment several times around the page, switching to black Staz On ink for that one.

With the majority of my background work done, it was time to switch to adding some papery layers and texture. I created a layered mat for my photo using an assortment of tissue paper, paper doilies, paint sample card, a tag, glitter cardstock, frayed gauze and coloured wire. I also added a few pieces of torn washi tape around the page.


Once the layers were in place I added some scrap cardboard to the back of my photo before mounting it on top. I also added a handmade heart embellishment from Charms Creations, and a flair button from Cocoa Vanilla Studio.


Then it was time to finish my page off. I added my handwritten journalling using a felt pen, then stamped the Let Fear Be quote underneath it using black ink. 


I also used my favourite Doodle Dots stamp to add further depth to the background. (How could you not love how this stamp looks?) 

The finishing touch was a few blue and green sequins from Cocoa Vanilla Studio scattered around the page.


Here's a closer look at some of the finished details...


(I am so in love with that background, and glad that I finally treated myself to some Distress Oxides for Christmas!)


You can see where I used my Tim Holtz tiny attacher to fix the wire to my page. I love the extra texture the metal staples add.


That's all from me today, I hope I have inspired you to get your stamps out and create something too. Until next time, get inky! X


Stamps used: 

Other materials:
- Bazzill cardstock
- Ranger Distress Oxides
- Ranger Archival Ink
- Tsukineko StazOn Ink
- Cocoa Vanilla Studio flair button and sequins
- Charms Creations handmade heart
- Assorted collage materials (as detailed in post above)
- Felt pens
- Staples

Saturday, December 01, 2018

Monthly Challenge - UGLY CHRISTMAS SWEATER

Welcome to December's Monthly Challenge >>> 2019 is next month. NEXT.MONTH.

Yeowza. Let's get to winning some rubber hey?


It's time for UGLY CHRISTMAS SWEATERS & red, black, white, teal. Think about ornaments, Santa, blocky christmas patterns, reindeer, sparkles, letters to Santa Claus. Christmas icons, script, dots & anything else that you can gain inspiration from in our board.

Don't forget the rules:
-Create a new project based on our inspiration board (it has to be posted this month, but you can certainly link up to other challenges as well!)
-Use at least one (but certainly more if you want) Viva Las VegaStamps! rubber stamps
(We are now allowing competitors stamps to be on your work, but please make VLVS! the focus of the project, thank you.)
-Post it to your blog with a link back to us
-Upload to our linky using your direct blog post link (You may also upload via facebook, flickr or other gallery)
You could win a Project Spotlight post on our blog + some new rubber of course.
And visit us back here for inspiration!


Tuesday, November 20, 2018

Awesome | Sue Plumb


Hi everyone!
It's Sue Plumb here to share my latest Viva Las VegaStamps design team project with you. Today I have a 12x12" mixed media scrapbook layout to share that features some new release library-themed stamps, as well as a few others from my stash.
I created this page to document some photos of my boys that I captured in a hospital waiting room one day, while they both practised their reading and writing skills.


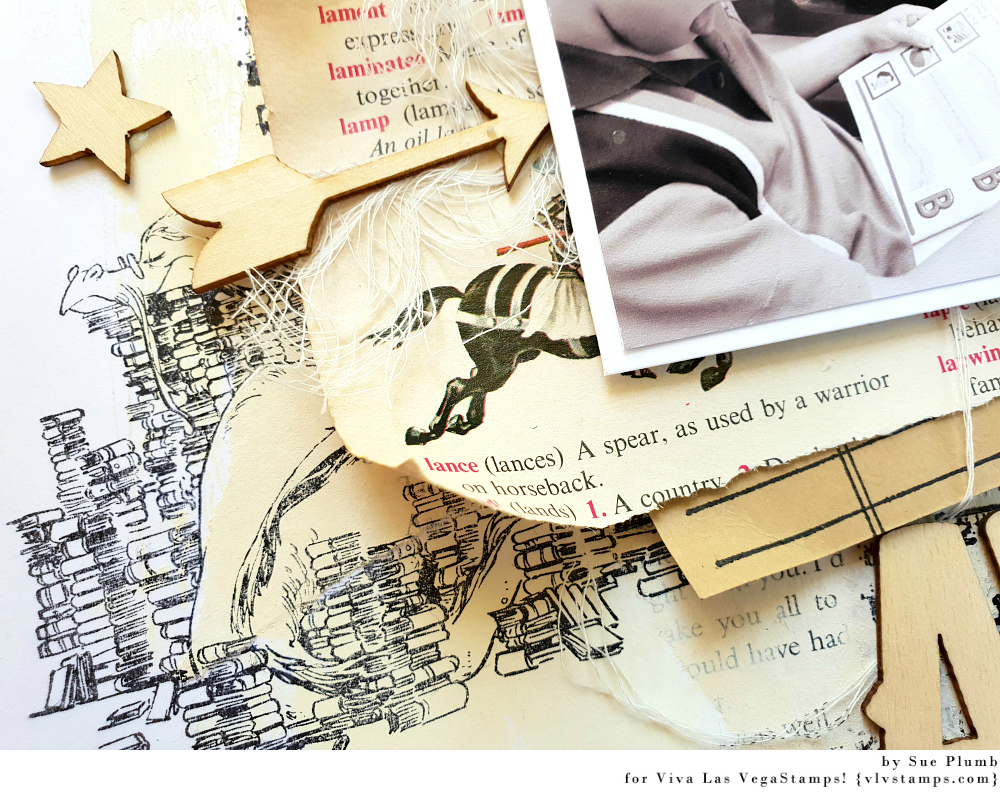
I began my layout with a sheet of white cardstock, and a couple of pages torn from some old books. I collaged the pieces onto the cardstock, then applied acrylic paint over the top with a brayer to give the page more of an aged paper look. 


Once the paint had dried, I stamped the new Library Return Card stamp multiple times to define the focal area of my page where my photos were going to be placed.
I then used the This Book Belongs To: and the Library Return Dates stamps to add some extra interest and structure to my background. 
(These three stamps are all available together on plate #1508.)


With all that text in place, it was time to add a few images to my page. I used a series of dragon images (all with a book theme) designed by Brian Kesinger - Aagar the Emotional; Telkyn the Learned; and Vornii the Bookish. (These three stamps are all available together on plate #1499.)
I stamped the three dragons around my page to form a "visual triangle" around my photos. 


With all my background in place, it was time to add some papery layers to form a mat for my photos. Naturally, I turned again to book paper (a logical choice for this page, right?) 


I layered some torn pieces of paper, along with some brown paper, small white tags, and a large kraft tag that I had also stamped with the Library Return Card stamp. 


I stapled all the papers in place along with some frayed gauze, and then added my photos on top before turning my attention to adding some embellishments to finish off my page and tie it all together. 


In keeping with the reading theme of my page, I chose a handmade book paper star from Charms Creations, and tucked it under the right edge of my photo.


I added three wood veneer stars from Cocoa Vanilla Studio, layering one on top of the book paper star and using the other two to again form a "visual triangle". 


To the left of my photo I added a wood veneer arrow, and then below my photos the large awesome wood veneer piece for my page title (all from Cocoa Vanilla Studio). 


I added some simple handwritten journalling below my title using a felt pen, and my page was complete.

Thanks so much for stopping by today so I could share this with you. I hope I have inspired you to get inky too!


Stamps used:

Other materials:
- Bazzill cardstock
- Mont Marte acrylic paints
- Book paper, brown paper, gauze, tags
- Tsukineko Staz On ink
- Cocoa Vanilla Studio wood veneer pieces
- Charms Creations handmade book paper star
- Felt pen