Wednesday, December 30, 2015

Bright Wings

Since were are all winding down from our holiday crafting here is a fun background technique to use with any color combination...
Michele here today with my last post for the second term of 2015 and as always what a pleasure it has been!!!


I started with a piece of watercolor paper and sprayed three different colors of Distress Spray; fossilized amber, abondoned coral and pickeled raspberry.  Topped off with a bit of water to make sure the colors blended.


Then I dried it really quick with my trusty heat gun!


With a stencil from Um Wow Studio, I randomly wiped with a baby wipe to remove a bit of the color.


Layered up with stamps and marks... writing circles and grunge circles.


Whimsical face with horns, watercolored with Distress markers and whisical leaf  colored with Brusho then covered in ultra high gloss embossing powder.


The sentiment, her wings were made, tied it all together!


Thanks for stopping by and HAPPY NEW YEAR!!  May 2016 bring you all you wish for!

Tuesday, December 29, 2015

Clean and Simple Card

Hi everyone.
This is my last post for the Viva Las VegaStamps! Blog. I love the versatility of the stamps. Today I'd like to share a clean and simple card.

I used Distress Inks (Mustard Seed, Peacock Feathers) for the watercolor background. Both stamps, the Be adorable and the Boy in Cape, are from Plate 918. I stamped the Boy with Memento Luxe Danube Blue. The Be Adoreable was stamped with StazOn Jet Black ink.


Stamps from Viva Las VegaStamps!:
Be adorable (Plate 918)
Boy in Cape (Plate 918)

Other supplies:
Distress Inks (Mustard Seed, Peacock Feathers)
Memento Luxe (Danube Blue)
StazOn (Jet Black)


I wish you a happy, colorful and crafty 2016. xx Susanne.

Monday, December 28, 2015

Mail art : recycled envelope


Hello my dear crafty friends and welcome to my my last for this term VLVS tutorial!
This is my very first mail art project and I just hope I did it right. But then, with Mixed Media there is no right or wrong things; so I hope you do like it and I made a good job.
Here we go!
Step by step tutorial:
1. Take the old envelope and open it as shown. Cover it all with a layer of gesso and let it dry. Do not try to make the perfect coverage; just a bit is  sufficient for this project.


2. Take a few Iridescent Ann Butler's Clearsnap paint and cover the gesso over with a mix of 3-4 of them. Those paints are Gel Medium based, shiny and very thin ones. Wipe  some paint with baby wipe as shown and let it dry.


3. Tear a couple of paper rectangles and glue them with non permanent glue on the top right corner and the low left corner (this will be the place for the shipping info). Add a bit of paint around just to wet the edges of those rectangles and add  black embossing powder over the wet edges. Heat emboss the powder.


4. Peel off the paper rectangles and this is what we have now: one layer painted envelope.


5. Grab your favorite VLVS stamps and stamp them over the envelope with black Archival ink.
Actually this ink was the last one I tried over the sample piece. I tried pigmented ink  and it didn't work over the glossy paint. Then I tried solvent ink- BIG NO! Then I tried die inks- different brands- and it was still a mess. The last one left- ARCHIVAL- made the job.
 The full stamps list in on the bottom of this post.

6. As the next step I added a few stencil strokes with white Chalk It Up ESF paint over the Stencilgirl stencils and added a few more VLVS images to make it look finished. I used stencil with the words with meaning: like SECRET over the front and Inside Out on the back  and not just lovely splashes.

7. Finally, as I didn't like the colors too much, I added a few layers of another colors of the same kind of semi translucent paints, more in pinks/blues and as you see the images are still seen and the color  looks more interesting.

And this is how the finished envelope looks:


And the back of the envelope:


VLVS stamps used :
Discover Item 19024 Plate 890
Special delivery Item 19559 Plate 1451
 Writing  Arrow Item 19078 Plate 917
Deliver toItem 19562 Plate 1451 
Postal Background Item 14596 Plate 1200 Cancellations, Postmarks, Postmark Collage
Map of the world  Item 19340 Plate 1435
Tricycle  Girl  Mailing Letter  Item 19558 Plate 1451
Happy mail enclosed  Item 19560 Plate 1451
Dictionary page Item 19015 Plate 890


Tuesday, December 22, 2015

I believe

Hi Hermine here. This is my last post for 2015. I believe together we can make the world a better place, I believe dreams can come true. Sometimes you let loose of the old ones and make some new ones. And I want to wish everyone a very merry Christmas and a happy, healthy and artful 2016.

step 1: sand the wood, so you create a very smooth surface to stamp on.
step 2: stamp the Banksy balloon girl 19430 with Stazon for the balloon, stamp this with red Memento Luxe
step 3: stamp the line of Rocks/pebbles 19720 and the tekst I believe 19347 with Stazon Black/
step 4: colour the rocks with colouring pencils.


warmly Hermine

Used materials:
Bansky Balloon girl 19430
Line of rocks/Pebbles 19720
I believe 19347
Stazon black
Memento Luxe


Monday, December 21, 2015

Thursday, December 17, 2015

Destination unknown...

Hello everyone,

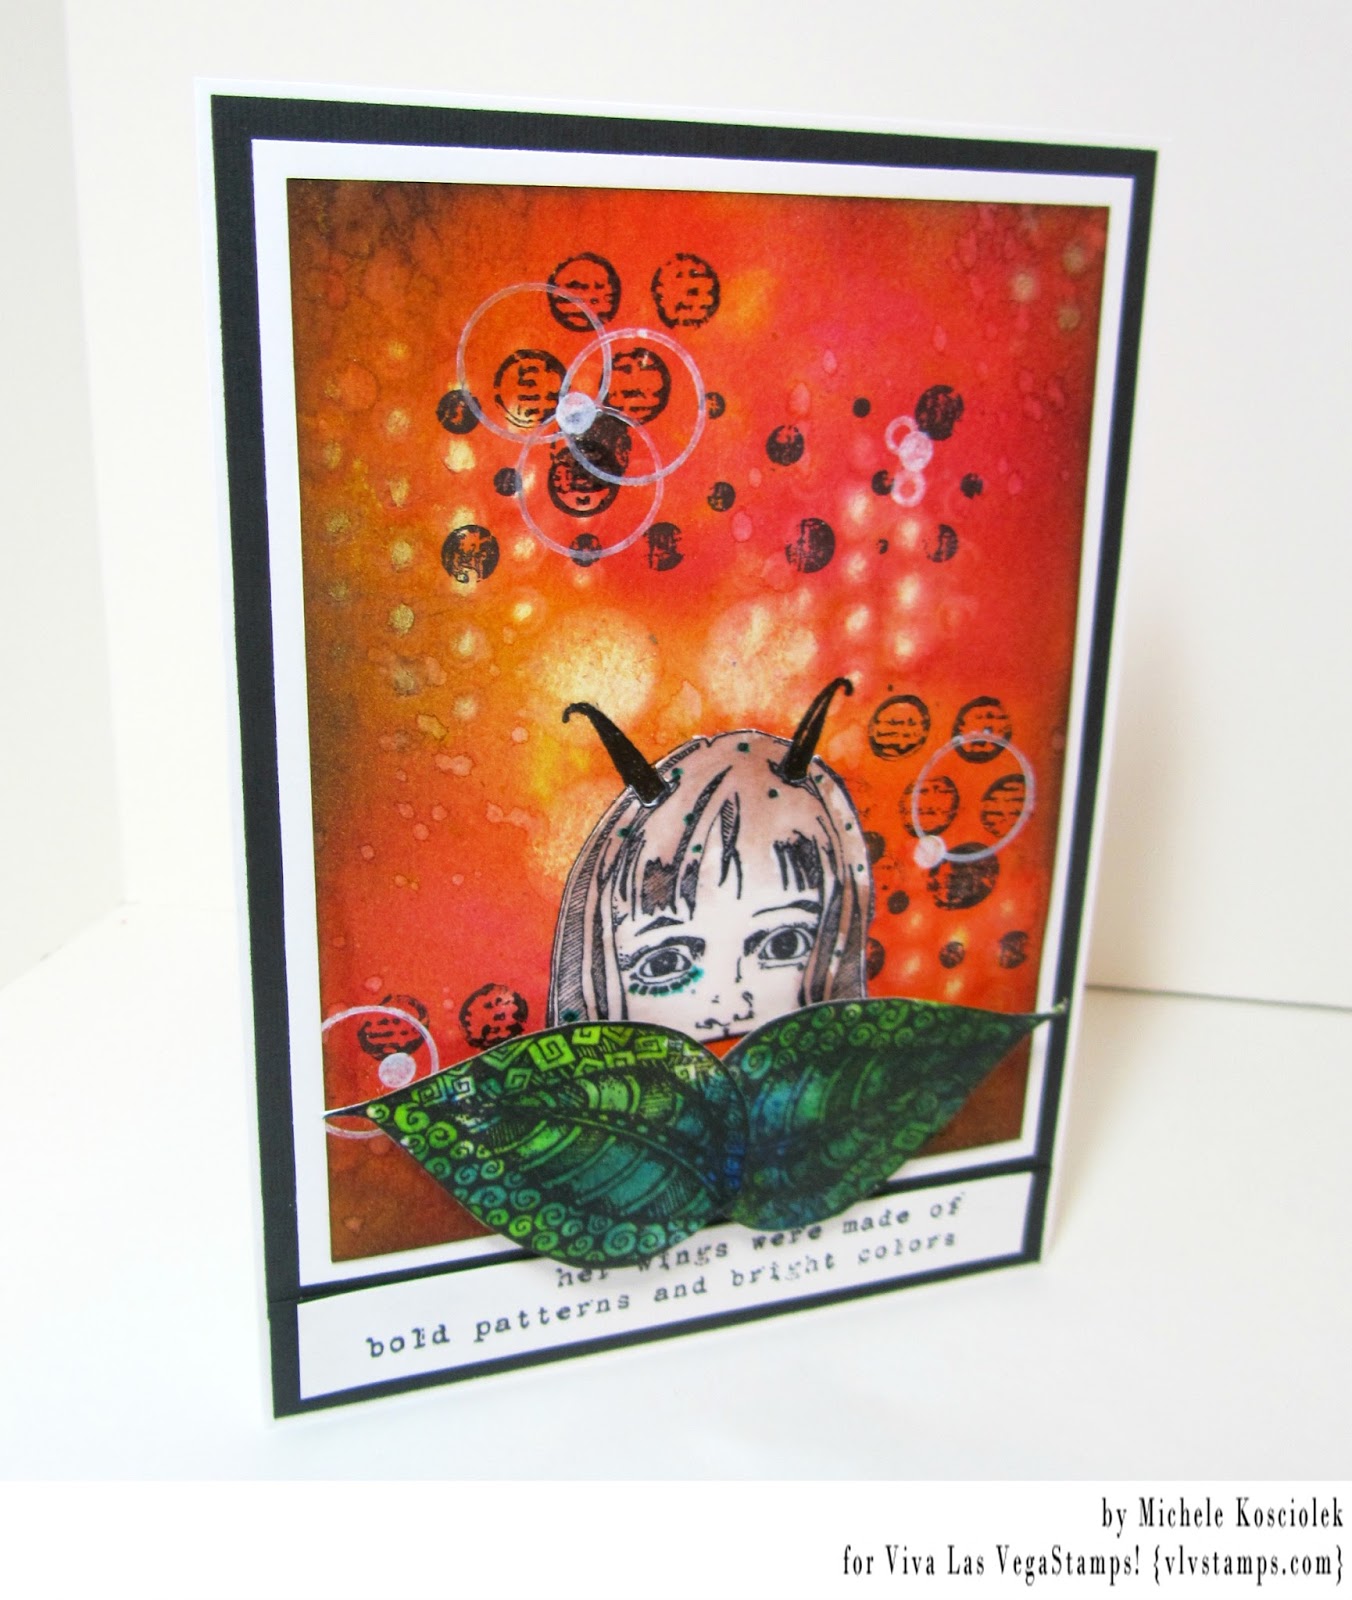
For my DT post today, I have a little tutorial for you. This technique is not mine; I saw somebody do this on YouTube. It is a technique using Brusho. I really didn't like my Brusho's and so regretted buying them until I saw this technique. I suppose you could do this with Bistre and Colour bursts too. Anyway, first the finished article, which is a postcard by the way :


And here's how to make it :


First, stamp your image on your postcard. Use a waterproof ink as you are going in with water later. 


When it is dry.....


Sprinkle Brusho powders on your card, avoiding the stamped image as much as possible. I used Yellow, Orange and Crimson.


You the, rub the powder into the card using your fingers, and this is what that looks like.


Next, take a stamp, spray with water and stamp.....


This is what that looks like... Continue to do this until you have done the whole card, again avoiding the stamped image. I suppose you could mask it if you wanted to.


After you finished stamping, mist a little water over the card so the colours get even more vivid. Not too much though, as it will all run and become a solid coloured card. That is exactly what I don't like about Brusho's when you use them in the traditional way. Far too messy for me... lol 


After everything is dry, take some coloured pencils or markers and colour the image. I used pencils..


Here she is in all her glory !


I then took some background stamps, and stamped the background lightly.. (a list of all stamps used is at the bottom of this post).


I also used a black marker and doodled a line around the card. 


I think this just finishes it off nicely; I still wasn't happy with the background though and decided to do a little more stamping 


This time I used black ink...


Here is the result, much better I think.... 
Lastly I chose a sentiment and stamped it in the top portion of the card... and that was that. 

Here is the finished card again :


I used the following stamps :


Thank you so much for stopping by today ! 


Wednesday, December 16, 2015

Santa Mail Art

Have you all stopped by to play the December challenge yet? If not stop by because today I am here with a little challenge inspiration!


I wanted to have fun and try my hand at some Mail Art!!! 


I am not sure what to think about it all as I love it and it was my first try.


I started with a cover for where you would write the address. Then I stamped 19314 - Santa Smoking.


I stamped it again and created a mask for the santa. 


Then I used some washi tape to create my own stripes. 


Then I used some Fired Brick Distress Paint to paint on my stripes. 


This is what you get after you removed the mask and washi tape. 


I used a Pitt Pen to outline where the addresses would go. 


I added some additional stamping and thought to finish it off add some black splatter. 


Stamped Used: