Showing posts with label Christmas card. Show all posts

Tuesday, November 27, 2018

Santa Claus is coming...

Hello crafty friends!


It's time for me to get to work on Christmas cards.  I wanted to create something simple and sort of grungy/vintage so it would be great for anyone. 

Stamps used:

Using archival ink in watering can grey.  I stamped Santa and my sentiment.  I used distress stains to "watercolor" everything.  The card is A2 sized with each matte being 1/4 in smaller than the layer below.


I hope you enjoy this fun and easy card!
Happy Holidays


Wednesday, November 14, 2018

Holiday Cheer ► Majo


Hi folks, with Christmas just around the corner, I decided to finally start my card making for this year.


Today I'd like to show you a technique I recently discovered and I just knew I would love to try this. 

It’s called "Watercolor Smooshing" and it allows you to play with so many colors on top of each other.


I used Watercolor Paper because it will hold up to lots of water, an acrylic stamp block, a Distress Sprayer and of course, many Distress Oxide inks. I tapped the first color (Cracked Pistachio) on to the acrylic block, spritzed with water, smooshed my panel around a little and left it there to allow the ink to be absorbed into the paper. I dried the panel with a heat tool. This is very important, or you will end up with a muddy mess.

I repeated these steps with the other colors (Worn Lipstick, Tumbled Glass and Fossilized Amber), making sure again to dry each layer of ink before using the next.

I diluted the colors even more and used a brush to create the splatters. Again it is very important to dry the splatters right away to prevent the colors absorbing into the background.


I stamped my panel with the “Holiday Cheers” stamp in different colors. The word my dream is from the Banksy sentiment “This was not my dream”, which I stamped on black cardstock and heat embossed with Stampendous Detail White embossing powder.


I cut the snowflake with a Sizzix Die, designed by Tim Holtz. It’s almost Christmas time, so I added some sparkle to my card with several rhinestones.


I used the following stamps:

8603
20066

Miracle Tape

I hope you enjoyed my tutorial and I hope to see you around next time!


Happy Crafting ♥


Friday, December 22, 2017

Merry Christmas

Hello everyone,

Today I have a quick Christmas card to share. I filmed to process so you can see how I made this. It is very simple but not simple enough for me to stamp the sentiment straight ! LOL... Hope you can forgive me !

I have used the following stamps :


Here is the link for the tutorial:


Thanks for stopping by today ! 


Monday, December 21, 2015

Monday, December 07, 2015

Letters to Santa ...MAM Video Tutorial

Hello Again! 

Tera here with another Mail Art Monday video tutorial, and you won't believe how easy it was!!!!


Stamps Used:

Santa Collage 3 1/2 x 4 1/4


Thank you for visiting and I hope you all are enjoying this holiday inspiration!!


Tuesday, December 09, 2014

Merry Merry : A Christmas Card

Hello stamping friends :) Yesterday we had a giant delicious blog hop full of Christmas Cards by our Design Team. Please stop by if you didn't get a chance to see everything. We had a fun giveaway and now we have a winner to announce!!!

the winner is......
Julie Steed said...
Er... no, I haven't started them yet. But I've been THINKING about it!
Congrats Julie!! Please email me @ deedee430@gmail.com with your shipping address and we'll get you a LB o' rubber and a Christmas grab bag!

Also -- Sometimes things don't go as planned and we had a little hiccup -- so today I'm sharing the deliciously whimsical card by Amy Lassiter here on our blog that was missed yesterday. Her original post was here. Check out the her card, leave her some love here on our blog, and we'll give away one more Christmas themed grab bag to a sweet comment left for Amy.

Plucked directly from Amy's Blog:
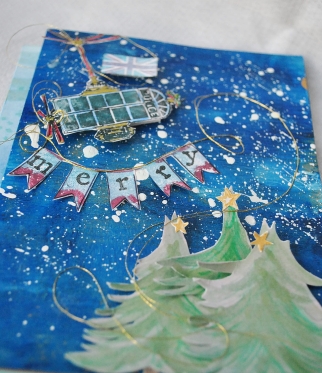
"I have created a fun little card to shine with Christmas spirit, without a single Christmas specific image! Today I am giving a shout out to Dr. Who…and thinking of how the TARDIS would look, sailing across a sky of Christmas stars, sending a Christmas greeting.


The background of my card was created by adding many colors of blue on my Gelli Plate, and then spreading with a brayer. When this was dry, giving splatters of white ink from 13 Arts, gave me a nice night sky to work with.

????????
 
I painted the watercolored pine trees, fussy cut them out, and added them in layers. Each tree is topped with a star from the Stars 2 x 2 1/4, using gold ink from Imagine Crafts.
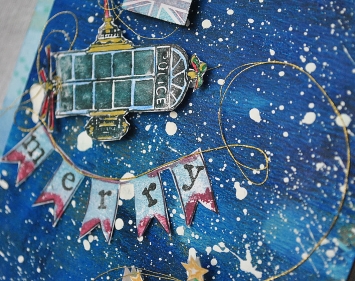
????????
 
The Whimsical flying police box stamp is focus of this card, obviously. I decided to stamp it in several colors of blue, and then color with Sakura Gelly Roll pens, Faber Castell Design Memory Craft big brush pens, and fine line Sharpies; for pops of color. I wanted the TARDIS to be flying the Union Jack, so I stamped it using the Union jack silhouette, and added it and the Chevron banner stamp, using shimmering gold heavy embroidery thread….like they were being flown. The entire card was added in a layer to another white plain 4×6 card, which was watercolored to give a lighter background pop of color."


Thursday, December 12, 2013

twice as much fun!

Hi Hermine here again and still in Christmas card mode hahaha. Below you will find two crds using exact the same materials and rubber stamps (except for the tekst stamp) but using two different techniques.


Technique 1:
step 1: take a piece of paper and scribble different colours Derwent Inktense Blocks on it horizontally. Take a waterbrush and blend the colours. Do the same with different colours vertically, repeat the blending and dry with a heattool.
step 2: take a round sponge and some gesso and put 3 circles on the background. Let dry. Put some colour on the circles with Derwent Inktense Blocks using reds and orange and blend with the waterbrush.
step 3: Stamp with Versamark the set of three Christmas ornaments 19309 at the top and embos with WOW Silver Hologram Sparkle Embossing Glitter and heatset.
step 4: take a Lyra watercolor crayon, I used sepia and mae some shades around and inside the ornaments.
step 5: Stamp with Stazon jet black the tekst Eat Drink end be merry 19316. Colour the edges with Colorbox chalk ink and matt on a double folded card.


Technique 2:
 
step 1: Stamp with Versamark the set of three Christmas ornaments 19309  on the cardstock and emboss with WOW Silver Hologram Sparkle Embossing Glitter and heatset.

step 2: scribble with Derwent Intense Blocks some colours at the top. Take a waterbrush and blend the colours, then squeeze your water brush to let the colours run down.
step 3: Take a waterbrush and a Lyra watercolour crayon sepia and make some shades at the top part of the ornaments.
step 4: stamp with Stazon jet Black the tekst Bring on the twinkle 19313 and matt this on a double folded card.

Used materials:
set of three Christmas ornaments 19309
Eat Drink end be merry 19316
Bring on the twinkle 19313
Stazon Jet Black
Versamark
WOW Silver Hologram Sparkle Embossing Glitter
Derwent Intense Blocks
Lyra Aquacolor
gesso

Tuesday, December 03, 2013

Christmas Card in Black #VLVS #VivaLasVegaStamps #VLVS #ChristmasCard

Black isn't a color you usually associate with the holidays but it works surprisingly well as a base when using metallic or glittery gel pens.


Supplies
VLVS! Stamps Used:

Sakura of America Gellyroll Pens
     Stardust: Red-Star, Lime-Star, Green-Star, Sky-Star, Golden-Star
     Metallic: Green, Gold, Blue, Red
     Standard: White
Tim Holtz Distress Markers: Barn Door, Peeled Paint


Elmer's Paint Pens: White, Black
Kromecote A2 Cardstock
Strathmore 140 lb cold-press watercolor paper 8 x 10
Golden Black Gesso
Miracle Tape
A finger or blending tool

Fold the sheet of watercolor paper in half so the more textured side is on the front.

Paint the front with black gesso, leaving a white border around it.  Don't worry about crisp  or even edges.


Stamp the Santa on a piece of Kromecote and color him with the Distress Markers.  
Place enough Miracle tape to cover the Santa.  Leave the strip on the back side of the tape for now.

Cut him out.

Remove the back strip from the Miracle Tape, and place the Santa so he is flush with the bottom of the card and outside the black area.

Add some blue metallic around the Santa and smudge it with your finger or blending tool (I really find the finger does a better job.  The oils I think).  Smudging must be done immediately while the ink is still wet.


Use the Gold Metallic pen to draw a border around the black, but keep a black border around the gold.

Continuing with the gold pen, outline a simple christmas tree, each section a triangular shape with three loops on the bottom.  Keep a line of black between each section.

Add the gold ornaments.  Simple again--just round and oval blobs.

Outline the packages, still using the gold pen..  Don't worry about perspective.  This is a primitive-style drawing so simplicity is what counts.  Make one large package next to Santa, and then draw 2 small packages behind him and the tree.  If you can fit another small one between the large package and tree do so, but don't sweat it.  

Fill in a stripe around the boxes for ribbon, and draw loops for the bow.

Color the area around tree, packages and Santa with the Red-star pen. Throughout, while you are coloring, leave a thick, black line between your color and the gold lines.  The black does not have to be an even thickness. It's more interesting if it isn't.

Use the red metallic to place stripes that run from the edge of the card toward the tree.  They won't show much, but will add a little depth.

Switch to the green metallic pen and color each section of the tree completely.

Switch to the Green-star pen and draw stripes from the bottom of each section to the top (same reason as with the red stripes)

Now switch to the lime-star and add similar stripes.

Switch to the Golden-star and make dots along the center stripes.

Use the blue metallic to draw the strings for the lights. Use the Red-star to color the lights (simple ovals), then use the Elmer's paint pen for white highlights.

For the rest of the black (except the border on the outside of the gold) color it with blue metallic.  Rather than making it solid blue, color a section about the size of your fingertip, and then smudge it as far as you can.  Keep doing this until the black is covered, but hints of it show through in places.

In the white border, on the left edge, color a dot of blue metallic about the twice the size of the pen's tip, and smear it in a fan shape.  Go down 1/2 and inch or so, and repeat this on the right edge.  Continue doing this around the entire border. Just skip over Santa and continue on the other side of him.

Use the black Elmer's painter pen to adjust your black lines.  If you have places without a black line around objects, add one.  If you have an area where it's just too, too uneven, even it out a bit (don't get to fussy about this.  It's a primitive-style, remember?).

In the white border, where you created the blue smudging, draw a line or two and smudge.

Finish by using the black Elmer's to thicken the Santa's outline on one side.


I hope you've enjoyed creating a Christmas Card in black!

Don't forget to check out the VLVS! November Challenge for a chance to win (plus it's fun!).

Thank you for stopping by, and I hope you've enjoyed your visit to Wonderland!For more of my work with Viva Las VegaStamps!, Amazing Mold Putty, zentangle-inspired art, and daily links to tangles, tutorials, and giveaways please visit my "Life Imitates Doodles" blog.   ~ Sandra Strait

Helpful Links: VLVS! Store for all your stamping needs; the  VLVS! Blog for new projects; VLVS! on  FaceBook,  Pinterest and Twitter

Thursday, December 13, 2012

Santa Is Coming!


Adventure ahead and in just a matter of days!  Yes, Santa is coming.  I tried my hand at coloring Santa and creating a wintery forest background for him with Copics and Stickles.  First, stamp Santa with Tree image on Kromecote.  Create a paper mask of this image and stamp Tree image around and below Santa image.  Set with heat gun.  Color in with Copics.  Add glitter to branches and robe.  Allow to try overnight.  Layer onto papers and stamp expression.  Merry Christmas!

Santa with Tree  #18939
Christmas Tree #18932
Adventure Awaits #19009
Kromecote
Miracle Tape